


Seriously, How Is It Done?? Is There Some Trick?
Decorating By CakesIMake Updated 23 Oct 2009 , 1:35pm by FromScratch

Here's a cool tutorial (scroll down): http://www.blogcatalog.com/search.frame.php?term=topsy+turvy+cakes&id=20b2e5738f12db748c01086532de9176
Thanks, Jeff!
Hey, how does one cut and serve a three-layer cake? Do you just slice through all three layers?
If I do three layers, then yes, just smaller slices.
If I want a taller cake and use 4 layers, I put a foamcore board between layers 2 and 3. You then slice layers 3 and 4 and serve, then layers 1 and 2 and serve.

That really is a terrific tutorial. Very clear written instructions a great photos. Thanks for sharing that FlourPots![]()


But how do you get the right angle ( using graduated sizes)?
This diagram may help.
http://www.cakecentral.com/cake-photo_1496199.html
Thank you for this diagram... 

Here's a cool tutorial (scroll down): http://www.blogcatalog.com/search.frame.php?term=topsy+turvy+cakes&id=20b2e5738f12db748c01086532de9176
Incredible!!!! Thank you!!!! ![]()
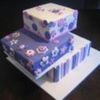
Okay, so the top cake is mine. I basically did what the diagram Jeff_Arenett posted says to. Baked a 6-7-8, trimmed and frosted. I didn't angle the top of this cake, but if you do you just take the top layer and cut across and down then flip and turn to get the exaggerated top. I hope that helps.

first of all, try a different buttercream recipe, there are lots of great ones on this site :} also make sure to use a scraper on your buttercream.
if you carve a cake where the top is at a 90 degree angle with the sides, it might not work out. when you're putting on the buttercream, the fondant, the decorations, etc., it's gonna tend to poof out a little bit. then you could end up with some weird obtuse angle cake.
but!
if you angle the sides in, you might get it to look more like you want it. that worked for me :}

When I make a cake that is tapered I always start with a solid tier of cake with all the layers the same size and carve it. I have done it with the graduated sized layers and I don't care for that method at all. It looks sloppy when you cut it and it is a pain in the ass to ice. Just use cake boards as guides when you carve it... one the same size at the cakes you started with and one that is 2 inches smaller. Place the larger board on top and flip it upside down (unfilled) then center the smaller board on the bottom and using a sharp serrated knife carve away. If you keep the knife so that the flat edge is touching both boards while you carve, it will come out perfectly symmetrical everytime. I hang the edge I am carving over the side of my turn table as I go.. easy peasy and the resulting tier is solid and sturdy and MUCH easier to ice. It looks nice and clean when it is sliced too... no pieces with giant glops of icing to fill in the gaps.
Quote by @%username% on %date%
%body%