


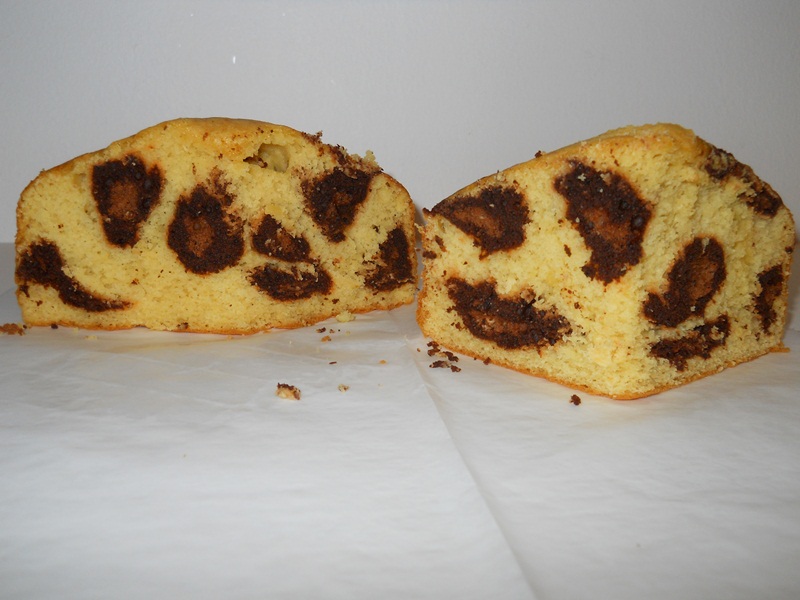
Okay so I never posted in the forum before so hopefully I do it right. I'm wanting to post pictures of the cake I made so I'm hoping that works too. I've been searching the internet to find tutorials on how to get the leopard print inside the cake and there aren't many out there. I baked this cake last night using the technique from this youtube video, http://www.youtube.com/watch?v=DV1vZ5qo6Io&list=UUmjVrDng0IumI1ITmCsyBhQ&index=10&feature=plcp, copy and paste the link in your web browser. If it doesn't work go to youtube and search for Crumb Boss and find the video for How to make a Leopard Cake Part 2.
I used her technique, but I didn't make the large "C" shapes like she did. Instead I did slighter smaller "C" shapes with the batter and some straight lines. I did two layers of these too not one. I did use a box cake for test purposes, and I used squeeze bottles for the two different chocolate colors. I found to have more control over placing the batter, but I think I'm going to try the pastry bags next time cutting a small hole at the tip. There was batter left inside the squeeze bottles that couldn't be pushed down like you can with pastry bags. For the darker chocolate I added cocoa powder to yellow cake batter and brown gel paste to get a darker color, the lighter brown I just scooped some of the darker chocolate into another bowl with more of yellow cake batter. I did have to add just a bit of the brown gel paste to get a better color. I'm sure you could just use all gel paste to get the colors you want instead of adding cocoa. I found you couldn't taste the cocoa so it makes no difference in the flavor element. I was thinking of trying it with brownie batter wondering if that would add more of a chocolate flavor to the cake. Sorry I didn't take pictures while I was doing this...wasn't thinking.
I did bake this cake late at night and didn't wait for it to cool all the way before cutting becaus I was so excited to see the results! It was very soft so the cuts aren't very clean....should have stuck it in the freezer for a few minutes. Anyway, all in all I really like the Crumb Boss's technique. It's less time consuming and the results are good.
I did try another technique, but it didn't work. With the two different chocolate colors I made a dot with the lighter brown and then using the darker chocolate I traced a circle around the dot. I made lots of them, added yellow batter on top, then did another layer of the dots and added yellow batter on top. It didn't give the prominent look of leopard print at all, but now I'm wondering if I had made the dots more of a longer oval shape.....hmmm, might have to experiment again. Anyway, give it a shot. Use a box cake mix so you're not wasting time and ingredients.


Dayti, yes having thin batter can give poor results. My batter was very thick, I added a 1/2 cup of flour and 1/2 cup of sugar and used apple sauce instead of oil to the box mix. Don't give up, practice makes perfect!
@FlourPots, thanks! I wish I had thought about taking pictures. Next time! I want to try it again and add even more "spots". Glad you found it useful!

Yeloroz i see ur comment back to Dayti about adding ingred. to the box mix. How much apple sauce did you use? And does it matter what brand i buy to test out this awesome cake!!!

Mrs. Jessica, I can't exactly remember, but I believe I just used the same measure as the oil on the box mix for the applesauce. I think I used Betty Crocker, but I don't think the brand would matter much for testing. You do want your batter to be thick. I think that is key to getting a good pattern. If it's too liquidy the "C" shape may just sink or fold into the yellow. I was thinking of doing more testing too on batter consistency to know for sure. If I do that I'll post my results, and if anyone else tests it using thin batter let us know.
Awesome this technique makes more sense to me than all the others I've seen and it seems quick to do as well. Thanks for sharing. I like yours more than the original with the smaller dots and more of them![]()

WOW! I think that is absolutely gorgeous and a job well done!
So I tried this last night with a medium density cake mix and I did see the definition of the spots but they fell to the bottom. I am going to try this again today with a thicker batter and I will post results. I used a box mix last night with the addition of some flour and sugar but I still don't think it was thick enough. Today I will use my trusty scratch recipe.


Yeah, she had to re-do all her videos. Try this link.

AI also noticed the Crumb Boss's video has been completely removed from the net. It seemed like it was pretty popular....does anyone know why it is gone?

Quote:
I also noticed the Crumb Boss's video has been completely removed from the net. It seemed like it was pretty popular....does anyone know why it is gone?
UniqueCakeDesigner: It seems that she has dissolved that business and changed everything to the Woodland Bakery website and reshot her video tutorials with a new photographer. So if you just look for Gretchen Price of Woodland Bakery you should be able to catch up with her great posts.
Cheers,
mb

Brilliant. And to add to that, I've discovered a faster way to get the leopard spots on fondant. Us a tan fondant then break off a portion of the leftover tan fondant and color it brown. Roll it out nice and thin on a crisco'd surface. Next take some black fondant (I use store bought) and roll that out flat too. Then starting with the black, pull off small bits (making sure the pulled edges are all ragged and put onto the cake - then do the same with the brown - only make them half as small as the black and stick onto each pulled black piece. The pulling gives them the ragged furry look you need and the Crisco on the back of the pulled pieces helps them stick to each other and the cake. The thinner the fondant (black and brown), the neater the spot designs.
Wow, do you have a picture of that? Also wonder if you can do that before you put the fondant on the cake...and then roll it in. Make it congruent instead of sitting on top of the fondant. I don't know if I have time to try it before the next leopard cake but if I do I will post it. Everyone is so wonderfully helpful on these posts....thank you.
It came out great!!!! I see what you mean around the edges....it is perfect.
I think I will try it and then roll them in...they need to be smaller so they can expand. I hope it looks as good as yours. Thank you for the reply.
Dyanna
Thanks! This is a 6" cake but you can make the leopard spots as small or large as you want. Rolling them into the fondant sounds great but if it's going on a large cake the fondant might stretch and distort the spots. Maybe not, but just something to think about.

Thank you mb...I do follow Gretchen...she is fantastic. I found the video. All is good with the world.
UCD

Quote by @%username% on %date%
%body%