


Is there no end to my cake supply addiction!!!!!!!!
ROTFL!!!
Oh my.... that sounds like my house! Thank you so much Justdi for sharing with us.... looking forward to the book

...It's in my dining room,kitchen,bedroom,spare bedroom,and what was my office/painting room...and where can I store the Agbay...and it's just a hobby ![]()
![]()

OK....I will try to help with your questions. All of my sheets except the butterfly sheet had a "#1" or a "#2" on them. I used these to decide which side to orient up. I put the side up that would allow me to see the #1 and #2 normally, as you would read them. This was valley-side up (If you treat the sides as 1 side with raised bumps and 1 side with sunken valleys. ) Actually, I ended up doing two batches of butterflies and accidentally did the bump side up on one batch.....they did not work anywhere near as well. I could only salvage a couple of those.
As far as drying times and releasing. I had one batch that released overnight and one that took a good chunk of the next day. It helps to release if you do not paint one giant layer of gelatin over the whole sheet, but leave space in between the different figures. This isn't always easy, as they are close together. No big deal if they run together. I did have to help a few of those off the sheet though. If you have waited a good day and a half and they still haven't released, I would go ahead and try to pull them. Keep your scissors at hand, as if you have connected figures of different sizes, you will want to cut them apart from each other while peeling. Otherwise pulling off one figure may tear the ones next to it.
As far as fragility, this improves as they age. The first day I was trimming them, they were fairly easy to tear. A couple of days later when I was trimming them with disco dust and assembling the flowers, they were much tougher.
As far as ice cubes......I don't know. I would try it with a thicker gelatin to water ratio than say, jello jigglers. If there is too much water, I think the shrinkage from drying is going to cause your cubes to be mishapen. Maybe the ratios used with the sheets will work. I do think your dry time is going to be pretty long though.....a few days probably.....depending on the size of your cube. If you can use them slightly soft, that would be OK. But if you want them hard......a long dry time.
Oh, and as far as "too thin" goes. They may be quite brittle if too thin. However, I think the thicker ones have a harder time relearsing by themselves. At least that is my experience. My thinner ones released completely by themselves, but were more fragile. Like everything else, it is a balance. I did make extra that I didn't use. But I still had plenty of useable ones, even my first time working with the mats. Hope that helps a little bit!


Oh mama -- I just got the NEW sheets that Di has out -- oh man, I can hardly wait to make these flowers!! They have calla lilies, orchid, roses and tulips, a ton of leaves of every variety and get this -- dragonflies!! Oh man, I can't wait to get cranking on these!! ![]() Oh and I got word that the book will be done "soon"!!! Yeah baby!!
Oh and I got word that the book will be done "soon"!!! Yeah baby!! ![]()

Wow -- I am fascinated by this. Thanks for all the great info!!
I just received the newest impression mats from Diane at www.cakeconnection.com - (THANK YOU!!) I can't wait to try them out - they will be gorgeous, I have no doubt!! The new ones are in stock - they are orchid & calla lillies, rose & tulip, poinsettia & geranium, and ivy & eucalyptus and a dragonfly!!!! I just can't wait to try them all out!! I am still waiting on the book - it should be coming soon!! ![]()
This is nothing -- wait till the book comes out! ![]()
I have the gelatin getting ready right now. I am going to try the rose first. (and the dragonfly) I can't wait, I KNOW they are gonna be gorgeous!! ![]()
BWB - I didn't mean to RE post what you had already posted! I was just so excited to get them..... ![]()
If all goes as planned, I will post pics of some KEWL new flowers and such tomorrow!! (doin' a happy dance now!!) ![]()
I know what you mean Lou!! I want to try the poinsettia and the tulips! ![]()

Loucinda and BWB....where are you? Dying to see pics of the new flowers! You both are our mentors in the world of gelatin!
Loucinda and BWB....where are you? Dying to see pics of the new flowers! You both are our mentors in the world of gelatin!
![]() Oh yeah, NO PRESSURE!!
Oh yeah, NO PRESSURE!! ![]() I'm actually working on the cake from Hades at the moment (thankfully it will be done and gone by tomorrow) and maybe by next week I'll have something to post. How 'bout you Lou???
I'm actually working on the cake from Hades at the moment (thankfully it will be done and gone by tomorrow) and maybe by next week I'll have something to post. How 'bout you Lou??? ![]()

Okay, I have got to be the dimmest bulb in the box. I just read through all 22 pages, made notes as I read along, and managed to foul up on the VERY FIRST TWO STEPS!
"Mix 2-1/2 parts water to 1 part gelatin. Or, 12T water to 4T gelatin."
How do you go about the mixing? Do you let the gelatin bloom first? Do you just stir it into a blob?
Step two: "Warm in microwave"
For how long? 5 seconds? 10 seconds? 20 seconds? On full power? Half power?
Step three: "Wait 5-10 minutes, then remove scum"
After 10 minutes, my gelatin is still extremely liquidy. The first time, I think I heated it too long. The second time, I heated it for only about 15 seconds, but it's still too liquidy to skim.
I tried brushing it onto a Silpat. What a disaster. It began to bead up, leaving large holes in the sheet.
I tried to let my gelatin firm up a little, but I still had to apply several coats in order to fill in the holes.
What on earth am I doing wrong???
WHOA!! Okay, let's back the boat up and start from the beginning. First off, a single batch is 1 TBSP gelatin to 2 1/2 TBSP water. Use cool water. Stir well to soak up the gelatin. Let bloom for 5 minutes. Then it becomes a solid.
Now, nuke for 5 - 10 seconds. It will be a drippy liquid. You want it liquidy. I use full power in the microwave. I set it on 30 seconds and stop every five seconds to check it. Remember, you only have a couple of tablespoons of the gelatin mixture and believe me, that makes a TON of butterflies!! (See the teal butterfly cake in my pix? I used two batches of gelatin mixture and ended up with well over 100 butterflies.) So a little goes a VERY long way.
When the gelatin mixture is nuked, THEN add ONE DROP of airbrush liquid. Airbrush liquid is very liquidy and is better in this application. See my teal butterflies? Those were done with one drop of teal airbrush color. Now at this point you may see scummy bubble on the sides of the dish you are using -- skim those off. Now you're ready to "paint." If the gelatin mixture gets hard or gummy, pop it back in the microwave at 5 second intervals.
Now, I've not done anything on a Silpat with the gelatin mixtures, I use the mats provided in the kits I get from Di. But you can use a regular plastic impression mat (from art supply stores) and paint the whole thing to make bows like Lou does. Paint in even strokes trying to keep an even coat. I like to use the sheets for butterflies and flowers -- it provides the veining necessary as well as the outlines.
So kiddo, I hope that helps some. Did we answer your questions?
I do the 4 T. gelatin to 12 T. water. Let it bloom, then warm it up 5 - 10 seconds at a time.
Let it set till the foam has risen to the top and skim it off, rewarm and do this step again if needed.
From this point, I actually let mine set till it is solid one more time, then warm it up (again 5 seconds at a time) till it is the consistency of fingernail polish.
the painting on the mat is trial and error until you get it right. I tried 3 times before I finally got it. I use a heating pad to put my impression mat on and a coffee mug warmer plug in thing to keep the gelatin liquid while I am working with it.
You should not have to put several coats on (although I have never used a silpat, I use Diane's impression mats) ONE coat will do it. Maybe you are using the wrong kind of brush?
I made my rose petals, but I did them wrong - I am redoing now!
I am doing the roses over again, I am on the "trial and error" trail here one more time...... ![]() As soon as I get them figured out, I will post. The way I tried it, not so good (I tried it with just a wire in ONE petal ......not so good)
As soon as I get them figured out, I will post. The way I tried it, not so good (I tried it with just a wire in ONE petal ......not so good)
The dragonflies are GORGEOUS! I did them on a baby shower cake today - I don't have a pic of it, but I will take some of them and get them on here so you can see them.
I WANT THE BOOK!!!! I can't wait till it is ready!!
Okay Lou does this a little differently than I do. But basically it's the same. She's right though, it's definitely trial and error. When I wanted to learn this technique I picked one thing, the butterfly, and went at it. That's partly how the teal butterfly cake came about. And remember, it's all about practice, practice, practice!! ![]()
Thank you, BWB for holding my hand. ![]()
My very thin sheet is almost dry. Well, the thinnest PARTS of it are dry. My painting wasn't terribly even. Although it's too thin and the color is too light, I'm excited that I may have done something right!
The reason I'm using the Silpat is because I'm trying to recreate an organza bow (the cake design is based on the girl's dress and hair bow), so I don't want any pattern. I do, however, hope that I can manage to dip the edges into some type of glitter dust.
FYI - I tried to spread it on an acetate sheet. Ha! The entire sheet curled up and I can't even find the edge of the gelatin! I think it became one with the acetate!
So, what kind of brush does everyone use? I was wondering why we don't just pour it onto the mat or Silpat and smooth it out with something like a bench scraper...? Perhaps I'm thinking this way because my mixture was too thin and I was using the wrong brush.
I appreciate all the help. I can be an uber-dork, sometimes. ![]()
"So, what kind of brush does everyone use? I was wondering why we don't just pour it onto the mat or Silpat and smooth it out with something like a bench scraper...? Perhaps I'm thinking this way because my mixture was too thin and I was using the wrong brush."
Good point. I am about to try this for some fairies I have to make for next week. I wish I had known about the impression mats alot earlier. I tried to email for an order on cake connection and the email won't come up...could anyone provide me with her email so I can order some mats? Thanks in advance ![]()
Carrie
I just use a wide flat brush. When the gelatin is dry it will curl up, that's normal. Sometimes you can hear a popping sound as it releases itself from the impression mats, but not always.
For anyone wanting to buy the kits, here's a link:
http://www.cakeconnection.com/gelatin.htm
Glad to know I was a help to y'all! ![]()
Thank you! I just got a hold of Di and ordered. I am so excited! Can't wait!
My gelatin did curl up when it dried -- to the point that it was unusable. It was flexible, but I couldn't smooth out the wrinkles. This may have been due to my playing around with it before it was completely dry.
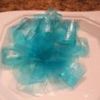
On the other hand, I could see using this technique to make a really mod looking candy dish. ![]()
I've got a new batch setting up right now.
Thanks again for all your help, BWB!
When you paint it on, do it quickly and evenly and let it be. Then when it dries and curls up, just trim the edges. That's what I did with the butterflies. Glad to help! ![]()
I have a lot of pieces here ready to play, but haven't had the time to play. ![]() (MIL has been in the hospital - she lives with us here) I am hoping time is my friend this weekend so I can relax and enjoy my toys!
(MIL has been in the hospital - she lives with us here) I am hoping time is my friend this weekend so I can relax and enjoy my toys!
I hope others have been able to play and have fun with their stuff!
I have a bunch of strips, but haven't been able to make my bow yet because I still have to make the flower that goes in the center.
Just from playing with this stuff, it seems to me that it would hold up great in humidity. Water doesn't seem to bother it. Washing my tools is quite a chore! ![]()
I have several pieces made up and in the wonderful Ohio heat and humidity, they have not been affected at all by it. I have them all stored in just plain snadwich type styrofoam containers - not air tight. They look as nice as the day I made them! ![]()

Yahoo - just received the new book from Michaelle & Dianne today and all I can say is WOW! Thirty pages of mega fun with detailed instructions, recipes and lots (I mean a huge amount) of color pictures for inspiration and instruction. What a bargain this book is and I would recommend it to everyone that has been watching this thread.
Way to go Michaelle & Dianne - I hope you make thousands on this book and its related supplies! Good luck at ICES - I hope you sell out!!!!!!

Quote by @%username% on %date%
%body%