


Difference In Photos With/without Using A Light Box
Decorating By KimAZ Updated 14 May 2010 , 6:52pm by thecakeprincess

Hi All,
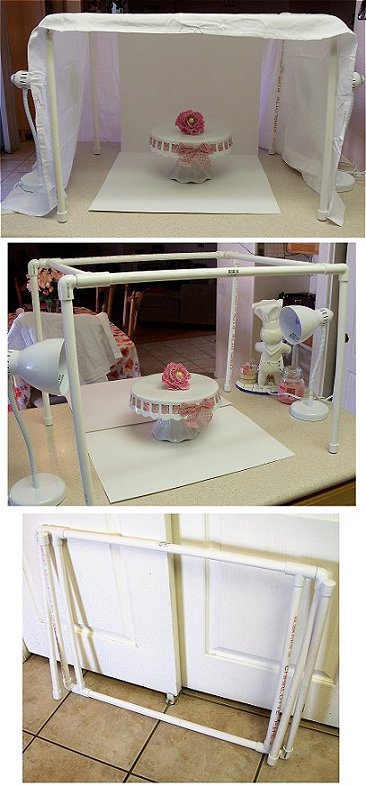
I was very excited to read other threads about making a light box to take pictures of my cakes in. So I made the cardboard style one with tissue paper "windows". It was ok but not easy to store and too flimsy.
Then I had my husband make me one using the PVC pipe method and a white sheet. Viola! So much better!
Here are pictures of my light box itself with the sheet on and off and folded up for easy storage. I know someone else posted the how to link but here it is again: http://www.pbase.com/wlhuber/light_box_light_tent
I used white poster board inside the box as my background.
I thought I'd share some pictures I took with my Kodak Easy Share camera, which is nothing real fancy to show the difference in using the light box with and without lights shining on it.
I think it makes a great difference!
KimAZ


Love the pictures...what a difference. Love the cake!


I can see them now! I must have had a glitch on my end. ![]() The difference is vast with and without light, but I do need to say that your work is truly incredible! Thanks again for the info and for the great set-up photos. I normally only shoot natural light, but we are moving to WA state where it rains a decent amount and gets dark early. I have been meaning to start looking at lighting options, so this is very helpful. Much appreciated!
The difference is vast with and without light, but I do need to say that your work is truly incredible! Thanks again for the info and for the great set-up photos. I normally only shoot natural light, but we are moving to WA state where it rains a decent amount and gets dark early. I have been meaning to start looking at lighting options, so this is very helpful. Much appreciated!


Ok, first of all...I didn't mean to post this in the Spanish forum. Is there a way a moderator can move it to the General forum?
The desk lamps I used were just some cheapy ones I bought at Wal Mart. They have 40 watt bulbs in them. I just position them on either side of the light box. You can play around with the position of moving the lamp closer or further from the box, or shining the light up, down or towards the back too. And you can change the color of the poster board or whatever you choose to use as a background. Fabric or a long sheet of colored paper would work well.
And yes, the white sheet just difuses the light so there is no glare on the cake or whatever you want to take pictures of, cookies too!
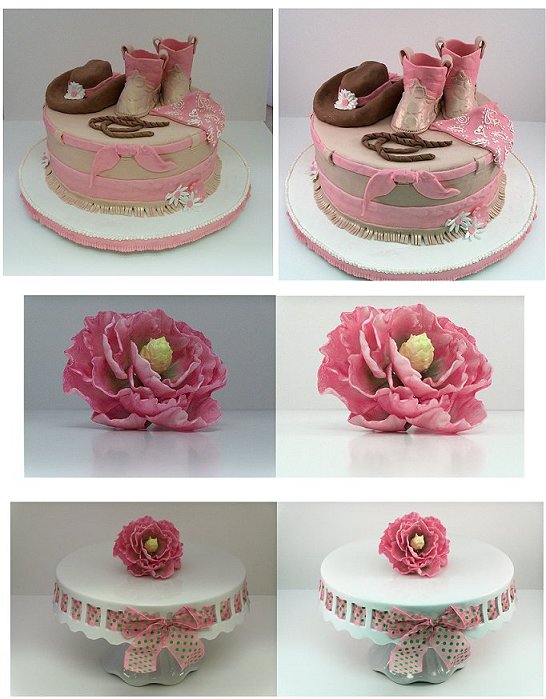
I got the cake stand for a Mother's Day present this year and it was purchased at Kirklands. I love it because the ribbon can be changed to match the cake.
Hope that helps!
KimAZ


I so appreciate the time you took to share this info.....love it! I will have to get my hubby to do this maybe this weekend.
As for the black sheet, I heard that you shouldn't use black as a background as it absorbs light. But I like the look of using a black background......anyone have any tips for this?


has anyone tried this with a black background/sheet?
I used the same method for this:
http://www.cakecentral.com/cake-photo_1669722.html
I used two sheets, though. Black just for the background, and white over the top and sides for the light to shine through.
Great pictures!

I made one!!!!
Took 30 minutes tops. Hubby went to Ace hardware and purchased all the stuff for me and when I got up this morning it was all waiting for me to cut and assemble.
I have one of those sears clamping table things kinda like a work / saw horse that has built in handles that crank and slide the top in and out so I use that as a clamp for the pvc. Tightened up really well to use the hack saw to cut the pvc without it moving around.
Only thing is I need longer "legs" for taller stuff. I had 3/4 of the pvc left so I can make longer legs. 14 inches isnt high enough. Didnt dawn on me at the time when I read the instructiions. Oh well I like the idea of mutiple sets of legs for different heights. Just have to remind hubby not to glue them on so I can change them out as I need to.
Cant wait to try it later today.
Congrats! I got enough PVC to make two sets of legs: 12" tall and 24" tall.

Thanks for the info. I need to start selling some things on ebay as well a post better pictures of my cakes and cookies.

Hi All,
I was very excited to read other threads about making a light box to take pictures of my cakes in. So I made the cardboard style one with tissue paper "windows". It was ok but not easy to store and too flimsy.
Then I had my husband make me one using the PVC pipe method and a white sheet. Viola! So much better!
Here are pictures of my light box itself with the sheet on and off and folded up for easy storage. I know someone else posted the how to link but here it is again: http://www.pbase.com/wlhuber/light_box_light_tent
I used white poster board inside the box as my background.
I thought I'd share some pictures I took with my Kodak Easy Share camera, which is nothing real fancy to show the difference in using the light box with and without lights shining on it.
I think it makes a great difference!
KimAZ
KIM thanks soo so much! I really really needed this! your cowgirl boots!!! I want them 4 my daughter they are soooo adorable ![]() I going to look in your pictures
I going to look in your pictures ![]()

THANK YOU! I have been struggling with taking good photos

Thanks, I too have been having trouble taking good photos of my cakes.
Quote by @%username% on %date%
%body%