


I don't know if this will help or not, but I did a search on Google and came up with this (I've yet to try this particular border). http://www.bakedecoratecelebrate.com/techniques/reverseshell.cfm

The only way I could learn this was to practice on cake pan turned upside down...it is different when you are going in a circle compared to practicing on a practice board..just do 9's and p's all the way round..that was what helped me..honestly I found this the most difficult one to do..I managed to do a cake or two with this border after practicing on the cake pan.
Hope that helps!
Jane
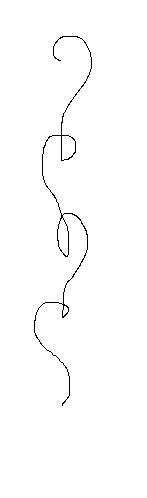
I taught a friend of mine on another forum an easy way to look at the reverse shell technique. You have to look at the pattern as though you were drawing a valentine, but you start the second side of the valentine off the bottom of the first side. Does that make sense to you?
I am attaching a download of a pattern I just drew up on MSPaint. Please let me know if this helps you.
Theresa ![]()


I just had to giggle, because even though I can do reverse shells, I often have to stop and look at the last one to figure out how to do the next. It takes some real hand-brain-eye coordination!

Oh I am so glad you posted this question!!
I cannot do this techinque either. Doesn't matter how often I try.
And I am so jealous when people do it on cakes, I just love it!!
So, Thank you so much for the wonderful and helpful hints!!!!
I do this border alot, and it really helps me if I say to myself (or out loud) left, right, left, right. I also teach Wilton classes and tell my students the same thing. I also try to picture it like a question mark ?? Just be sure you draw to a point and not start the next one too close.

I have trouble with this border as well, I am always going the wrong way! I try to think of it as a heart also, but I still screw up! Anyway, what is the best tip to use? I think I have just used a 21, but it seems like the ones I see that look really nice to me are perhaps a little bigger.
I teach it this way. Start just like make the regular shell border holding your bag at six o'clock position with a 45 degree angle, let it "fan" out a bit, then move your tip to 12 o'clock, around to 3 and down to 6 as you slowly release pressure, then pull away. For the other direction it is 12 to 9 to 6. I, too have to say out loud, "right, left, right, left" so I keep on the "reverse shell" mode. Hope this is helpfull.

I have tried the question mark technique as well as the p's and 9's but still cannot get the hang of it. I guess I am always forgetting which way to go! I am going to try the half valentine technique next to see if that will work for me.
Thanks for all your great ideas!
I forgot to mention this...But whenever I do it....I find the first 2 maybe look ok....Then I go around the cake and notice they are now circles. Like you would put on the 3D lamb....NOT sure how I end up with them, but have to scrape off....And I still end up getting the circles!! YIKES!


I love this border, I use it probably too much because i find its the easiest for me to do (the regular shell border to me is harder because its hard for me to stay uniform in size and its less noticable with the reverse).....I also think about question marks.....good luck to everyone!

I have leftover icing in a piping bag with a #16 ready to go for practicing the "frustrating" reverse shell. I can't seen to get this border for nothing! I can usually master anything I put my mind to but this border eludes me and quite frankly I'm about ready to forget about it, except.... I just love how it looks when it's done right! I too, am so jealous of those of you that make these so beautifully!


I can't seem to get the hang of the reverse shell either. I thought I had it down pretty good and then froze when it was time to use it on a cupcake cake. I finally just did a squiggly border on it and was very happy with the look. Worked well on a ccc but I'd still like to get it down to use on more formal cakes. There are ones here who do a fantastic job with the reverse shell. Grrrr..... LOL

Yes, as Nglez09 mentioned, the tails need to be in alignment. There is a cake decorating video I borrowed from my local library and the teacher says: start off with tip above surface, squeeze like you're going to make a star and then curve it. Think of it as writing a question mark, then letter c, question mark, c, and so on. One curve would be on top of the cake and the tail should be squeezed on the top edge of cake then the next curve would be squeezed just below the top edge of the cake then the tail on the top edge of the cake. In the end, all tails should be along the top edge of the cake. Hope this additional info helps.
Quote by @%username% on %date%
%body%