


My "lambeth Method" Attempt Birthday Cake
Decorating By Taigen Updated 11 Nov 2006 , 2:12am by ShirleyW
After the discussion the other day about the Lambeth method I just had to give it a try. Tomorrow is my birthday and although I don't eat cake it gave me the perfect excuse to try this ![]() I am absolutely facinated by this method.
I am absolutely facinated by this method.
I also decided to try painting the fondant, which has opened yet another door (like I really need anything else!!!) It was a lot of fun although I got a lot of strange comments from my family haha
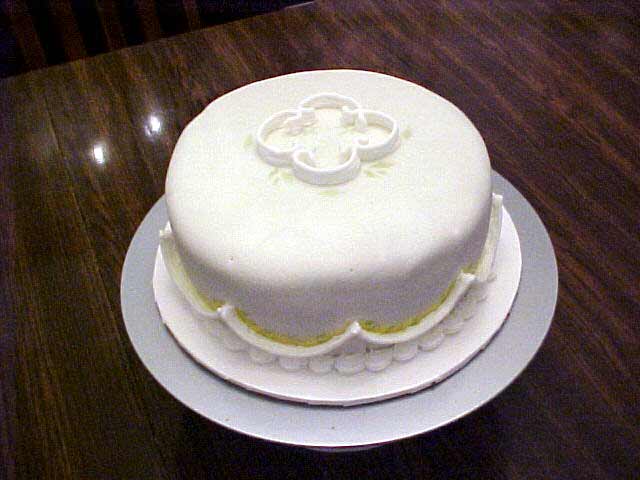
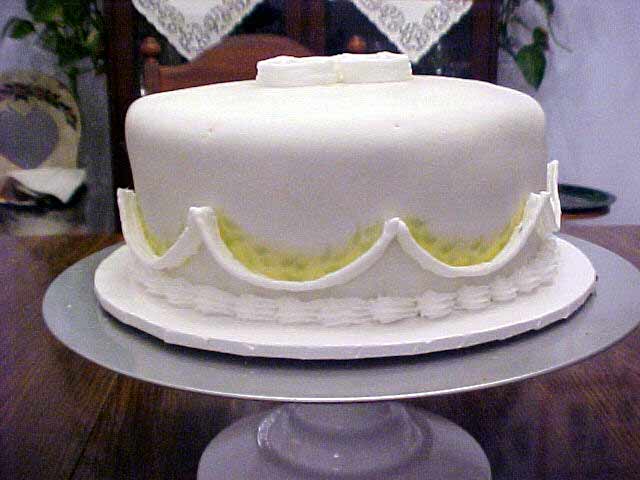
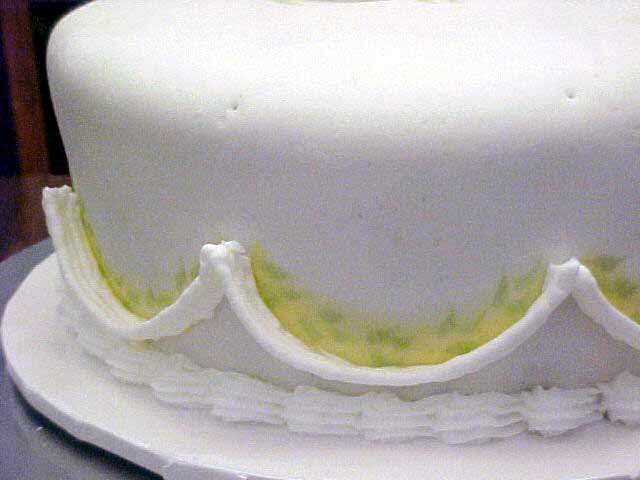
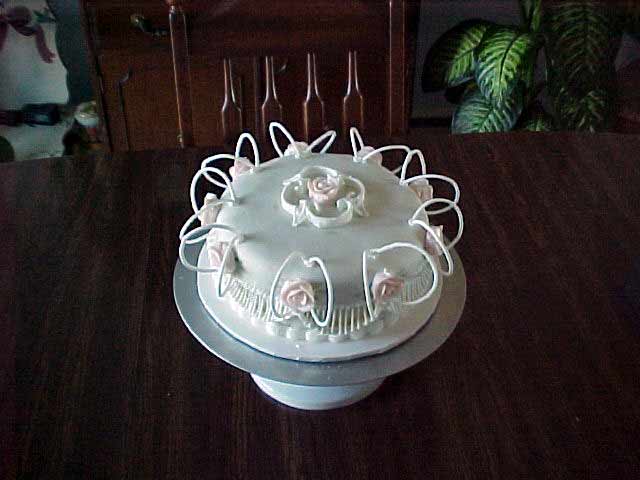
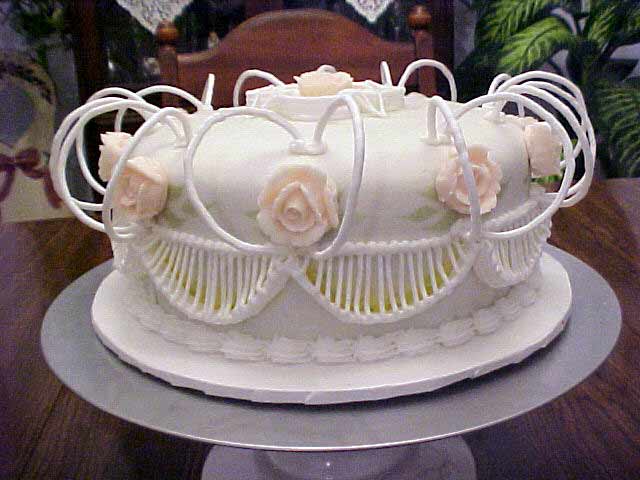
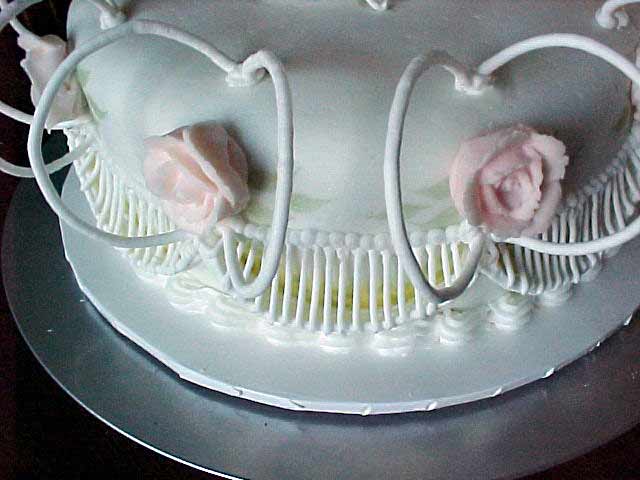
The cake is chocolate and each layer is torted and filled with either caramel and pecans or nutella fudge type icing ( I just added the nutella to BC and lessened the amount of sugar) The whole cake is then iced in this and covered in MMF. All the "lambeth" type of frosting is royal.
Anyway here is cake #7.....there are 8 pictures in all but I am not sure how many I can post at one time. Enjoy the pics.
P.S. Notice I splurged and bought an actual real turn table ...Micheals had a 50% off coupon.....I love it!!!


Wow! That looks awesome! Great work. And Happy Birthday!!!
Angie

Wow is right! That's a ton of work- great job! BTW, Happy Birthday to you! 
so when you cut into the icing , the royal icing pieces would shatter???or do you attempt to take them off??It is so pretty, I LOVE the painted fondant underneath, it gives it so much more demention!!!!!!!!
was it a design you came up with? I am so bad about coming up with ideas. PLEASE , do tell!


It's beautiful!
I have never seen a cake like that. I'm going to have to look up lambeth method now. lol


Taigen,
Very impressive - fit for a princess!
Like the stencil work, it just addsanother dimension to the design.
Here's a post on the Lambeth method:
http://www.cakecentral.com/cake-decorating-ftopict-47762-.html
JanH~Okay, I have decided that you need to become a moderator for CC. You are just so full of information and know how to find anything and everything here on CC! I'm going to consider you my regular encyclopedia!!! ![]() Thank you for all your help!!!
Thank you for all your help!!!
Amy


Happy birthday! I like your cake, you did quite well for a first try. The only thing I would suggest is the last two rows of piping need to be done with a smaller tip. Start with a #14 shell tip for one row, #5 plain piping tip for two rows, #3 piping tip for two rows, and finish off with #2 piping tip for two rows. And the lace curtain work should be done with a #2 or if you have the courage to try it, even a #1. You can make a center template by making a parchment paper circle the size of your cake top, say 10" and then folding the paper into 12ths, (half, half again, then thirds) and cut the rounded edge of the paper into a scallop or really whatever design you would like, unfold the paper and pinkprick the design onto the center of the cake. Then follow with the same tips you used for the overpiping on borders.
Thanks everyone for comments....they are very much appreciated.
I really don't know anything about the Lambeth method either...I stumbled across some incredible cakes and posted them here http://www.cakecentral.com/cake-decorating-ftopict-50011-taigen.html
...that is when someone said they were based on the "Lambeth Method of Decorating". Well it just intrigued me to no end....I had to try it. The design just happened along the way....that's why I would not make a good decorator for hire because I just let things happen as they go. I had some royal roses left over from when I was learning royal frosting and so I used them. Painting the fondant came because I figured if I painted the butterflies on rice paper for our daughters wedding then I should be able to try fondant. To be honest I thought it would bleed/run...but it doesn't. It also doesn't make the fondant mushy so I am thrilled as painting is what I do most!!
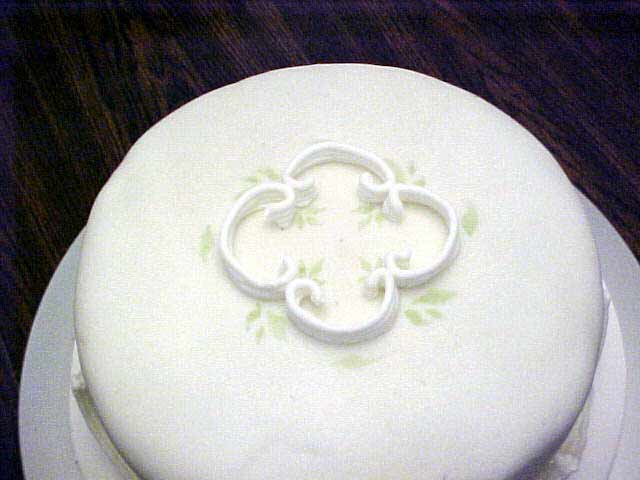
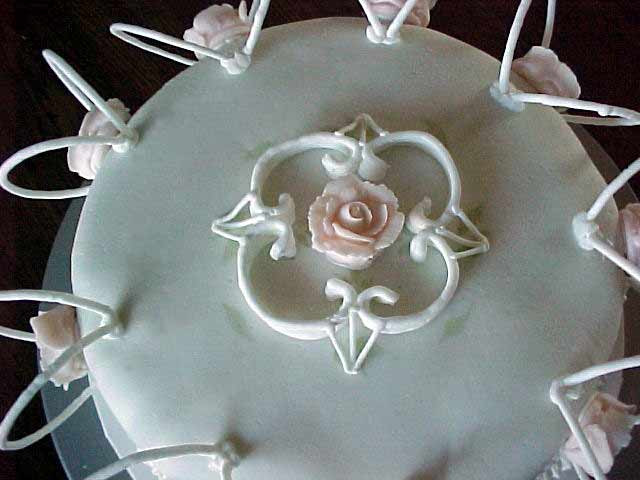
The actual decorating isn't that hard....just repetitive and time consuming as you have to let each "row" dry. My string work is still very shakey but for the first time of ever trying it and my second time using royal I am quite pleased ![]() I used one of the "design" presses for the top design and for the scallops I used the 2" petal former for the shape. I painted the fondant first then started doing the rows of royal. Then I had to figure out how to do the top and decided to use the roses and those loops. The loops were just 3/4 of a circle I piped and dried. Then just attach. I think next time I would poke a little hole for them to go into.....or build up a pretty "holder" for them.
I used one of the "design" presses for the top design and for the scallops I used the 2" petal former for the shape. I painted the fondant first then started doing the rows of royal. Then I had to figure out how to do the top and decided to use the roses and those loops. The loops were just 3/4 of a circle I piped and dried. Then just attach. I think next time I would poke a little hole for them to go into.....or build up a pretty "holder" for them.
It really is quite addictive....I had no intention of doing all this yesterday but once I started I couldn't stop. Well, I had to for a bit to get supper ready, find the table again haha and eat. But then right after I just had to get back at it. It is just so awesome what you can do with sugar!!!
Kind of wish I knew more about this when our daughter was getting married.....this type of decorating is quite elaborate looking and wouldn't be used for normal cakes I don't imagine. It sure is fun though ![]()
Thanks for all the birthday wishes too ![]()
![]()
Shirley....you must have posted while I was posting haha....thanks so much for the "tips", I didn't realize you should have a shell border to start. I just used #3 & #5 over and over. I did the lace curtain then found they were too spaced so added more in between. When I did the curtain part I did add a smidgen of corn syrup to the royal.
I think next time I am laminating I am going to laminate a sheet for markings so that I will have it.
Thanks so much for the advice ![]()
Your cake is a tremendous one especially for a first try at Lambeth and stringwork. I love it!
When I did the stringwork for the cake in my avatar (I have a full view in my gallery)I used a #2. The idea with doing curtain work is to start in the middle of your bridge and work out to the sides of each bridge. The lines are to be close enough that another line can not fit inbetween! That's what I read in one of my books on curtain work!
I can't wait to see your next attempt and more of your painted cakes!!! 
Amy


Your welcome. When you use the #14 shell tip try piping a line on a piece of paper or counter top. You will notice that if you turn the tip in one direction you get a sharp line on the top of the design, if you rotate your wrist and pipe again you will find you get a groove or trough in the design. When doing Lambeth you want that groove or trough so that the next row of piping sits inside the trough. It gives you more stability and helps the lines to stand up straight rather than leaning over.

That's great for your first attempt. My only constructive criticism would be that the strings should be a little finer. I normally use a no1 tip but it's much better than my first attempt was


Wow! I really respect those of you who are brave enough to try this method. I don't think I'll ever have enough patience to learn it! But it is beautiful, as is this cake of yours. Happy Brithday!

Quote by @%username% on %date%
%body%