


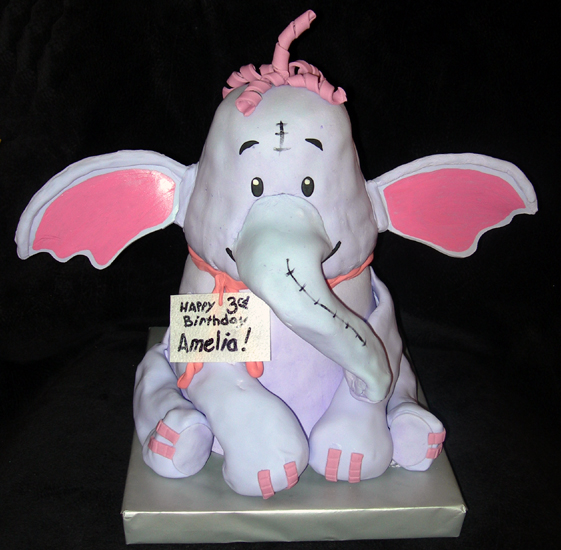
Heffalump/elephant Cake Instructions.
Decorating By krissy_kze Updated 4 Aug 2007 , 6:45am by Shamitha

Many of you asked me how to do the Lumpy cake. I'll post the instructions here so you all can see them.
I have to preface this by saying that I downloaded a picture and just kind of went with it. "Wing-it" is my middle name ![]()
I went to the heffalumpmovie.com website and found 2 pictures front and back of lumpy that I printed out and had in front of me while making the cake. It was a great reference tool.
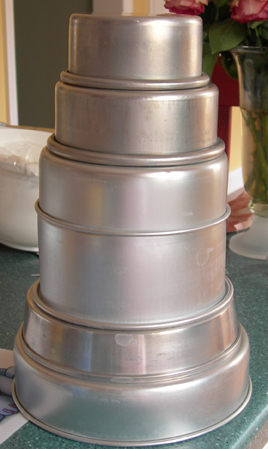
With all of my cakes I stack different pans to see the size and shape before baking. I attached a picture of the pans I used.
The bottom 3 were for the body and done in chocolate and the top 3 were done in yellow.
After baking I torted the larger layers and then sculpted the body slightly. I tapered it from the top down then removed the layers and put boards and supports under the top layer then reassmbled it and iced it.
The head was a little more challenging and I would sculpt it more next time. The head was on it's own board. I torted the layers and then shaped the layers in the head shape. Kind of like a bell. I cut into it at the bottom to give it about and inch of "neck" then I iced the whole head.
I used MMF to cover the body and head which I wouldn't do again. Well, the body was fine, the head was a challenge since it tapered in at the neck and it got pretty wrinkly which I had a hard time smoothing out. I had some Satin Ice fondant on hand so I used that for the appendages.
I put supports in the bottom layer to support the head then drove a dowel through the top of the head all the way through.
For the legs and arms I scrunched up some tin foil in the shape of legs and arms. I rolled out fondant and shaped it around the foil. I had to cover the ugly creases in the feet so I put round pieces on the bottoms. I cut little rectangles and scored them to resemble the things on the hooves. I have no idea what they are called, I was just copying the photos!
The trunk I made sure was long enough to rest on one of the legs. I twisted three strands of floral wire and left about 2 or 3 inches to curve and stick into the face for support. One thing I would have done better was to have smoothed the trunk out at the face more.
I made a tail by rolling a little ball and attaching a bunch of rolled thick shapes of hair strands.
The ears were a nightmare plain and simple. I freehanded a design from the photo. I twisted 2 lengths of floral wire and placed them along the top of thears and rolled the top of the ear down to cover the wire. I left about 4 inches of wire to be able to stick into the head for support. I let the ears dry overnight on a flower former for a curved ear. To attach them I sank them into the head about a half inch along with the wire. I supported them and wrapped some fondant at the seam for more support.
For the hair I cut strips of flondnat and wrapped them around a dowl and let them dry. I stuck a little wire through the top hair to get it to stick up.
The eyes and eyebrows I used black fondant and little balls of white for the twinkle in the eyes.
All of the "stitches" were painted on with black paste coloring and lemon extract. I painted the inside of the ears pink with cherry pink powdered coloring mixed with white liquid coloring and some lemon extract.
I held my breath and hoped it stuck together.

WOW...Thank you very much...that is a lot of info and you cake looks amazing by the way!!

wow ----------that looks like alot of cake.
great job i think that its great


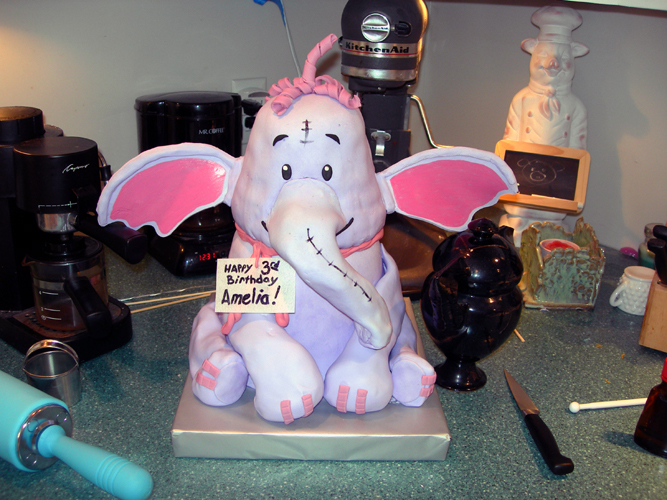
wow thank you!!! how tall was the cake?
I don't know exactly. Here's a picture for reference. The ears are propped on the teapot and the cappuccino machine. 18 inches maybe??
That is so great! I can't wait to try a similar one in a few weeks for my son...
For those who don't want to try a large one, I was looking at a pix of Lumpy the other day and it looks like you could use the 3D bear pan, cut off the ears and hands, and then extend the head up a bit with fondant, extent the feet out a bit with fondant, and cover it all and add the trunk and forelimbs and ears out of fondant...
I'm going to give that idea a shot as we won't need that much cake...


What a great cake! A few years ago I made a elephaunt cake and was searching for ideas- yours is amazing and I will have to give it a try! Thanks for all of the instructions! Do you have a picture of the back?
Great Job!


Quote by @%username% on %date%
%body%