


Several of you have asked how I made my Wedding Wrap cake so I thought it would be easier to post here instead of sending a PM to everyone who asked.
http://www.cakecentral.com/modules.php?name=gallery&file=displayimage&pid=1227632
I start using ShirleyW's method. There is a sticky in this forum of her instructions but I am going to add them here and then give the additional instructions.
This is ShirleyW method for wrapping a cake in chocolate.
"I buy Mylar, a clear plastic that comes in sheets from a plastic store but I think that art supply stores or maybe Home Depot carry it as well.
I measure the circumference of the cake plus about 1/4" and the height that I want the wrap to be, usually a tiny bit taller than the iced cake; say about 4 1/2".
Lay the strip of Mylar flat on a table top or counter, spread the melted chocolate smoothly over the strip with an off set spatula; thickness is probably 1/8" or so. You don't want to be able to see the plastic through the chocolate but you don't want it too thick and globby either.
Have the iced cake ready on a covered cake board.
Pick the strip up carefully at both ends with the tips of your fingers at the top edges. Get in as close as possible to the bottom of the cake where it touches the cake board; tilt the top of the strip back towards yourself just slightly. Let the bottom of the strip touch the cake board just next to the cake, move your hands in, bringing the strip top up so the plastic is standing straight and is touching the cake side.
Begin moving your hands in opposite directions as you go around the cake until the strip is completely wrapped around. Touch one end of the strip to the cake, you will have a tiny bit of overlap when you bring the other end around; touch it to the end of the other strip.
Put the cake in the fridge for about 10 minutes or until completely set.
Carefully take your fingernail or a sharp knife point and work loose the outside edge of the strip where they join together. The strip will almost release itself but you can help it along, just carefully peel it off from one end to the other.
One tip I will give you is, when you attach the strip and begin moving your hands around the cake from the left and the right, get the bottom of the strip in first; then upright the strip and it will attach itself at the top.
People have a habit of going around after the wrap is on the cake and smoothing the outside of the strip with the palm of their hand. If you do that, it will cause the strip to wave and the set chocolate will be wavy and uneven."
Now to my part- I actually use acetate as it is easier for me to find. You can buy it online at www.dickblick.com or I recently found it at JoAnn's in the art supply area.
I bake, frost, and wrap my cakes as Shirley instructs but on the larger cakes I did it in two halves. I also cut my strips a bit higher to allow for the peaks. Once the first wrap sets I carfully break off pieces at the top to achieve the jagged look. I cut additional pieces of acetate in random peak shapes. One at a time, I follow the same process as shirley describes on each peak cut out. Then I place them randomly on the cakes making sure to cover any seams from the first wrap and making sure that none overlap each other. I let them set up and then do the process over until I have the desired effect.
One thing I have learned is that the additional peak wraps do not need to be as thick as the original wrap. I keep them a bit thinner or it is very difficult to cut. As far as cutting goes you need a warm blade to cut through the chocolate with out it shattering.
For delivery I doweled and stacked as usual. Just be very careful because the wrap is very delicate.
If you are planning on using strawberries you need at leat a 4 inch difference in the cakes. Mine is a 6-10-14. If you go with anything less you end up not having enough room for the strawberries.
I hope this is helpful, if you have any questions post them here. I will check the thread to make sure I am answering your questions. Have fun.


Here's an Addendum to what MisterC said about acetate -
The stuff is phenomenal. I use it for all my chocolate garnishes. It makes a really shiny and beautiful surface. You can lift it and see if there are air bubbles on the underside, then pop them out with a toothpick.
Acetate sheets come in different grades, or thicknesses. For small work, I use the medium grade. For larger pieces, I always use the heaviest grade available.
I buy mine at Dick Blick, and they always put it in a cardboard tube for me.
A word of caution about ordering acetate online -
Call them first, and see how they plan to package it for shipping. If they do not say that they roll it and put it in a secure cardboard tube, do not buy it.
Acetate sheets are fragile, in that they crease easily, and cannot be repaired. If you use an acetate sheet with a crease in it, the crease will show in the final product.
Theresa ![]()

is there anywhere to get the acetate cheaper?? I'd like to get a roll that's at least 4" wide and maybe 10 ft. long.........I don't wanna spend over $20.00 though......is that possible? I'd like to play around with it, but don't want a huge investment in case I suck!
Is there an art supply store near you? I also buy mine at Dick Blick's. They have different grades (thicknesses) there, and they're not expensive.
You can also order online from them. Here's the link for their acetate sheets online
http://www.dickblick.com/products/grafix-clear-acetate-sheets/
Theresa ![]()

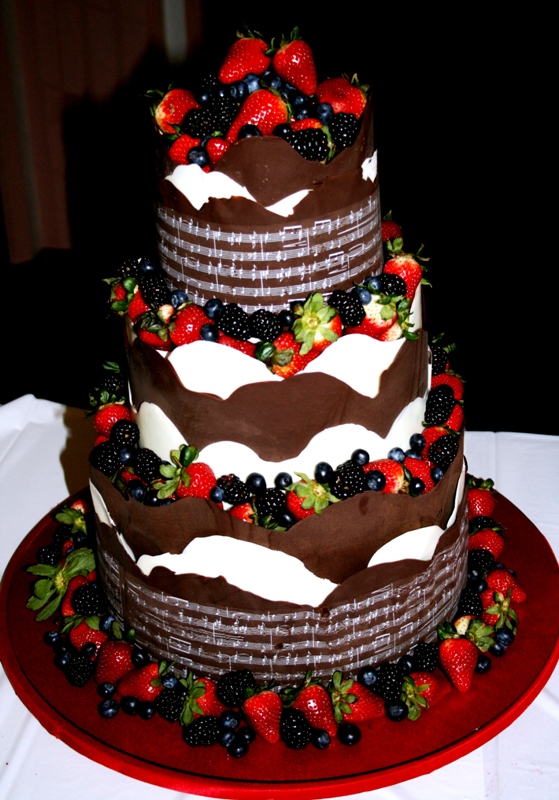
I did a chocolate wrap cake last week (it's my avatar). I didn't use acetate. I used freezer paper. I could cut it to length, which was great, so the chocolate wrap was one piece around the bigger cake. I just wrapped a piece of string around the cakes to measure and then cut the freezer paper to length. Then I folded the paper into thirds lengthwise, so it was easier to handle.
Jodie
ok, I found some cheaper on dick blick (must not have been looking right the first time).
wowowowowow that cake is GORGEOUS!!!!! Soooooooooo beautiful!!!
Now tell me, did you have to travel with it fully assembled??? If so, did that totally freak you out?

Jodie that cake is just fabulous!!!! Gorgeous! I am so dying to try a cake like this and have inquired in a few stores but they didnt carry acetate paper, I also read about the freezer paper and it is supposed to work just as good. Does anyone know if acetate is similar to the plastic rolls people use around Easter time to cover the Easter baskets with?
Sorry...I didn't get any emails that there had been replies to this thread. Nope Khalsted, I took the tiers separately, stacked it and then added the fruit on site. That cake was for my sons' recital reception, which was at his university 2 hours away. I would have had a nervous breakdown taking it stacked. ![]() Actual, the tiers were very easy to pick up and stack. I just couldn't hold them very long so I didn't melt the chocolate!
Actual, the tiers were very easy to pick up and stack. I just couldn't hold them very long so I didn't melt the chocolate!
Mariu...in my experience that wrap for the easter baskets is very, very thin, and tears very easily. You need something sturdier!
Jodie
Quote by @%username% on %date%
%body%