


Instructions: Calla Lily Illusion Wedding Cake (Long)
Decorating By Lazy_Susan Updated 3 Jan 2011 , 5:54am by Lisa-lou

Hi everyone!
I'm using this new thread to share the instructions for my version of the Calla Lily Illusion Cake. If you have any questions or something isn't quite clear just ask them here and I will be more than happy to answer ![]()
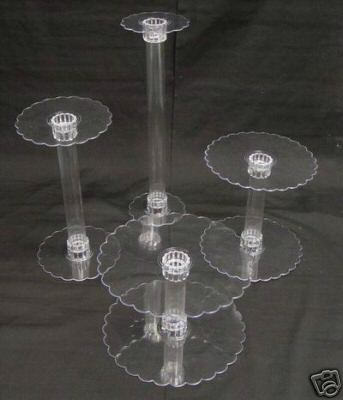
The main thing to have for this cake is the acrylic stand. I found mine on Ebay and I checked recently to see if there were any more and there were. Here's the link to one of them on Ebay:
http://cgi.ebay.com/4-tier-WEDDING-CAKE-STAND-ACRYLIC-CLEAR_W0QQitemZ290035240697QQihZ019QQcategoryZ102424QQssPageNameZWDVWQQrdZ1QQcmdZViewItem
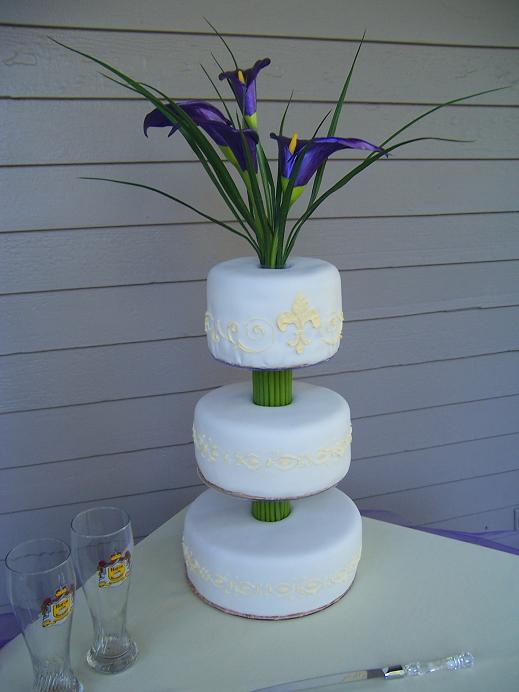
The picture of the stand is posted below along with a pic of the cake for those of you that may not have seen it before.
The stand comes in pieces of
(2) 12" round plates
(2) 10" round plates
(3) 8" round plates (for better stability on the highest tier)
(1) 6" round plate
(4) acrylic pillars 6",8",12",18"
I'll explain more about the setup of the cake stand later.
The Cakes
Any type of cake can be used. All the cakes must have a hole in the middle so they slide over the acrylic tubes of the cake stand. The way I made the holes in the cakes was by placing an aluminum tumbler (wrapped with parchment paper and filled with dried beans) in the center of my cake pan. I lined the cake pans with parchment circles. So, to find dead center, I folded the parchment circles in half and then folded the half in half to make fourths. This gave me dead center when unfolded. I then used a compass to trace a circle in the center of the parchment circle and placed it circle side down into the cake pan. By doing this I knew exactly where I needed to place my aluminum tumbler.
After the cakes have baked, let them cool for a few minutes and then gently wiggle and remove the aluminum tumbler (I forgot to mention that you could also use a heating core to make the holes). Once the tumblers are removed you have a perfect hole directly in the center of your cakes. Then just remove them from the pans as you normally would and treat them as you normally would.
When you are ready to decorate, you will need to cut a hole in the center of your cake boards that the cakes are going to sit on. No need for super duper sturdy boards because part of the illusion is that you want to see as little of the board as possible. I would suggest covering them though ![]()
If you plan on covering the cakes in fondant as I did, roll out your fondant and cover the cakes. Take a knife and insert it directly into the hole in the cake and make a cross cut pattern. Then fold the four points of the pattern down inside the hole in the cake. By doing this it gives it a much cleaner look than cutting the hole out.
The Stencil
You can use any stencil that you like. I found mine at JoAnn's. They aren't in the cake decorating section. I think it was in the woodworking section. They have many to choose from (I'm going back to get more).
The Royal icing for the stencilling has to be rather thick so it doesn't run and it gives it a nice 3D effect. Color the royal icing any color you like. Also, I decided to use a sponge brush to apply the royal icing because I didn't want to take the chance of getting bristles in the royal icing. The sponge brush actually worked out really well!!
Some people mentioned that you can apply a thin coat of crisco to the back of the stencil to make it stick onto the fondant for stencilling. However, since this was the first time I had done this and it was for a wedding, I didn't want to try that method in case I messed it up.
What I did use though was T-pins. I took the stencil and placed a T-pin on each end of it and pushed it straight into the cake to hold it in place. I then applied the royal icing using a stencilling method instead of a stroking method (this would push icing under the stencil).
Once the royal icing was applied, I immediately pulled the stencil straight off the cake. The pulling made the royal icing pull out as well and gave a nice 3D look. I then washed and dried off the stencil so I could complete the design the rest of the way around the cake.
Once all the cakes are decorated, place them in the refrigerator until you are ready to assemble.
The Flowers and Stems
I found the flowers at a local department store. They were fake flowers (not silk but some funky material that held it's shape really well). You can use whatever kind you like. The flowers I had were white and the bride wanted them to be purple so I painted them with fabric paint.
You may need to buy extras because you'll need the stems.
The flowers on top of the cake do not go all the way through the cakes. They are actually cut and inserted into the top acrylic tube that runs through the top tier (I had to put a foam stopper in the top tube to prevent the flowers from going deeper than I wanted).
The stems in between the two tiers are actually cut and hot glued to a piece of round cardboard that was large enough to slide over the acrylic tubes. Remember to leave enough room for the acrylic plates to be fastened on top of the stem rounds (I'll explain in assembly section).
Assembly
If you order the cake stand thats on Ebay like I did, you'll notice that the acrylic tubes are probably not the length you would like. I had to cut the large tube to the size I wanted. The others were a good size.
Do not set the cake up and try to transport. Assemble when you get to where you are going.
Connecting the cake stand can be a little tricky so I'll tell you what I found to be easiest. Most people would think to push the acrylic tube onto the acrylic plate. However, this didn't work very well.
But what did work was holding the tube and placing the plate onto it (so it looks like you are holding it upside down).
Then just flip it over and set it on the table.
Eyeball the tube to make sure it is sitting straight.
Then carefully slide the cake over the tube and down onto the plate.
Then slide one of the stem rings over the tube and gently secure it into the cake by pushing down on it a bit.
Once you have the bottom tier in place, set up the next acrylic tube and plate just as you did the first ones. Then push the plate, with the tube already connected to it, onto the acrylic tube of the bottom tier (just above the stem ring).
Eyeball it to make sure it is even and level.
Then slide the next cake over this tube just like you did the first one. Followed by the second stem ring.
Then set up the final tube and plate for the top tier. Push it onto the second tube just above the stem ring.
Then slide the top tier cake over the tube.
Arrange your flowers inside the top tier acrylic tube.
Eyeball everything to make sure it is all straight and Voila! you are done ![]()
If you wanted to add a border to the cakes, I would suggest doing it after the cakes have been set up on the cake stand. That way you don't mess up your border when you slide the cakes over the tubes.
It's also a good idea to play around with the cake stand many times before setting it up for the first time. That way you feel confident with it. I know that some people are concerned about the stability of the stand. It was very sturdy and I had no problem with it at all. The weight of the bottom cake is an excellent support. Just make sure they know to disassemble it before slicing and serving.
I'm sorry if this all sounds confusing. If you have any questions, I'll be happy to answer them.
Lazy_Susan
Wow, you are so generous to share this with us. Thank you so much!


Thanks for the compliments.
If anyone else attempts a version of this design I would love to see it. Please post a pic of it here on this thread ![]() That way we can have different styles to look at all in the same place. Personally, I would love to do another version of this cake. Who knows...maybe I'll get the chance
That way we can have different styles to look at all in the same place. Personally, I would love to do another version of this cake. Who knows...maybe I'll get the chance ![]()

Beautiful! love it! Thanks for sharing your directions.

Thank you for sharing this great cake and the instructions. My gosh that is a lot of work....hope you got a million dollars for this cake....or close to it...
The cake was my gift to the couple. I was afraid to charge anything for it because the place where the reception was held was asking the Bride if I had a license (which I don't). I didn't want to get in to troubl. Plus I figured what better gift to the couple that has everything?

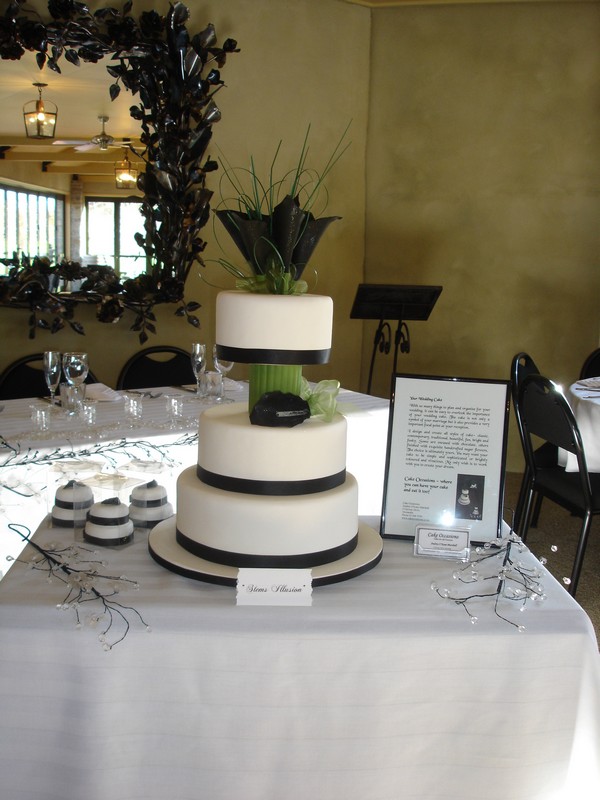
This is the version I did. Black and white and the Calla Lilies were made out of sugarpaste. Only the beargrass was artificial. I really enjoyed doing it but they are dummies done for a bridal show at a new venue and the owner asked if she could purchase it to have on display when the brides looked through. I was really chuffed.


That is such an elegant cake, thank you for sharing! I filed the instructions away to try at a later time (when I get around to purchasing the seperator set).
I was just wondering if it would also work if I were to wrap a piece of fondant around the plastic tube and imboss the stem lines and paint it with food colors? Do you think it would make the stem design look more proportionate to the top of the bouquet (that is if the bouquet is small)? Would love any suggestions.
I was just wondering if it would also work if I were to wrap a piece of fondant around the plastic tube and imboss the stem lines and paint it with food colors? Do you think it would make the stem design look more proportionate to the top of the bouquet (that is if the bouquet is small)? Would love any suggestions.
It's possible that it may work. I guess it would depend on how well you work with fondant and painting with food colors. The whole illusion rests on the look of realism. Personally I have just begun to work with fondant but you do have a good idea there. I think it would be worth a try ![]()


Thanks for posting how to do this type of cake!


You're very welcome everyone. If there are any questions please feel free to ask.
Bump... So everyone sees that I have posted the instructions they asked for ![]()

I was wondering could you just bake the cakes in an angel food cake pan???? That would give you the hole right??
Sure, that should work ![]() At least worth a try! Would you get the straight edges on the outside of the cake?
At least worth a try! Would you get the straight edges on the outside of the cake?
yeah yeah.........they make them like that!! They're not all rounded edges like a bundt pan I have one that has the same straight edges as a regular pan. I also have a springform pan with an insert that could work too. Thanks.....I've always loved these types of cakes

yeah yeah.........they make them like that!! They're not all rounded edges like a bundt pan I have one that has the same straight edges as a regular pan. I also have a springform pan with an insert that could work too. Thanks.....I've always loved these types of cakes
That's perfect then! I think I'm gonna have to go buy me some of those pans ![]()

Quote by @%username% on %date%
%body%