

How Do You Make Fondant Seams???
Decorating By EllenLeigh Updated 24 Aug 2008 , 7:19pm by EllenLeigh
I am a newbie to fondant, (no Wilton Class in my area).
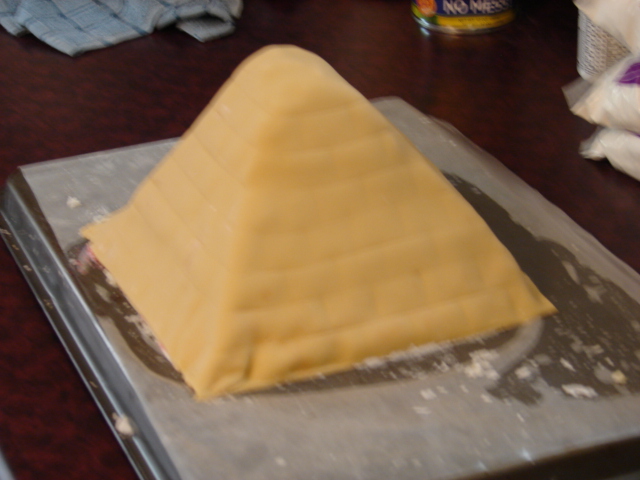
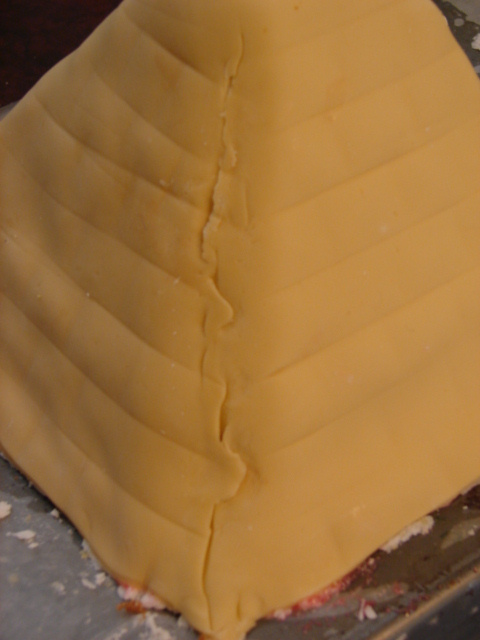
I made a test cake today using fondant, in the shape of a pyramid.
I had to make a seam to get the fondant to lay flat on the cake.
My question is....
How do you make fondant seams invisible or at least hard to see?
As you can see from the pictures my seam is quite messy.
Any suggestions would be appreciated greatly.
Thank you.

Hi Ellen!
You really should try not to seam if at all possible. My semi-homemade fondant is more forgiving than fondant straight from the package, as far as being able to blend seams, ect. Seams are very hard to conceal....
If you rolled a large enough piece, you probably could have covered this in one piece.
Hope this helps, even a little ![]()
Jen ![]()

What I find easiest is that the seams be clean and straight. I line up 1 piece with a straight seam and then overlap the other piece on top. Using something like a pizza cutter or sharp knife to cut the top piece to match. There will always be a seam but as Bronwen Weber told us in class, make the seam work for you. You can use a tiny bit of shortening to lessen the appearance of the seam.
I hope that helps a little. Good luck and welcome to CC! ![]()
This was one piece.
there was a hugh amount that would not lay flat so I cut it.
Maybe I should be asking how to work extra flat instead of seaming it.
Thanks for your answer, I really am so new.

I think she means placing the point in the center of the fondant drape and then smooth down all 4 sides, cutting excess off the bottom...
oh..... ok.
I pull each wrinkle or wavy part out gently pulling side to side.
Jen ![]()

OK that makes sense. Just kind of work it back and forth?
Will it kind of shrink back a bit? Or i stretch it a bit down and out?
I will try this, it makes sense to me. Iam just playing so there is no deadline for me and I can work with it till I get it.
Thank you all for such a fast response and help.
I LOVE this web site.
OK I have one more question.
Did I make the piece too big?
Is it better to have it close to the right size or is larger than needed better.
These probably sound like such obvious questions, but I truly just don't know. I bought the Wilton Class II book. Not much direction there.
It says simply, "cover cake with fondant".
Again Thank you for all your fast input.


That shape would be hard for me, and I am experienced with fondant, LOL. Because of the narrower top, you have more excess fondant to try to work out as you are smoothing down the sides.
I agree with above:
1) doing it as a wrap is feasible, overlap the 2 pieces in the back and cut thru both at the same time so the edges and seem will be stright up and down.
2) rolling your piece bigger, not smaller, makes it easier in most cases.
Thank you all for your help.
I did it.
Thought I would send a photo
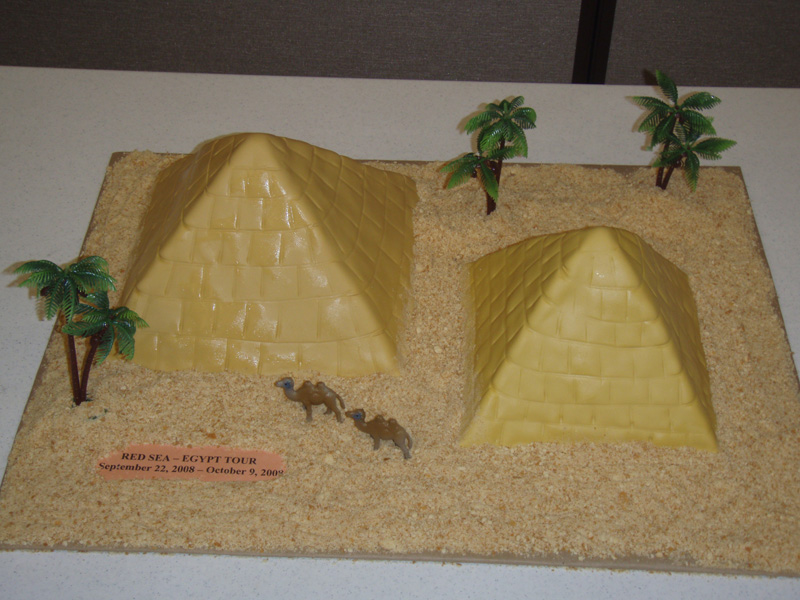

Thank you.
It makes me want to do more with Fondant.
I used the recipe from here "Michelle's" Fondant, and it takes good as well.
Love this web site


OK I have one more question.
Did I make the piece too big?
Is it better to have it close to the right size or is larger than needed better.
These probably sound like such obvious questions, but I truly just don't know. I bought the Wilton Class II book. Not much direction there.
It says simply, "cover cake with fondant".
Again Thank you for all your fast input.
Ideally you want to have a bit of overhang to you fondant. This way you can trim if. If you cut the fondant too skimpy it will most likely tear on you.
Unfortunately the Wilton Course books were designed to to supplement the face to face demonstrations. So they tend to be skimpy on details.
As for the best way to cover the cake. Sometimes you will end up with a shape that simply cannot be covered in one big piece. When I am faced with this I look at the least amount of faces/sides to the cake. Then I cover each face/side and use a stencil knife To neatly trim the sides. Then I use a paintbrush to smooth the sides by applying a very small amount of water. Then lightly rolling the fondant with the handly of the paint brush.
Hope this helps.


Hi there.
For a tricky shape like that it is good to cut your pieces to fit each side. To get seams really straight, use your hands as much as possible, and then take a knife down the seams to make them pin-straight.
Your finished product is beautiful. Keep working with fondant and you will feel more comfortable with it. I didn't take the Wilton course in fondant. I learned by the school of hard-knocks, and with lots of help from here.
I actually ended up with no seams at all.
Just took one piece and worked it down the sides.
I used my own fondant made from the "Michelle's" fondant recipe here on the web site.
thank for all the input
Quote by @%username% on %date%
%body%