


Mixinvixens Cupcake Bouquet Tutorial
Decorating By mixinvixen Updated 1 Sep 2009 , 9:00pm by alisapoly

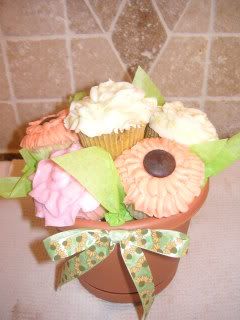
After moving into a new home last year, I was wracking my brain for something to help me meet new neighbors, while at the same time advertising my business. The project needed to be relatively simple and "assembly line", since I planned on making about 25. I decided to try my hand at CUPCAKE BOUQUETS, but didn't want to pay the expense of some of the often used accessories, such as styrofoam balls. I also didn't want to use toothpics since I felt they would be more prone to rip through the cupcake, being so small in diameter. I instead chose to create my own way and just make it up as I went along...it turned out really easy and successful in the long run!
SUPPLIES TO BE PURCHASED BEFOREHAND:
**plastic, metal or clay pots of your choice.
**Small plastic portion cups shown in the pictures, which can be purchased from sams, costco, or gfs. i used the larger cup (5 oz) for my tallest cupcake, and 2 1/2 oz cups for the other 5 cupcakes. i believe these are sometimes also called souffle cups. If you are unable to acquire these cups, paper dixie cups will also work.
**Bag of pea gravel, purchased from a garden center like Lowes or Home Depot, or you can use styrofoam packing peanuts that come free in packages.
** foam board sheets, cut out in circles measuring the proportions of the bucket about an inch or two down.
**hot glue gun and extra glue sticks
YOU WILL ALSO NEED THE FOLLOWING SUPPLIES:
green tissue paper, scissors, dowel rods, cutter for dowels, screwdriver to make holes, small knife to cut holes in bottom of cupcakes.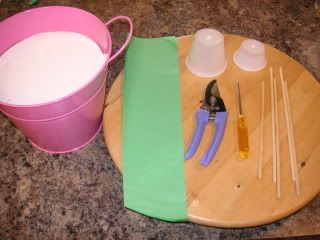
Make a paper template of your intended pot, approximately one to two inches down, then cut out a foamcore circle, using the paper template as your guide. Add approximately 2-3 inches of pea gravel or styrofoam peanuts into bottom of pot, then hot glue the foamcore circle into place inside the bucket. the dowels you will be using as flower stems will be held still by the gravel or peanuts in the bottom, and then stabilized once again when it passes through the foamcore circle. the gravel also helps give the pot some bottom weight, keeping the cupcakes from making it top heavy and prone to tipping over.
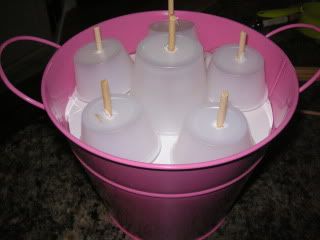
start assembly by using the screwdriver to place hole in center of foam. stick dowel in, place portion cup down over it, and then trim so you will only have approximately an inch or so sticking up. i also chose to hot glue around the base of each portion cup to keep it in place. since i was doing a total of 3 flavors, 2 cupcakes each, i made 5 additional holes around, sliding the smaller portion cups down at an angle and trimming the dowel. make sure to trim the dowels of your outside tier a bit lower than the middle dowel to help give you the stacked effect. 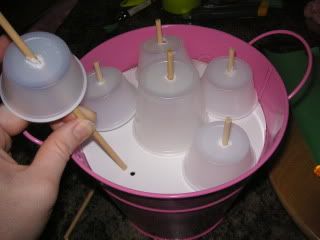
place small rectangles or triangles of tissue paper, twisted in the middle to form two "leaves", behind each portion cup to hide the cupcake liner.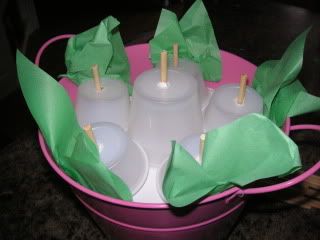
Use your knife to twist a small hole into the bottom of the cupcake liner, slightly off center, so you can angle your cupcake outwards once it's on the dowel. i started doing this halfway through, and really liked it better than sitting straight up. Complete your bottom tier, doing this process one by one.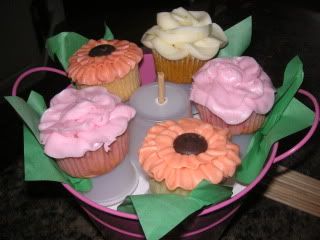
Twist a hole into your top cupcake, this time dead center. Slide it down the dowel. 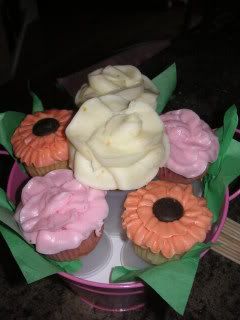
Make small triangles with your tissue paper, and form these into leaves by bringing two corners together and twisting...then place those in random spots to help cover the cupcake liners. I also added a bit larger pieces between each of the bottom tier cupcakes to cover up the spaces and to camoflage the cupcake wrappers.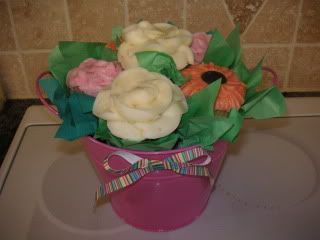
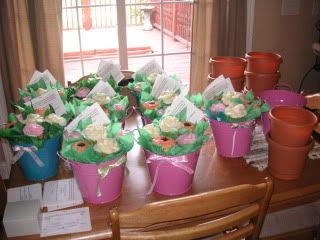
in total, i did 24 bouquets for a total of approximately $125.
here is one from my valentine advertising campaign
PLEASE FEEL FREE TO PM WITH ANY QUESTIONS YOU MAY HAVE...I WILL DO MY BEST TO ANSWER ALL POLITE REQUESTS FOR INFO.
Starla


Thank you for the awesome pictorial.
I am a visual person and this helps me out a lot. I will start making plans for giving these to my friends for their birthdays. I just need to learn how to make the petals, I really am bad at making them.
Thank you.


Great tutorial!! Thank you! Will it be going into the articles?
i used the large petal tip...can't think the number now...it's the one that has the opening that's 1/2 long or so.
Quote by @%username% on %date%
%body%