

I've seen a bunch of cakes that have a road leading up to the top tier. I can't seem to figure out how to cut my cake so it looks like that. Any advice?
Do I just have my three tiers frosted and stacked then cut out the road?
OR
Do I have three tiers and add on to each layer to make the road?
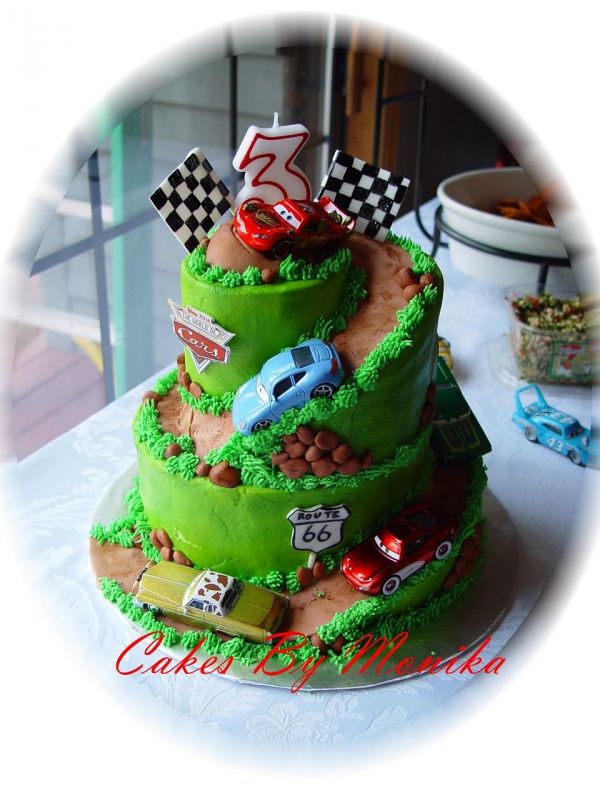

I've made a couple "road" cakes. I used 2 tiers, a 10" and 6" rounds. That way you can have at least a 2" wide road winding around the cake. The cake you've pictured is a 2 tier cake carved.
When carving I just eyeballed it. I scored with my knife where I wanted the road to start and where it would end. Then took a smaller cake pan, set it on top to help guide me and get the curve of the road. When I started the cake, I had no clue how to *really* do it but it was actually pretty easy to do once I started. I hope that makes some sense. Good luck!
Following the info Michellers gave note in the pic you posted that the top tier is set as far to the side of the cake under it that the sides match up......this give you the room to carve the road into that tier under the top one.
As for the road part in the lowest tier......I have a feeling they took the cake cut off the top tier & added it to the bottom.

Here's a thread with a few diagrams.
http://forum.cakecentral.com/cake-decorating-ftopicp-6285600-road.html#6285600
Here's a thread with a few diagrams.
http://forum.cakecentral.com/cake-decorating-ftopicp-6285600-road.html#6285600
Yes! That's how I made mine. Wish I would've found that before I made mine though, so I didn't have to stand there and stare at it for so long. ![]()
Thanks everyone for all of your advice!! Here's the finished cake (I forgot to put the toy car on though...) I didn't do a lot of carving, I just added on to the cakes.
http://cakecentral.com/modules.php?name=gallery&file=displayimage&pid=1348423

ACan someone send me a link with step by step on this to do the side roads?
Quote by @%username% on %date%
%body%