


3D Football Helmet Cake Tutorial?
Decorating By lv2bake Updated 4 May 2015 , 4:44am by lovesensation24

I would like to know too....hope you get an answer.

Here you'll find instructions I posted for the helmet in my little avatar photo: http://forum.cakecentral.com/need-instructions-for-a-foofball-ftopicp-6194052.html#6194052

heres an online video you can buy https://store.yummyarts.com/ProductDetails.asp?ProductCode=speccake72
Thank you Flourpots for the directions, I copied them. Can you tell me what kind of cake you used? I need a nice firm cake (WASC?)
thanks also Kayla1505, I can't afford to pay for the tutorial, I wish I could but money is so tight right now. But she gave a nice demo.
No problem. The helmet is covered with fondant.
Here's the version of chocolate WASC I use:
1 box of chocolate cake mix [I use Pillsbury's - the one that contains 1 cup of pudding in the mix]
1/3 cup all purpose flour
2/3 cups cocoa [I use Hershey's unsweetened]
1 cup sugar
3/4 tsp. salt
1-1/3 cups coffee [I microwave 1-1/3 cups of water for 50 seconds and add 1-1/4 tsp. of instant coffee to it, stir, then let it cool a little]
2 Tb. vegetable oil
1 tsp. vanilla
1 cup sour cream
3 lg. eggs
Place all dry ingredients in a large mixing bowl and stir with a whisk. Add the remaining ingredients and mix for 2 minutes. Pour into greased and floured pans [I use butter and a parchment circle], filling each a little over half full. Bake in a pre-heated 325 deg. oven till it tests done [Mine takes 45 minutes].

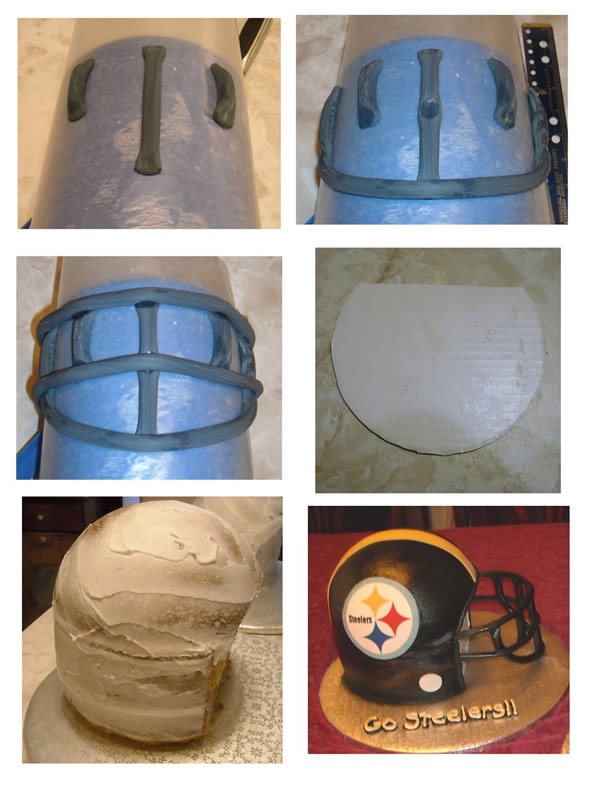
I know the Superbowl is over, so this is a little late. But I took pictures of how I do my football helmets. The process is pretty similar to FlowerPots, it's just bigger. I'll put them together and make a tutorial.
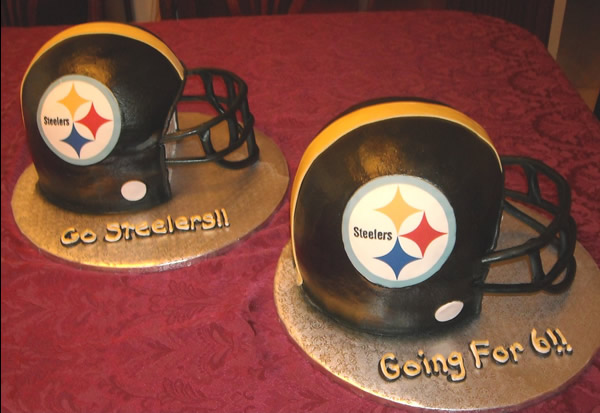

I know the Superbowl is over, so this is a little late. But I took pictures of how I do my football helmets. The process is pretty similar to FlowerPots, it's just bigger. I'll put them together and make a tutorial.
WOW! Thank you so much! I have been wanting to make a Cowboys helmet for my DH b-day in July! This will be such a great help! 
Hello, has anyone made a tutorial for the 3d football helmet cake yet, would love to have it if possible. I want to do a cake for my daughters football team banquet on Friday
Here's a kind of draft of what I'm putting together for a tutorial. The pics will help with the face mask. Let me know if I can help in any other way. Kitti
Let's see...The bottom layer of the large helmet is made of 2 - 8" layers and the top layer is a dome pan with an 8" base. Actually, I used the pan you see on TV that Betty Crocker sells for a cake within a cake http://www.bakenfill.com/?sour.....GgodgDhiCw , but any large, sports ball pan should do. I do have a cake board under the half ball cake for added support, with the edge cut off. The edge needs to be trimmed for when you go to carve out the shape of the cake. (Look at the pic). Supports under the top layer wouldn't hurt.
Stack the cakes and then stake them with a dowel. I dont freeze them anymore since Ive gotten used to cutting into the cake, but if this is the first time you will be doing it, I suggest you freeze the cake before you carve it. Freeze the cake for a couple of hours. While it is frozen, using a serrated knife, cut away from the cake until the desired shape is achieved. Next, crumb coat it while it is still frozen. Once it comes to room temperature, ice it. I use a crusting buttercream icing. Let it "crust" for 10 - 15 minutes and then smooth it with either Viva or Job Squad paper towels.
For the logo, I used the pin prick method in the past. I printed up the size I wanted and then poked holes through the outline. I carefully put that on the side of the cake and ran my finger over the holes. When you remove the paper, the holes will be imprinted on the icing. Then you pretty much connect the dots to get the picture. Fill in the picture with the appropriate colors. Fortunately, I now have an edible image printer.
For the face mask, use gumpaste, or at least a 50/50 mix of gumpaste/fondant. Fondant by itself will soften when it is in contact with the buttercream. And if you can, do the mask a week in advance.
What I did was roll out ropes of gumpaste/fondant. I used a 1-1/2 gallon pitcher, covered with wax paper, that had an 8" diameter, so a hat box or some kind of cylinder with the same diameter would work. I rolled 2 pieces about 1 long each and another piece about 2 long. These form the center, vertical lines. (Follow the pics). I then took another rope and started about half way up one side of the pitcher, then looped it over to the same spot on the other side. Then lay 2 horizontal ropes. The ropes touched the countertop on both sides of the pitcher. There was probably a space of 1" to 1 -1/2" between them. I usually do this a week in advance to make sure it dries really well. The two ends of the horizontal ropes are the "posts" that are put into the cake. I believe the front part of the mask was just over 2" from top to bottom. If you have to paint it, don't forget to do the inside part of the mask, because that will be noticeable
You can do a smaller version if you want to, just use 2 - 6" layers for the bottom and one of the Wilton ball pans will fit. For the face mask I used a can the size of a large formula can.
These are very basic instructions. Ive seen some really good helmets with lots of details out there. But this will at least get you started.
Thanks, so much this is a big help. I will get started on the face mask tomorrow


Sorry to necromance, but I'm trying to make one of these for Saturday. I started trying to make the face mask tonight, and I could not get the stupid thing to work. I tried making a wire frame, and rolling the gumpaste around it with my hands gumpaste kept drying out before I could get it in a good shape), and I tried laying tubes from a clay extruder over the #d soccer ball pan, but I have a feeling the curvature won't match up.
My Wilton instructor said when she did hers, she laid the gumpaste over a real face mask to dry. I don't have a viable real one (the example helmet the customer gave me is 1/4 scale), and I'm at my wit's end!
Is there any other way to do the mask?
What is the diameter on the cake? If it's about an 8" diameter, a 1 1/2 gallon pitcher will work. Just lay wax paper over it and then drape the gumpaste over that. Or any kind of cylinder with an 8" diameter. I've used a round hat box before. If the cake is smaller, like say with a 6" diameter, something like a can of shortening or baby formula will work.
Just try to use some kind of cylinder that has the same diameter as the cake itself. Hope that makes sense.

I used 20 gauge floral wire. Cut each piece individually twisted the wire at each joint and secured it with a dab of hot glue. I rolled out the fondant into long skinny rolls then worked and molded them to cover all the wire. Even though it is covered with fondant it isn't meant to be eaten and all the wire & hot glued joints are covered so they don't touch anything that is eaten .
HTH

Here's a kind of draft of what I'm putting together for a tutorial. The pics will help with the face mask. Let me know if I can help in any other way. Kitti
Let's see...The bottom layer of the large helmet is made of 2 - 8" layers and the top layer is a dome pan with an 8" base. Actually, I used the pan you see on TV that Betty Crocker sells for a cake within a cake http://www.bakenfill.com/?sour.....GgodgDhiCw , but any large, sports ball pan should do. I do have a cake board under the half ball cake for added support, with the edge cut off. The edge needs to be trimmed for when you go to carve out the shape of the cake. (Look at the pic). Supports under the top layer wouldn't hurt.
Stack the cakes and then stake them with a dowel. I dont freeze them anymore since Ive gotten used to cutting into the cake, but if this is the first time you will be doing it, I suggest you freeze the cake before you carve it. Freeze the cake for a couple of hours. While it is frozen, using a serrated knife, cut away from the cake until the desired shape is achieved. Next, crumb coat it while it is still frozen. Once it comes to room temperature, ice it. I use a crusting buttercream icing. Let it "crust" for 10 - 15 minutes and then smooth it with either Viva or Job Squad paper towels.
For the logo, I used the pin prick method in the past. I printed up the size I wanted and then poked holes through the outline. I carefully put that on the side of the cake and ran my finger over the holes. When you remove the paper, the holes will be imprinted on the icing. Then you pretty much connect the dots to get the picture. Fill in the picture with the appropriate colors. Fortunately, I now have an edible image printer.
For the face mask, use gumpaste, or at least a 50/50 mix of gumpaste/fondant. Fondant by itself will soften when it is in contact with the buttercream. And if you can, do the mask a week in advance.
What I did was roll out ropes of gumpaste/fondant. I used a 1-1/2 gallon pitcher, covered with wax paper, that had an 8" diameter, so a hat box or some kind of cylinder with the same diameter would work. I rolled 2 pieces about 1 long each and another piece about 2 long. These form the center, vertical lines. (Follow the pics). I then took another rope and started about half way up one side of the pitcher, then looped it over to the same spot on the other side. Then lay 2 horizontal ropes. The ropes touched the countertop on both sides of the pitcher. There was probably a space of 1" to 1 -1/2" between them. I usually do this a week in advance to make sure it dries really well. The two ends of the horizontal ropes are the "posts" that are put into the cake. I believe the front part of the mask was just over 2" from top to bottom. If you have to paint it, don't forget to do the inside part of the mask, because that will be noticeable
You can do a smaller version if you want to, just use 2 - 6" layers for the bottom and one of the Wilton ball pans will fit. For the face mask I used a can the size of a large formula can.
These are very basic instructions. Ive seen some really good helmets with lots of details out there. But this will at least get you started.
Hi Kittikakes: could you tell me how many people would this size serve?
I ususally say the large helmet serves 30. That's party sized slices. If this is for a groom's cake, you might be able to get 40 out of it.
Thanks for the fabulous tutorial. I have one to make for Saturday and the facemask has been giving me fits!!!! I am so glad to see the pics to help me out, KittisKakes!! Now I can go back and try it again in a few moments!
Hey, KittisKakes. Is it absolutely necessary to put the cake board between the top and middle layers? i only ask because i got a negative reaction about it from my customer today when I reminded her that it would be in there especially for the support of the top tier since there is the over hang on the top. It has to be the large cake because of the # of guests. Help please before I begin working on this thing!!! TIA!!!
Okay, I am hopin that someone can help me out here. I have cakes baking in the oven now for the football helmet for Saturday afternoon. But I am checking again about the structure. Do you all agree about using the cakeboard between the top round half and the bottom layers of the helmet cake? I really need to know this right away so that I don't make a mistake!!! I have the facemask already drying since Monday. But is te carving that difficult at all? Thanks so much! I am getting so nervous about it!! I should have made a practice one. Help, help!!!!
Tanya
What size are your rounds?
For the smaller helmet in my avatar (using 6" layers), I had a single bubble straw through the whole thing...no inner cake board.
I later made a larger one (8" layers), and I definitely used a cakeboard and straws inside. Unfortunately, the mask for that one broke, so I never posted it. You can see it on this thread though: http://cakecentral.com/modules.php?name=Forums&file=viewtopic&t=627526&highlight=
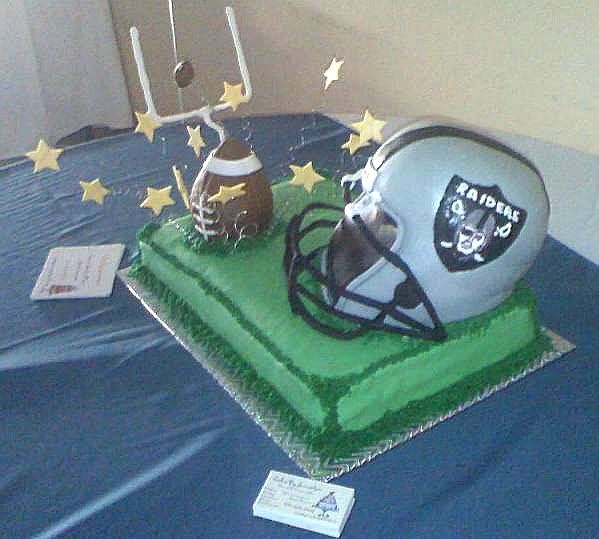
It wasn't hard to carve, but I hate how my larger one photographed...it looks so flat, and it really didn't in person...maybe it looked so bad because there wasn't a mask in front. Either way, I would do it different next time. I would try to make it look more like this awesome one: http://www.cakecentral.com/modules.php?name=gallery&file=displayimage&pid=1431492
Hi, Flourpots. I am using 2-8" rounds for the bottom and a soccerball pan for the top! I am so hoping that this works out ok. But at least I still have tomorrow if these act up on me. I am using the WASC recipe in vanilla chocolate and strawberry-gotta love the way kids want everything thier way!
PS I am also thinking I might need that advice for the soccer ball pan!!! But it is already in the oven, I just hope nothing bad happens!
Quote by @%username% on %date%
%body%