


This Is How I Made My Lv Purse Cake
Decorating By cakeforme Updated 19 Jun 2008 , 3:33pm by CristyInMiami

Since I joined CC, I've learned so much from everyone here in this forum, now is my turn to share some tips that I used making my LV purse bag.
As I'm a native chinese, and English is my second language, I hope everyone can understand, I'll try my best to explain as corretly as possible.
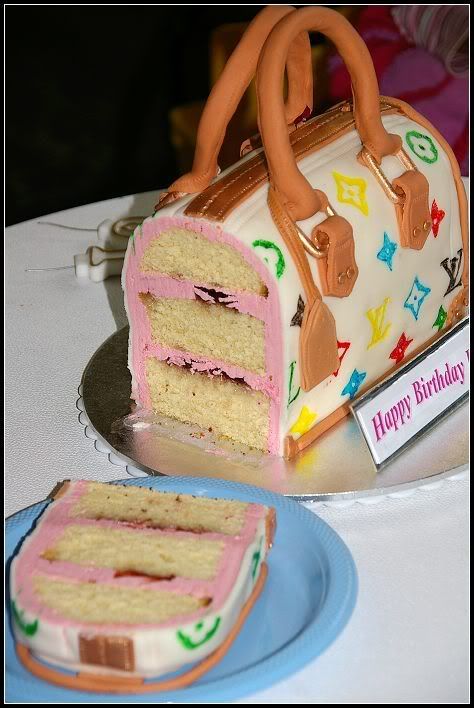
1. I bake a cake sheet of 18â x 12â, cut into 3 even pieces - size 6â x 12â, then individually wrapped with cling wrap and stored in the fridge overnight. This is done 2 days before the party.
2. The next day (the day before the party), take the 3 pieces out of the fridge, stack them one on top of another, and sculpt the top of the cake like shape of a mail boxâ top. Once finish that, you can fill butter cream between the layers, or use dam technic to put jam in between as well, then frost the whole cake with butter cream, I use pipping tip #789, itâs much easier and faster. Put the frosted cake into the fridge to chill for an hour.
3. Cover the cake with fondant in 4 pieces: 2 arch shape pieces for the 2 end sides of the bag, 2 rectangle shape pieces for the 2 handle sides of the bag. Trim to fit.
4. The handles, rings etc are made from modelling paste or gum paste. To make the handles stand up, I wrap a same length of lolly strip inside of the fondant handle, and put a wire through the lolly at the both end and leave about 2 inches out to stick into the bag body, it should be able hold the handle up. When both handles up, let them lean on each other giving good support as well. The lolly strip is the same kind of one that I used in my pink handbag as itâs handle, please see the photo in my gallery.
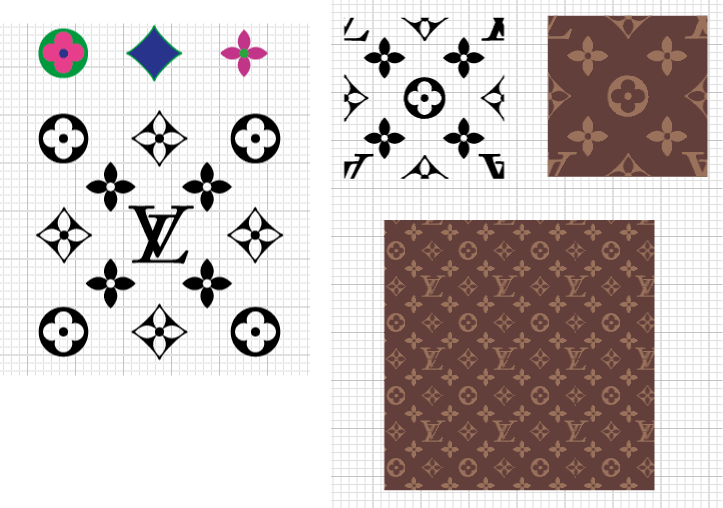
5. As to the logos, I made the templates out of a couple of pictures I fond online that shows the details of the logo:
http://img.photobucket.com/albums/v450/kphotopage/2007/Louis-pattern.gif
http://journal.davidbyrne.com/images/2008/02/15/10_02_08lv_murakami.jpg
I printed out the picture (adjusted the size to what I wanted) and guled it to a baking paper, then cut out the logos as templates, gentlely pressed the template(baking paper side) to the fondant where I want to write, using sewing pin to dot out the shape of the logo, carefully took the template off, then used edible marker to finish writing or filling.
writing logos should be your last step before you finish the cake, as by that time, the fondant is hard enough to write on, and it's much easier.
And that's pretty much all, if you have any questions, please feel free to ask. Thanks for looking.


Beautiful cake and very clear instructions! Great job 


Wow! Fantastic job!! Thank you for sharing your step-by-step instructions and Logo's!
Keep up the good work!
Karen


Thanks for your instructions. I want to do a purse cake so bad. Maybe I have the inspiration to get one done now. Thanks a million!!!
thanks for the instructions!! love the purse.
Your cake looks awesome and I appreciate very much your sharing how you made it!
Cakeforme -
First, let me welcome you to the forum. It is so nice to see someone so new posting to the group so soon. Most new members are shy to post right from the start.
I think your tutorial is great, and I also thank you for sharing it with us.
I also think that your English is well-written and very understandable.
Do you currently live in Asia, or are you living elsewhere at the present time?
Theresa ![]()

Thank you so much for the great comments, everyone, I'm so happy.
playingwithsugar, thank you for the warm welcome. I'm living in Australia. My English is ok for anyone to understand at conversation level, just not so confident when it comes down to writing.
I only started making cakes about 2 months ago, and this is my 3rd cake so far, and you can't believe it? trust me, If I can do this, everybody- else can!! However I did have done a lot of home work like collecting resources, gathering ideas, etc. and here at CC, I've learned so much from you guys, and everyone of you is brilliant!
Just to show you the way I come:
my first cake - a castle cake requested by my daughter for her 4'th birthday.
Being my first cake, I didn't know that I was supposed to put dowels for support. As you may notice, the lower cake started bulding, and the whole cake slightly leaned backwards, ![]()
![]()
my second cake: for my niece's 8'th birthday.
Had a lot of trouble with laying the fondant in one whole piece, the photo shows the inperfections. Now I have made myself a fondant lifter by using frankandcathy's instruction, next time round, it should be easier. ![]()
![]()
I can see by the quality of your work that you have definitely done your homework. Your fondant work is very neat and clean, very impressive for someone who has just a few cakes displayed in their gallery.
I can see that you have definitely done your homework.
You should be proud -
Theresa ![]()

Thanks so much for the detailed instructions!! I love that you posted the links to the patterns used also...
Laurel![]()

wow what an amazing cake! and the instructions are clear, too. thanks for sharing!
Very nice, hard to believe that it has only been 3 months. I to am also self taught, I buy books, and do a lot of googling to get cake information. There is a lot of info out there in the world wide web, you don't really have to spend money on a pastry school if you don't want to. Thanks for the instructions!


how can you estimate how many people eat from that?
I've been wanting to make one for parties but it looks like not many people can have.
It is very beautiful though! Great job!
Quote by @%username% on %date%
%body%