


I just got an order for a 3-D wildcat head. Well, my sister is in the athletic booster club and they are doing a supper for the football players and family before homecoming. She has asked me to make a full sheet cake and a 3-D Wildcat head (she knows I've been dying to try this) Okay I will try to explain what I am *thinking* if this make sense and if any of you have a different idea on who to construct please tell me!!
I was thinking of a wondermold pan for the neck beginning shoulders, then construct a cake board that is the shape of the jaw line like around the head right into the jaw somehow have a piece on the part that protrudes out going verticle to another flat board to hold the upper jaw that way I can fix a 2 layer 8 inch round and shape it to the head and then use a single layer square and lay on the protruding part of the cakeboard for the open mouth. Then I was thinking of fondant teeth and tongue. Do you think this will work or is there another way? I will actually be going to Hobby Lobby, Home Depot or Lowes this weekend (they are 2 hours from me) so if there is anything at either of these stores that would help.
I will try to post a drawing of what I am talking about and a pic of the wildcat, the only one I have isn't a good one.
THANKS IN ADVANCE!!!
Missy
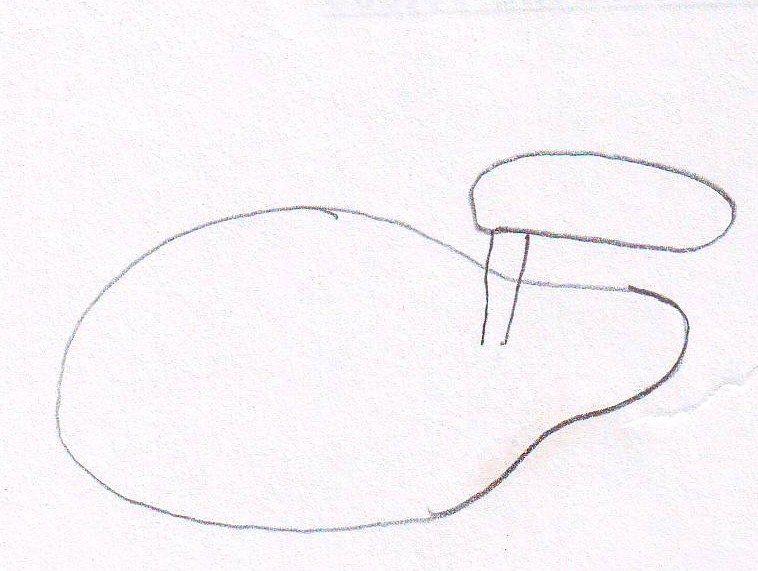


Your base board drawing is exactly what I did for a tiger. Just make sure you don't screw your upper board too far on side- you might need to keep it centered alittle so it doesn't droop.
But if you aren't interested in having the head up but keeping a 3/d effect look for I believe it is Debbie Brown's book-(or lindy smith) she has these incredible tiger faces that are in the same position your picture of the wildcat is. You'd just need to either upscale the size or instead of doing them on small cakes alone, just put it in the center of a large round, and have the over and under the head being the words like a logo.

OK I realize this is a tiger, but if you make a few color changes I think it will work. I hope you will be able to read the directions, I had to reduce these files in order to e-mail them, and believe me I'm no computer whiz, sooooo hoping for the best. If you can't read the directions, please let me know and I'll type them out on e-mail for you. Good luck !
Looking forward to seeing finished cake !!!
Hope this helps !
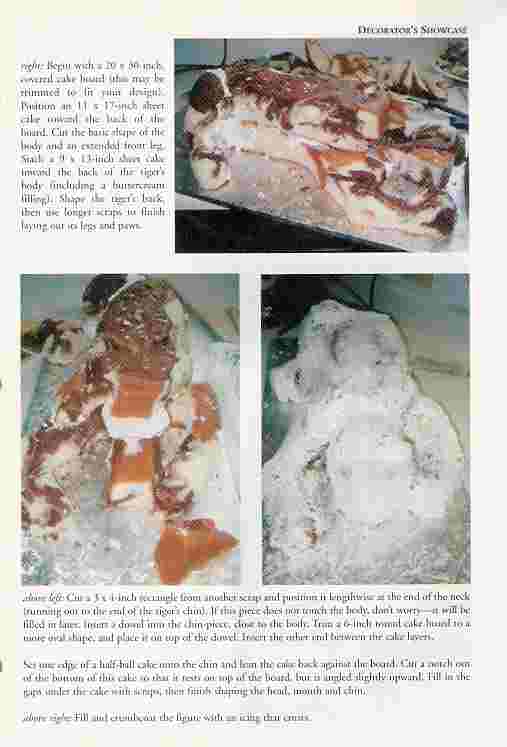
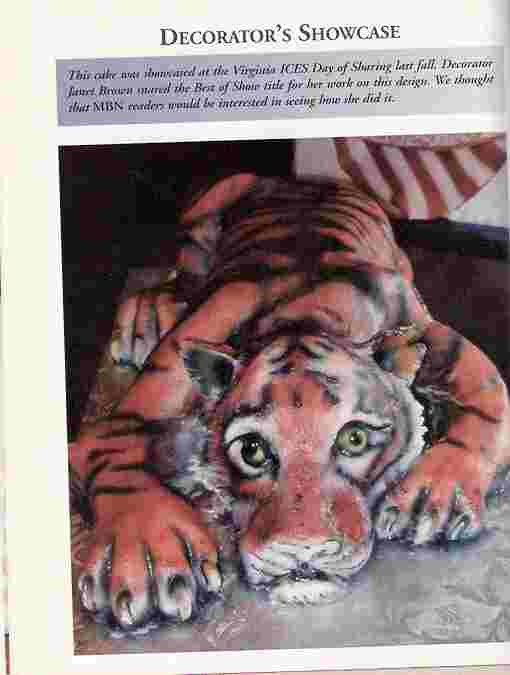
Begin with a 20x30 inch, covered cake board (this may be trimmed to fit your design). Position an 11x17 inch sheet cake toward the back of the board. Cut the basic shape of the body and an extended front leg. Stack a 9x13 inch sheet cake toward the back of the tiger's body (including buttercream filling). Shape the tiger's back, then use longer scraps to finish laying out its legs and paws.
Cut a 3x4 inch rectangle from another scrap and position it lengthwise at the end of the neck (running out to the end of the tiger's chin). If this piece does not touch the body, don't worry - it will be filled in later. Insert a dowel into the chin-piece, close to the body. Trim a 6 inch round cake board to a more oval shape, and place it on top of the dowel. Insert the other end between the cake layers.
Set one edge of a half-ball cake onto the chin and lean the cake back against the board. Cut a notch out of the bottom of this cake so that it rests on top of the board, but is angled slightly upward. Fill in the gaps under the cake with scraps, then finish shaping the head, mouth and chin.
Fill and crumbcoat the figure with an icing that crusts.
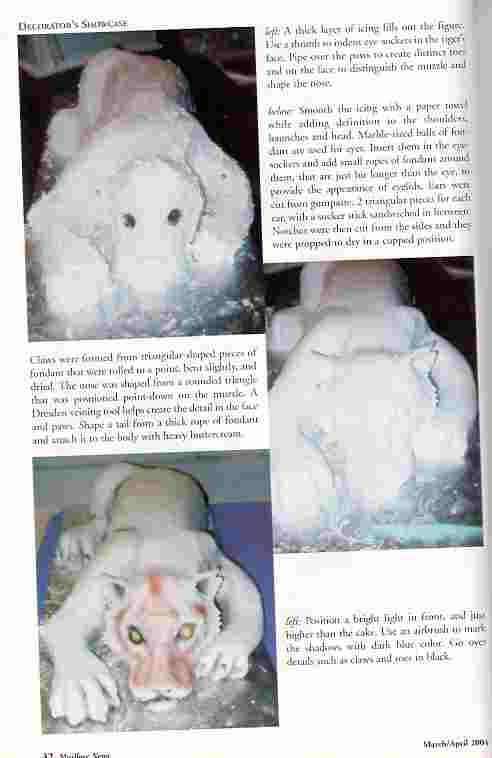
A thick layer of icing fills out the figure. Use a thumb to indent eye-sockets in the tiger's face. Pipe over the paws to create distinct toes and on the face to distinguish the muzzle and shape the nose.
Smooth the icing with a paper towel while adding definition tothe shoulders, haunches and head. Marble-sized balles of fondant are used for eyes. Insert them in the eye-sockets and add small ropes of fondant around them, that are just a bit longer than the eye, to provide the appearance of eyelids. Ears were cut from gumpaste. 2 triangular pieces for each ear, with a sucker stick sandwiched in between. Notches were then cut from the sides and they were propped to dry in a cupped position.
Claws were formed from triangular shaped pieces of fondant that were rolled to a point, bent slightly and dried. The nose was shaped from a rounded triangle that was positioned point-down on the muzzle. A Dresden veining tool helps create the detail in the face and paws. Shape a tail from a thick rope of fondant and attach it to the body with heavy buttercream.
Position a bright light in front, and just higher than the cake. Use an airbrush to mark the shadows with dark blue color. Go over details such as claws and toes in black.
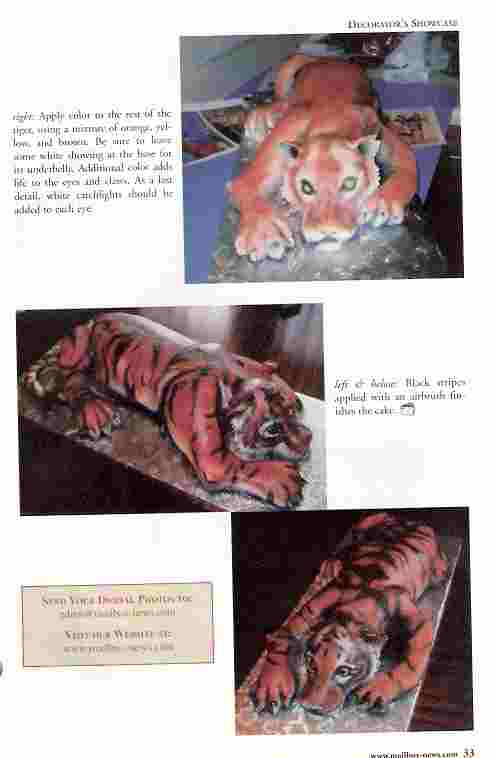
Apply color to the rest of the tiger, using a mixture of orange, yellow and brown. Be sure to leave some white showing at the base for its underbelly. Additional color adds life to the eyes and claws. As a last detail, white catchlights should be added to each eye.
Black stripes applied with an airbrush finishes the cake.
Of course the coloring will be different for the wildcat, but I went ahead and included the instructions anyway.
Hope this helps !!
For an upright one do exactly the same thing- but instead of doing the plastic dowel- Cut a 3/4 around wooden one, and a wooden board for the head. Screw the dowel in between the two boards in position. If you have a shorter one closer to the base board you can use the top of the board exactly like the other directions. Then for the open mouth, juststack up some cake to be the bottom jaw. If U don't want his bottom jaw to touch the board, cut the dowel a little longer (neck height) about to where you'd like his top jaw to end. That will be his upper jaw. Cut the head board a little larger- and you will need to make a foil (or a styrofoam)bottom jaw.(I think you had said that's what you had in mind earlier) I would think that the crayola model magic would be awesome to do the jaw with too! Just tape it really well and ice over it. fondant or gumpaste for the teeth- a tounge too...![]() Hopefully it makes sense.
Hopefully it makes sense.
Quote by @%username% on %date%
%body%