


How I Made My Mold For The Sugar Beer Bottles.....with Pics!
Sugar Work By ThisNameInUse Updated 19 Aug 2014 , 1:10am by CEPIN

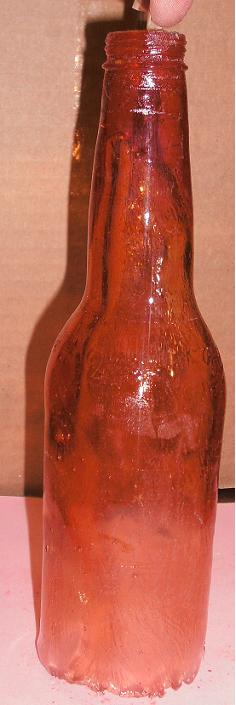
I used the directions given from the brilliant people in the sugar bottle thread.
My first reaction when I rolled the mold off the bottle..."OMG IT WORKED!" haha 

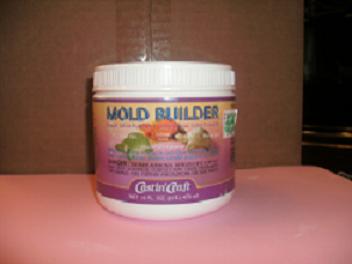
This is the mold builder I used. I bought it at Michael's, and it was $12.99
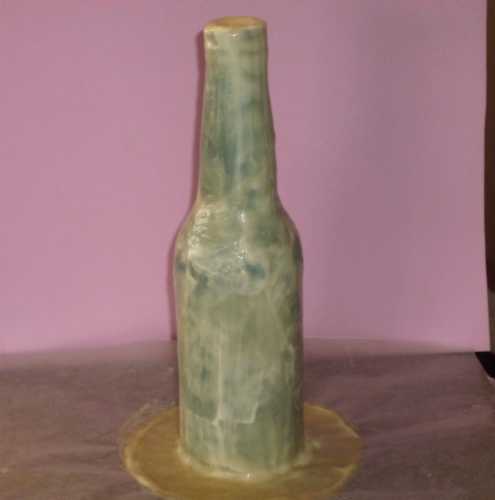
I cleaned the bottle, put a cork in the top of it, and started brushing on the mold builder.
The very first coat I let dry for about 3 or 4 hours. I could tell that it was really good and dry. It wasn't squishy or sticky at all, so I felt ok with putting the second coat on. Then I went to bed and let it dry overnight.
The mold builder turns kinda like a clear yellowish color when it's dry. When I see that, I kinda touch it to make sure it feels dry, then apply the next coat. I have a little space heater that I sat on the table next to the mold to help it dry. I'm probably just wasting electricity though because it really doesn't take very long for it to dry at all. You'll be able to tell when it's ok for the next coat.
After a layer would dry, I would check over the bottle to see if there were any spots that looked thinner than the rest of it, and dabbed a little mold builder on it, then let it dry. I did that because I was afraid of it being a weak spot in the mold. Once that was dry, I just brushed on another layer all over it. Don't worry, you will be able to tell when it's good and dry and ready for the next layer. It changes color and it's not sticky to touch.
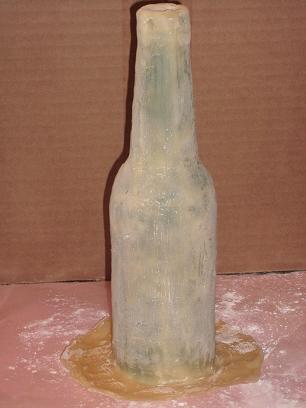
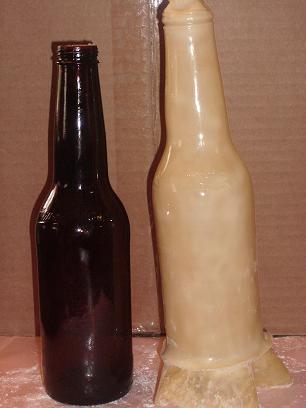
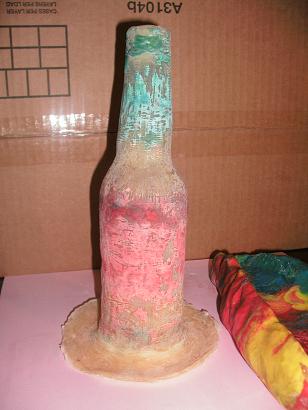
This is the bottle after 11 layers of mold builder brushed on it. It's dry in this pic.
Then I gently started rolling the mold off the bottle. I admit it, I was scared. I was afraid my nails were going to go through it. LOL
It came off the bottle super easy, and no fingernail mishaps! YAY!
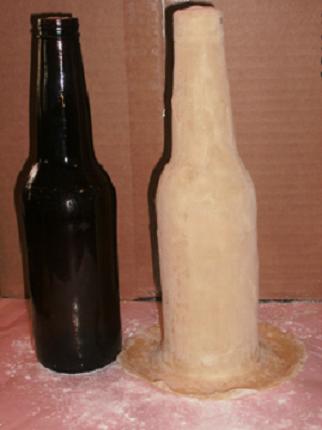
The cornstarch worked great, it didn't stick to itself at all.

This is the mold inside out. It's super smooth and shiney!
Then, using the handle of a rubber spatula, I turned the mold right side out.

Great Tutorial!! Thanks! Does it really need 11 coats? Just curious? So what can you put in the mold once it is all done? Chocolate? Sugar? Is it reuseable? And what was the clay used for in the beginning??
sorry for the questions but still trying to become familiar with the process. ![]()
I've never made a mold before, and was surprised at how easy it actually was. ![]()
I've never made the poured sugar either. I pray that making the mold was the hard part. ![]()
Great Tutorial!! Thanks! Does it really need 11 coats? Just curious? So what can you put in the mold once it is all done? Chocolate? Sugar? Is it reuseable? And what was the clay used for in the beginning??
sorry for the questions but still trying to become familiar with the process.
Well...from how I understand the directions in the other thread, once you pour the sugar into the mold and spin it so it is completely covered inside, it will quickly start to harden, and the clay mold is used to help keep the shape of the bottle until it cures all the way.
I feel pretty good about having 11 coats on it. I don't think it needs more as of right now.
It's very flexible, and feels like it will hold up pretty well. It's still thin, but doesn't feel too thin. I would say it's about the thickness of those rubber gloves people use when doing dishes or using cleaners...Do you know what I mean? LOL
I'm not sure what all you can use it for besides the poured sugar. ![]()
As far as reusable, one person in the other forum said that she made multiple bottles in one day using the mold!

Thanks!
I am going to try to make a bottle this evening. I'm very nervous about it.
OK....I did it.....It's almost time to peel off the mold....I'm so excited!
I followed SweetResults directions, using 1/2 c. sugar and 1/2 c. light corn syrup.
I didn't have a 2 c. measuring cup, so I used a 4 c.,....cup.
I wanted a dark brown bottle, so I added a smidge of Wilton's brown coloring and stirred it into the mix.
Then I nuked it, just like SweetResults said, 50% power for 6 minutes, 100% power for 2 minutes.
I had hubby on stand by to help me out. He held the clay mold in one hand, and as I poured the sugar into the mold, he rotated the bottle mold. Pour some, spin, pour some, spin....until it was completely covered. I used the entire mix for one bottle and it doesn't seem too thick.
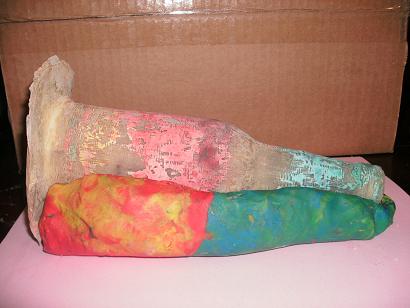
Here's the funny part...I used colored modeling clay for my clay mold. The heat from the sugar being poured ni started to melt the colored clay. My latex mold is now rainbow colored.
Next time, I will line the clay mold with some aluminum foil so the mold doesn't get funky.
I don't have pics of us actually pouring the sugar, but I did take some of what it looks like in the mold. As soon as I am sure it's hardened, I'll post the pics. (if it turns out well..LOL)
Here is my bottle mold (rainbow colored LOL) resting in the clay mold while it hardens....
About an hour or so after we pourd the liquid sugar into the mold, I felt comfortable with taking the mold off. It was cool, total firm, and I was DYING to see if it actually worked.
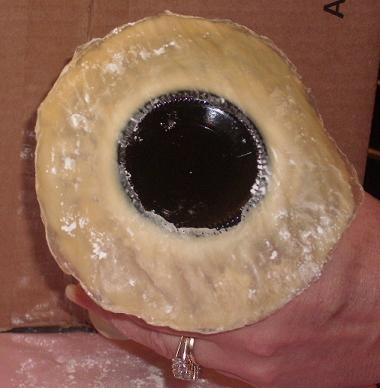
This is what it looked like from the bottom of the mold. I know, it looks like a donut, but I wanted to show you where we poured the sugar in, that it was hollow.
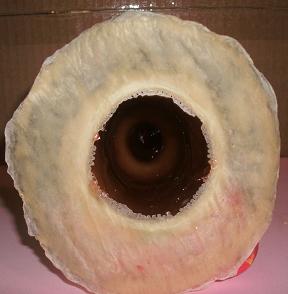
It stood up all on it's own....I thought that was a good sign....


awesome tutorial. Are you sure that stuff you bought at Micheal's is food safe though? I tried looking at Michael's and couldn't find anything that was food safe. If it isn't food safe, then you probably don't want to put it near food. No one's going to eat the bottle, but just wanted to warn you to be careful.
Again - great tutorial! I love the pictures!
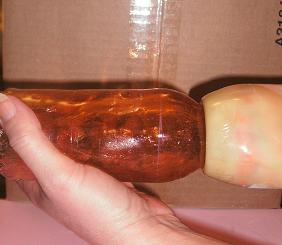
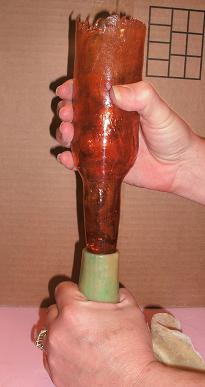
I gently pulled the mold back around the bottom of the bottle, just like I did on the real bottle. Hubby didn't make sure that the VERY bottom of the bottle was covered when we poured it, but I am ok with that since it is going into the cake anyway. It was a tad jagged, so I was really careful when I started peeling it back so I didn't crack it. It was fine...

It was a little bit harder rolling it off the sugar than it was the real bottle. I was afraid to hold onto the sugar bottle too tight for fear of cracking it.
There is a tiny hole in one lil spot on the sugar bottle that the liquid didn't cover....but I'm not showing it to you. ![]()
I totally blame hubby for that, too. No one will ever know it's there once the label is on.
I am allergic to latex, so I used Mike's amazing putty which you can get at Michaels (haven't seen it at AcMoore, or Joannes), and it is COMPLETELY food safe...even shows you an idea on the box for making chocolate molds out of it. It is pricey though, $19.99 a container, which will make one beer bottle mold if you work quick and do it correct by the directions. Mine came out awesome, and you can see it in my pics, I also just made a mold for a champagne bottle, which I still have to post. HTH!!!
Here it is! And if you look super closely, you can see "Miller" in the bottle.

Funny thing, too... Once the sugar was poured into the mold, Iused a metal spoon to scrape the measuring cup with to get as much out of it as I could. Well..I was paying to much attention to making sure he kept spinning the mold, I let the spoon with the liquid sugar on it harden to the glass measuring cup.
I turned on the hot water and let them soak for a bit. It worked just enough to let me remove the spoon from the glass...But....like a dummy, I grabbed another spoon and used it to scrape the sugar off the metal spoon, and ended up with TWO spoons stuck together. D'oh!
I put a little water in teh measuring cup and nuked it , and the hard sugar melted and came right out. I had to put the metal spoons in a pot of boiling water on the stove to unstick (thatta word?) from each other!

Quote by @%username% on %date%
%body%