

How Do You Do A Diagonal Like On This Cake?
Decorating By Edee Updated 18 Feb 2010 , 9:18am by juststarted
In the Celebrate with a Cake book by Lindy Smith, she explains you achieve this by copying your pattern on greaseproof paper, then roll out your fondant, place the template on top of the fondant, cut your template, place the patterned fondant on the cake, then repeat with your other color and line up the two colors up on the cake. Use your fondant smoother to make sure the fondant pieces meet, it looks like on your cakes they cover the meeting place of the two colors with a black line (for the first cake).
I hope this helps!

I did something 'similar' and to make the lines match perfectly, I'd lay the white fondant slightly over the dark fondant, so that it overlaps by about 2". Then cut them inside that 2" overlap. Since the cuts were made at the same time, they will line up so perfect it will look like one piece!

agree with Indydebi, makes them match perfectly but don't forget to pull off the cut blue piece under the white piece (for example with the first cake)
Can this look be achieved with BC??
I haven't done it in BC, but I did read an article that said basically ice the whole cake in white, then lay wax paper over the part of the cakethat you want to keep white .... ice the exposed cake in blue. The wax paper acts like the that blue painters' tape when you're painting your living room.
I would think the part of the cake that would be iced in blue wouldn't have to be TOTALLY iced in white .... just a crumb coat would do, wouldn't ya think?


or you could airbrush the blue part once it is "taped" off
I was wondering, if using Indydeb's method, does the top fondant stretch out of shape after you cut it then take it off to remove the blue fondant underneathe or os there a trick to make sure it doesn't? Maybe using a rolling pin? I'm just trying to trouble shoot in my head before I attempt this, which I really want to.
I did something 'similar' and to make the lines match perfectly, I'd lay the white fondant slightly over the dark fondant, so that it overlaps by about 2". Then cut them inside that 2" overlap. Since the cuts were made at the same time, they will line up so perfect it will look like one piece!
that makes sense to me, thank you so much. I am going to attempt the blue and white cake this week. I'm scared to try the airbrush with this, I've never airbrushed on fondant and I wouldn't want it to bleed, sounds like the simpler thing to do, but I'm nervous to do it. I will keep watching for more tips, thanks everyone.

Instead of attempting to match up the two pieces of fondant on the sides of a cake... do it sensibly.
Cover the cake with the top color, i.e. white. Roll out the bottom color and cut one edge straight. Cut the other edge wavy or diagonally or however you want it. Wrap the bottom color around the cake.
I thought about that too, but was afraid maybe the fondant would be too thick at the bottom of the cake?....
good advice from all- thank you

does anyone have pictures of completing this technique? i'm very visual and can't seem to grasp ![]()
does anyone have pictures of completing this technique? i'm very visual and can't seem to grasp
Dito! I'm not getting it. When you roll out the fondant, is this when you're attempting to overlap the colors Indy? Cuz one color would have to rolled out, say the blue for the top example cake, cut the design you want out of the center so there's essentially an open hole in the middle. Then roll out white and lay over top of the open hole of the blue and then overlap them 2" like you said and then cut within the overlap? Is that what you mean? I don't think they used the 2-layer technique because the seams look flush to me. TIA!
When I did something like this, it was a very simple design ... Mickey Mouse ears for my grandson's birthday cake.
http://www.flickr.com/photos/55969028@N00/3555736698/
and
http://www.flickr.com/photos/55969028@N00/3555740520/
I cut out the circles for the ears. Layed them in place on my counter.
I cut out the circle for the 'face'. OVERlay the face piece on top of the bottom portion of the ears .... a slight overlap. I then took the same cutter I used for the face and re-cut the face. Since the face was laying on top of the ears, this cut away the bottom part of the circles, so that when I put them on the cake, the ears lined up perfectly with the curve in the face-circle.
I think you can get a good idea of the end result if you look at the 1st photo (the one with my REALLY CUTE grandson in it!). You can see where the ears and the face "connect".
Another idea would be to make a cardboard template of the curve you want to put on this. Use that to cut each color's edge. the edges should be nice and flush!

I'm glad the OP asked this question -- I've been wondering that myself. ![]()


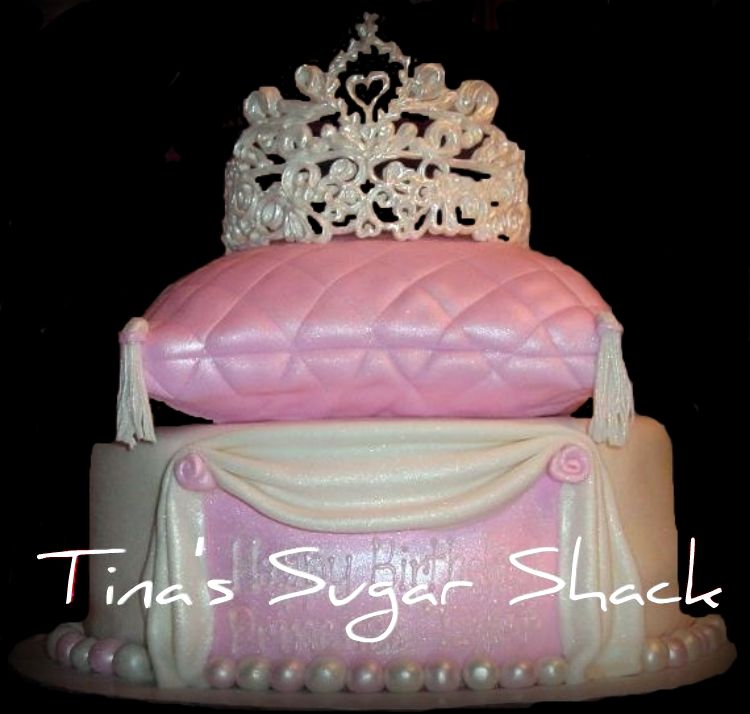
I believe Mensch's technique will not give the same result as the OP pictures. It's will create the effect like this picture, which is nice but not the same as the OP is looking for.
Thanks Indy. That makes sense. BTW: Your grandson is a cutie. That smile and those lashes- trouble!!! lol And it doesn't hurt that he shares my DH's name. lol
He's named after his Uncle John (my son), the Marine hero! (Ummm....I MAY have mentioned him once or twice on here! ![]()
![]() )
)

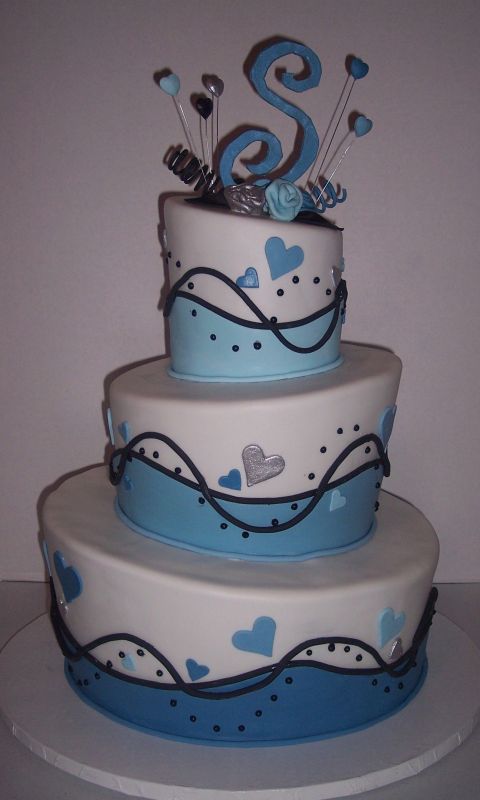
I made the blue and white topsy turvy cake - I wrap my cake with white fondant and then took a template I made and cut out the blue and wrapped it around the already covered cake. I then took black fondant and my clay gun and made the black rope that goes around the cake. The dots are royal icing. If you have anymore questions let me know.

I've done this technique (before I took photos of my cakes regularly...of course huh?)..and I did it like mensch said and while the bottom portion of fondant was slightly thicker than the top it was a sort of illusion, because once the join was covered it really came across as all being the same level.
I did this cake similarly...the whole cake was covered in white fondant, then a panel of pink fondant was put on the front and then the white fondant swag was placed over the join. I can't tell you how many people at the party this cake was at wanted to know how "the cake lady" (me) managed to pull up and ruffle the white fondant while keeping the rest of it so perfectlly smooth (muggles) lol

I made the blue and white topsy turvy cake - I wrap my cake with white fondant and then took a template I made and cut out the blue and wrapped it around the already covered cake. I then took black fondant and my clay gun and made the black rope that goes around the cake. The dots are royal icing. If you have anymore questions let me know.
see, now why didn't they ask you in the first place? LOL!
I made the blue and white topsy turvy cake - I wrap my cake with white fondant and then took a template I made and cut out the blue and wrapped it around the already covered cake. I then took black fondant and my clay gun and made the black rope that goes around the cake. The dots are royal icing. If you have anymore questions let me know.
You did an outstanding job on that cake! 
Thank you!
so pretty much it was done the way mensh said right?
And yes.

Quote by @%username% on %date%
%body%