


Has Anyone Covered A 3D Cruiser Cake With Fondant?
Decorating By cherrycakes Updated 22 Sep 2008 , 3:47pm by cherrycakes

I just got roped into doing it for a dear friend's son's 1st birthday - she wants it looking cartoonish so I thought I would try covering it with fondant. Has anyone done this and would you mind sharing any tips that may make the process a bit easier? This will be my first time using fondant on a 3D cake so any advice would be greatly appreciated!!

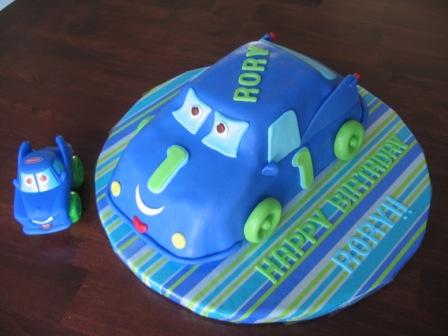
My first 3D cake was the fondant covered Lightning McQueen cake, in my gallery. It was just the same process (and I think easier) to cover and smooth.
I found that it was easier because the pan is sloped and not straight up and down, so there weren't as many issues with the smoothing at the bottom edge.
Hope this helps!
Edited to add....if you need help, let me know. ![]()

For the tires, the fastest drying way would be the 50/50 fondant/gumpaste mix. I colored them black, figuring about 2 - 2 1/2 inches across for that size pan. Made them round and flattened, then really flattened the inside area while laying on the table.
I flipped them over and pushed that inside area down again. That way, it was a little more flat across the entire tire and the edges were "sharp". Do this ahead of time, like the day before.
I left the tires off until just before bringing the cake out to the table. I attached them by piping some icing on the back of the tire and standing up against the side of cake. Then I flattened a piece of red, piped a dot of icing inside the indent of the tire and placed the red hubcap in there.
About baking the cake.......
When I was getting ready to bake in the 3D pan, I took a piece of wire, wrapped it around a flower nail, and stretched it across and hooked it over the narrow lip of the pan.
I thought this would be better than placing it in the bottom of the pan. It already gets the heat, but being a taller-than-a-normal-round pan, I wanted heat conducted near the top.
It worked perfectly! When it came time to take the cake out of the pan, I just leveled it with a knife, and VOILA! there was my flower nail. It had baked into the middle of the risen cake. And because of it being right in the middle, and cake had baked OVER it, it provided heat right in the centre top of pan (bottom of cake when flipped right side over).
And ...there was no hole to worry about in the top of the roof.


Thanks eveyone for your replies! I somehow wasn't subscribed to the thread (I thought that happens automatically?) so I didn't think it was still alive.
Anyway, I went with KrisD13's instructions for making the wheels and they turned out exactly how I wanted them! Because I was going for a cartoon look I didn't have to be so concerned about crisp edges around the rims.
Vonnie99 - After doing this (my first 3D cake covered in fondant) I would definetely encourage you to try one! It was actually very easy and fun to do!
The small car in the picture is the birthday's boy's favorite toy car that we re-created.

When you reply to someone else's post, you are automatically informed of replies. When you start a thread, you need to push the 'Watch this topic for replies' line at the bottom of the page.
Good to know. Thanks!
Quote by @%username% on %date%
%body%