

These are courtesy of jkalman. She is the very nice person who gave them to me.
You will need.. two 8' cake tiers, a long serrated knife, buttercream, red fondant, a small plastic fish bowl, fondant or gumpaste to make the face plate and coin turner part, silver dust and alcohol (I use vodka) to dilute it, a paint brush, an extra cake board, and gumballs.
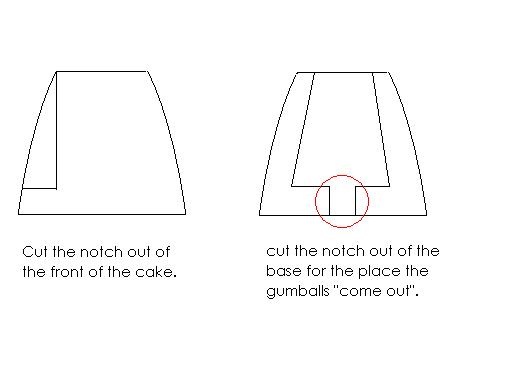
The base of the machine is made with two 8' tiers of cake (each about 4' tall) stacked on top of one another and there are dowels in the bottom layer. I made the cake board on the bottom of the top tier a little smaller than the actual cake to allow room for carving. Then take a nice sharp serrated knife and carve the general shape of the base. Once you have the basic shape carved out choose where the front will be. Then cut out a notch for the face plate. Cut in about 1/2 and inch into the cake about 2 inches up from the bottom and then cut down from the top until you get to the first slice you made. (I attached a diagram to better explain this part) This will provde a nice flat surface to attach the face plate. Then cut out another little notch to make the are the gumballs will come out of. Then cover the cake with buttercream and then cover in fondant. Covering a taller cake in fondant can be a bit tricky, but it can be done. I used Fondex brand fondant for this cake, but if I had to do it again I'd just get red Satin Ice because coloring fondant deep read was SUCH a pain in the butt. once you have the base covered in fondant put it on your cake plate and position where you want it. Take your plastic fisf bowl and center it on the top and press down gently to make in impression in the fondant on the top of the cake. Then roll out a snake of fondant (about 1/4 inch in diameter) and place around the top of the cake lined up with the impression you just made with the fish bowl. Then take a few dowels and place them inside the circle you made with the fondant snake to support the fishbowl. Press the fish bowl into your fondant snake to make a nice tight seal. You can very slightly wet the fondant if it's not sticking well enough, but not too much or it'll get slippery and gross. Fill your fish bowl 1/2 way with gumballs and set the cake aside. Take the extra cake board (that you have cut to fit ontop of the fish bowl) and place a lump of red fondant on it and shape it so that it is extending over to edges of the board. Place this ontop of the fish bowl and work the excess around the lip of the fish bowl. Then roll out another snake of fondant a bit thinner than the last one and affix that around the base of the topper you just put on the fish bowl. Before hand I made a screw head and painted it with diluted silver dust and you press that screw head into the top of the topper so it looks more real. Next roll out some red fondant and cut a 'U' shape to form the base of the lip that catched the gumballs then cut a strip to make the lip that catches the gumballs and place them on the cake. Then roll out a snake of red fondant to wrap around the base of the cake starting and stopping at the gumball catcher. Then measure the notch you cut out for the face plate and roll out some gumpaste (or fondant gumpaste mix) and cut a piece to fit into that notch. Cut a circle for the coin slot and decorate the plate.. I used tips to make impressions and thin snakes of gumpaste as well. Roll out some more gumpaste, thicker this time, and make the piece that covers the area where the gumballs come out of. Place it over the notch and use some cotton to support it while it dries. Once the face plate is dry enough to move around you can place it on the cake.. paint the area that is inside the circle with black food coloring and paint the area inside where the gumballs come out with back food coloring too (once the gumpaste piece is dry enough to not need support anymore). Cut out a coin and attach it in the circle. I made teh turner by making a small 1/2 sphere and then cutting out a circle out of thickly rolled gumpaste (I used an icing tip to cut the circle) and then cut it in 1/2 and then cut away a little bit of them so the fit onto the 1/2 sphere nicely. I used my clay gun to make a very thin snake of gumpaste to go around the face plate to finish the edge but that not necessary.. When you have the face plate attached and teh coin turner attached just paint it with silver dust diluted with vodka and you are done. Place a few gumbals in the catcher at the bottom and ta-da!!


Awwwe... you gals make me blush. You did a great job on your cake!! ![]()

Quote by @%username% on %date%
%body%