


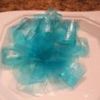
I do camo cakes a lot and have done a few in girly colors...it's pretty simple. I outline random shapes, using 3 or 4 colors, with tip 3, making sure the colors are well spaced. Then I fill in with tip 16 stars, or tip 7 piping ( then smoothing with Viva.) Here is an example of what it looks like:
http://www.sugarfrosted.com/displayimage.php?pos=-729
Click the picture to enlarge it to see the details better.
Good Luck! 
I do it the same way, only I don't take the time to star tip it. I use a tip 5, draw out the outlines, and then use the same tip to "fill in" - just keep going in circles till it is all filled with icing, then smooth with the Viva. I do all I can to avoid using the star tip, that thing wears my hand out!
I agree with the star tip idea. I hate a star tip.....thanks. I have done the "fill in" with just a tip and it worked fine, just wanted to make sure I understood. I'm still learning and won't to do it the smartest way not the hardest. thanks again for anyone who has ever helped me.....
Suagr-frosted.....got a question......
You piped the edges then filled with stars, I get that. You smoothed it using the Viva method? Did you just push it down a bit with the Viva, not completely smooth? Love it by the way......Can't wait to try this.
I do camo cakes a lot and have done a few in girly colors...it's pretty simple. I outline random shapes, using 3 or 4 colors, with tip 3, making sure the colors are well spaced. Then I fill in with tip 16 stars, or tip 7 piping ( then smoothing with Viva.)
As stated in my description, I have done this cake TWO different ways:
1.Outline and fill with stars, then do the border.
-OR-
2.Outline and pipe/fill using tip 7, then I smooth with a Viva towel, then do the border.
I never smooth the stars with the Viva.
What would be the point of going to the trouble of doing all the stars if I was gonna smoosh them down?
Btw, I know a lot of people hate doing stars, but I have never had a problem. It's just one way to do stuff. Lots of different ways to get a design on a cake.
I have not done the girly camo in the piped way. Here is an example of regular camo done in the smooth way on an airplane:
http://www.sugarfrosted.com/displayimage.php?pos=-566
Sugarfrosted - yes, that is exactly how mine look when done with the round tip. Works like a charm. Very cool airplane!
I agree with the star tip thing, there are sometimes when it works for a certain design, I just prefer not to do them (I have carpal tunnel setting in here) those repetative motions are a killer.

AI really like that idea but i wanted to do my daughters with two colors of pink and brown...now could i just replace the purple with brown?

Hope you understand what I mean in the pictures. Sometimes I don't excel at explaining myself.


Quote:
Loucinda: Buy the triple star tip, cut your work into a third of the squeezes.

AI like the roller idea, I wonder what type of roller it is though...I think it would have to be a special one that didn't leave a rough mark on the bc.
It is a high density paint roller I get from Lowes.. Just wash with hot water and let dry completely before using on icing.
After reading the camo cake tutorial I went to town. It was like a Twilight Zone experience, as it's 'fall' it's hunting season and men, women & children and their vehicles were camo...... shirts, pants, hats. surrounded by camo...... usually don't pay much attention to it.
These cakes & cookies you guys have made are great!! any color any shape any size cake or cookie-- cool.


Quote by @%username% on %date%
%body%