

Does Anyone Know How They Do This?....
Decorating By CakePhun Updated 27 Mar 2007 , 10:28am by carrielynnfields
Hey there,
Here is a question for the pro's (even if your not feel free to chime in).. how in the world do you get the chocolate to stripe like on the cakes at the following link: http://cakework.com/spotlight.html
Would love to know how, so please let me know what you guys think? Thank you so much for your time! S ![]()


I really think that they have chocolate transfers made up especially for them. The chocolate transfers are basically colored coco butter painted on flexible plastic which you then spread tempered chocolate on, let set then wrap around what you want. They are beautiful and it is definately chocolate. I would love to do it too but have not figured out a way to do it with limited time, money and resources. Let me know if you can figure it out ![]()
Was just looking at this site and thought this tool might help in making the transfers yourself if you are ambitious enough.
http://pastrychef.com/Catalog/three_color_pastry_comb_1026496.htm
let me know if you try????

YAY!!! You are awesome. I can't wait to find out!

I did this once with plain chocolate (nothing fancy with stripes). You measure the height and width around the cake and then cut a piece of flexible, thin plastic (like a transparency sheet) then you take chocolate that has been melted and cooled slightly and put a thin even cought of chocolate on the entire sheet. You then wrap the plastic around the cake and let it harden. when you peel off the plastic you have a chocolate "ring" covering your whole cake. It was a little bit difficult and mine wasn't very even or straight, but it still looked cool and everyone was impressed by it.

Ah, I found step by step directions and pictures, which were saved on my computer. I'll have to email the decorator and get permission to post them. I doubt it will be a problem, but I want to get her permission!!
Oooo, I hope you can post them 

Ah, I found step by step directions and pictures, which were saved on my computer. I'll have to email the decorator and get permission to post them. I doubt it will be a problem, but I want to get her permission!!
Oooo, I hope you can post them
me too!

Here are the directions... Thanks to Michelle H.!! She's a very talented decorator!! I accidently put the pictures in the opposite order... The first step is the third picture. I don't have time to fix it right now.
Ice your cake in buttercream and then place it in the fridge to chill.
Step 1: cut a strip of acetate taller than your cake, and long enough to
wrap around the sides. I made a short strip here, just to demonstrate. I am using the backing sheet from a Kopykake frosting sheet (which is basically a white acetate) instead of the clear stuff, so that it will show up in the pic.
Step 2: Design your stripes. Cut varying widths of acetate, longer than
your main strip, arrange them on top of the main strip, and then tape down on the sides. Make sure they are lying very flat and taut on the main strip so that the chocolate can't seep under the stripes in the nest step.
Step 3: Spread melted chocolate onto the strip. This chocolate used to be
white, but now it is brownish - which is why I'm throwing it out.
Step 4: Wait for the chocolate to set up a bit - it should have lost it's
sheen, and does not give when you press down on it with your finger.
Release the tape on the sides, and then lift up the thin strips one by one.
Step 5: Lift up the main strip, and then transfer it to a clean worksurface.
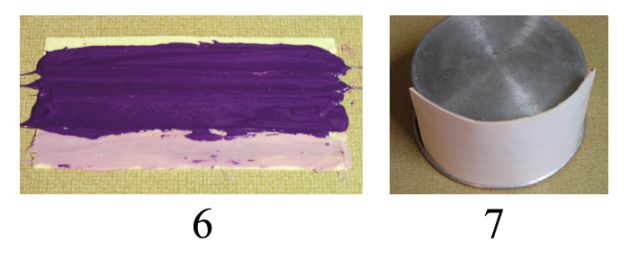
Step 6: Spread the colored chocolate onto the stripes. I actually piped
them into the crevices, and then spread with an angled spatula. It helps not to have your chocolate too fluid here.
Step 7: Wait for the chocolate to set up and lose it's sheen - it should be
set but still flexible. Neaten the side edges a bit by slicing off excess
chocolate with your spatula, lift up the strip, and then wrap it around the
sides of your chilled cake, chocolate side down. If you use the clear
acetate, you will already be able to see the pretty stripes at this point. Now you can also use a sharp knife to neaten the top edge in line with the acetate. Place this in the fridge to chill for a few minutes, so that when you peel off the acetate, the chocolate will have a nice sheen to it.
Et voila! Smooth chocolate sides with uniform stripes!
This is a very messy operation but well worth it for the effect. I did a cake
like this a long time ago, but with the stripes vertical instead of horizontal. I also used a comb instead of the thin acetate strips so it was nowhere near as neat as this. I've done the chocolate wrap (without the stripes) several times and I think it was easier for me because it is very warm here, and the chocolate has a longer working time. I have to wait longer for it to set up, but that gives me more time to dawdle.....
Like I said, it is warm here, so when the cake is at room temp the chocolate is soft enough to slice through, but firm enough to hold it's shape, so it does not crack all over the place.
Instead of acetate you could use wax paper, but since it is so floppy it might be a lot more difficult to handle. I looked at the cakework.com site, and I saw some of their cakes had a floppy top edge - for that look they probably did use something similar to wax paper so that it would droop down a bit when wrapped around the cake. ![]()


You are a true cake goddess TamiAZ! Thank you thank you thank you!!!!!!!! You rock!


Awesome!!! Thank you so much!!! I love to find out how people do these seemingly impossible looking cakes!

Wow! You guys are so awesome. Thank you all so much for replying to my question. I honestly thought I would get totally blown off. Thank you so so so much TamiAZ for the instructions. I will try this one day. You have all made my day!! God Bless! SW
This is the place to be CakePhun! You got a question? It will be answered if at all possible. This place is awesome!

If you go to www.beryls.com she has a TON of chocolate transfer sheets there, and a few that are stripped. I LOVE working with chocolate transfer sheets! I just got my cocoa butter in the mail yesterday, so I'm going to try painting on transparency sheets, and see what happens!
If you go to www.beryls.com she has a TON of chocolate transfer sheets there, and a few that are stripped. I LOVE working with chocolate transfer sheets! I just got my cocoa butter in the mail yesterday, so I'm going to try painting on transparency sheets, and see what happens!
I also ordered some cocoa butter.....what kind of coloring can you use with it? Must it be oil based? Thanks!
Good question, adven68! ![]() I wonder if Americolor could be used with the Flocoat? I believe that's what's recommended when coloring white chocolate or candy with the Americolors...someone correct me if I'm wrong, though! lol Maybe it would work the same way with the cocoa butter? hmmmm....
I wonder if Americolor could be used with the Flocoat? I believe that's what's recommended when coloring white chocolate or candy with the Americolors...someone correct me if I'm wrong, though! lol Maybe it would work the same way with the cocoa butter? hmmmm.... ![]()
![]()
my problem is that I do not have access to coco butter or flo coat. How do I color if no access to those things. I realllllly wanna try this for this sunday. any suggestions???

Thanks for all the gret info! Always wondered how that was done; now I can try it myself (one Day)!

Quote by @%username% on %date%
%body%