


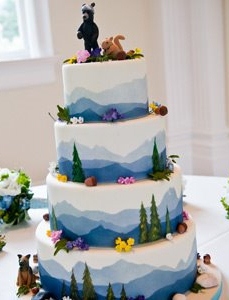
Any Ideas On How To Create This Mountain Effect??
Decorating By Spills Updated 6 Feb 2012 , 1:31am by Spills

Hey fellow CC'ers,
I've been asked to do a mountian wedding in May this year, and I have come across an effect block on how to achieve the blue mountains on the side of this cake (the picture was supplied by the customer, I'm not sure who did this cake). I have thought about just doing it out of buttercream, but on the picture it seems there are no signs of the images sticking out from the cake. I've also thought of airbrushing, but that's one smooth and solid air brush...I definately cannot do that. Then I've also thought of using those Wilton icing sheets, but they only come in light and dark blue - I've bought a light blue one to test it out, along with Periwinkle dust thinking maybe something could be done with that as well...
Of course, any and all ideas would be appreciated - I know there are some smart cookies out there 

Hi,
Thats one beautiful cake!! If this is Duffs cake then you can almost guarantee that its either airbrushed or painted.
How about etching out where you want the mountains to go on yr fondant and then painting them on?


It would seem to me that they wrapped a stencil around and airbrushed the distant, lighter blue mtns. Then, after drying, cut a second stencil, overlaid and airbrushed the mid-tone. The nearest mtns. were done with a third stencil, using the darkest blue. At least, that is how I would approach it.
It certainly is a gorgeous cake.
Jan
OK, here's my "I don't have an airbrush" idea for doing it.
I would roll out my gumpaste super thin, and let it sit for a little while to firm up a bit.
Then I'd get some acetate plastic that I'd already cut into the shape of the mountain silhouette, and smear some shortening on one side.
Lay the greased acetate on top of the gumpaste, the shortening will make it stick. Cut out the gumpaste with a scalpel to the shape of the acetate.
DON'T remove the acetate, pick up the whole thing and apply to your cake. Don't remove the acetate until it's in position and you're happy, then it should just peel right off.
Does that make sense? It works very well with silhouettes.
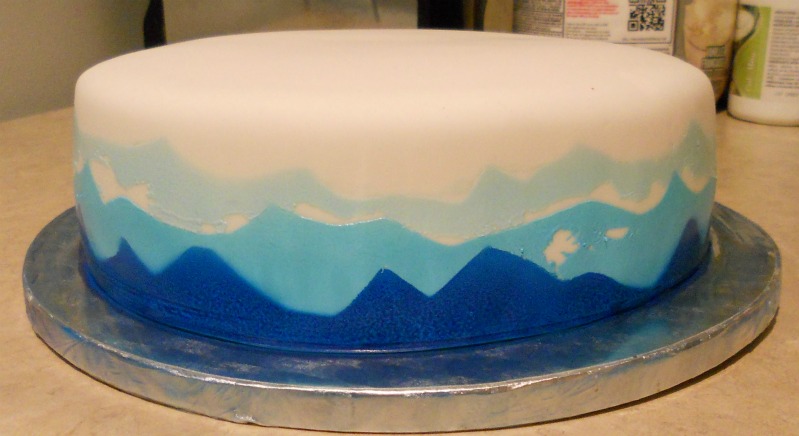
I think the airbrush is going to be the way to go - I'll just obviously have to be more patient with letting each layer dry completely (that's what tests are for, right?). I think it looks okay - and I think I blended the blue to be pretty close.
My next question would be, how does one secure the template to the cake so that the colours don't blend like some of my spot did? I made the template from parchment paper and taped it with small pieces of tape around the cake, then taped each template over the other as I went.
zespri:
Thanks for the idea - I'm sure that would work well, but I think the airbrush will be the way to go.
Quote by @%username% on %date%
%body%