


How Do You Evenly Space The Pearls/dots?
Decorating By sweetscene Updated 15 Feb 2012 , 8:33pm by cdmolina83

http://cakecentral.com/gallery/2246120/baby-cake
I'm sure there's a tool, but I can't think of what it would be called and my searches are coming up empty.... How do you even,y space out dots or pearls on a cake? Do you just use a ruler? Any ideas? I'm sure there's a trick to this...
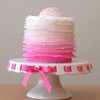
To me it looks like they eye balled it because they are not exactly even. If I eyeball spacing I start by placing a pearl on the outer portion of each side then 1 pearl in the middle then 1 pearl 1/2 between the left and center and another between the right and center. You can of course use a ruler or template as a guide.

If your "eye" is as bad as mine, there are impression mats with different spacing between the dots like this one
http://www.globalsugarart.com/product.php?id=18554&name=Earlene%27s%201%20inch%20Dot%20Impression%20Mat
Thanks Ibmoser - I think I may have that mat, if not, will be getting it! My eye tends to droop...

I am not sure if you have already made your cake but I was just looking for the same idea except more dots a lot closer for a Hello Kitty cake I am making. I found this DIY mat maker online. Here is the link.
http://cakes.keyartstudio.com/tutorials/item/87-diy-impression-mat-fondant-diamond-pattern-marker.html
I am sure you can make them further apart. Hope this helps!
cdmolina, That is a great tutorial. I do normally eye ball it but that's a huge help with placement.
I wish I could eyeball it. I am fine for a while then it goes sideways. ![]()
I will be doing this cake the second week of March so I will let you all know if it worked. I bought the pearl sprinkles to place inside the impressions. Does anyone know if they will stick with just water? Or should I use a frosting or melted candy?
OMGoodness cdmolina83, that is an awesome idea thanks!! I will be using this week!
Thanks!!! Post a pic when you are done! I have yet to try this although I am making the mat right now! I went to Dollar tree and got a 2 pack of the flexible cutting mats. Then Michaels to get get the adhesive pearls. I can't wait to use it! ![]()

Another way to do it if you don't need a lot of dots is to use a dividing wheel (wilton makes it, it has lots of circles and lines) and a ruler.

And you can use the cake marker like this one
http://www.google.com/products/catalog?q=wilton+cake+marker&oe=utf-8&rls=org.mozilla:en-US![]() fficial&client=firefox-a&um=1&ie=UTF-8&tbm=shop&cid=4098758973852670176&sa=X&ei=-_k7T7ONI4X42gXuu6DzBg&ved=0CGAQ8wIwBA
fficial&client=firefox-a&um=1&ie=UTF-8&tbm=shop&cid=4098758973852670176&sa=X&ei=-_k7T7ONI4X42gXuu6DzBg&ved=0CGAQ8wIwBA
to get the exact height wanted. So I'd use the dividing wheel for spaces apart and the marker for height. That way, you can have them further apart that the impression mat allows.
Cut yourself a piece of parchment paper the same height as your cake and long enough to go completely around it. Fold that paper in half horizontally, then in half again horizontally. Unfold. Your paper will now be scored horizontally. Now fold your paper in half vertically, and again, and again, and again. Now unfold and your parchment paper should be scored in a grid pattern. Wrap your paper around your cake and tape it in place. Make sure it is level with the surface of your cake. Using the grid lines as a guide, use a pin pushed through the paper to mark where your design is to go. Remove the paper and place your pearls etc. over the pinholes using piping gel. Voila! A perfect design every time because you can make a fresh template for any shape and size of cake. HTH
So I wanted to share the mat I made. It cost about $4 to make and took me about 15 minutes to complete. I cut my mat to size then taped it to my cutting mat I use for scrapbooking. I then began sticking away. Turned out fabulous! ![]()
The parchment paper is a great idea! I will have to try it sometime.
Here is the link to the picture.... I can't seem to get a picture uploaded on here.
http://cakecentral.com/gallery/2268844/diy-impression-mat
Quote by @%username% on %date%
%body%