

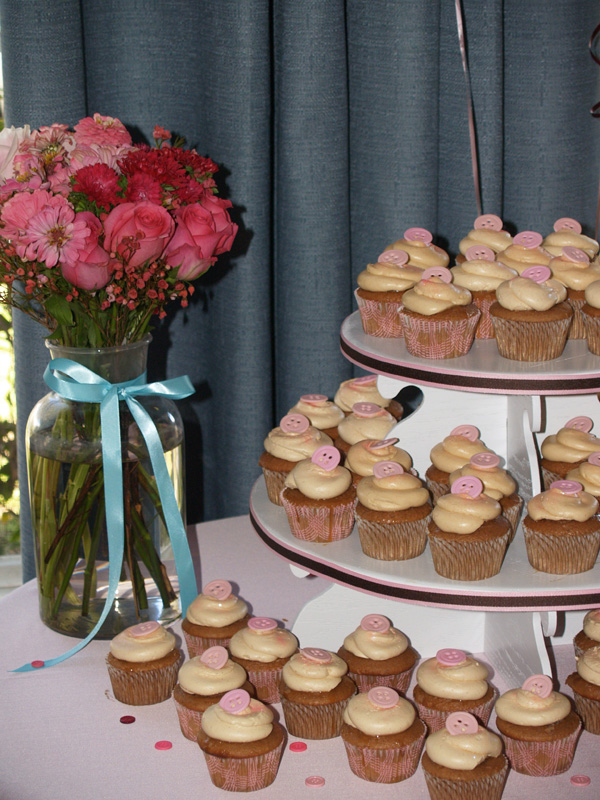
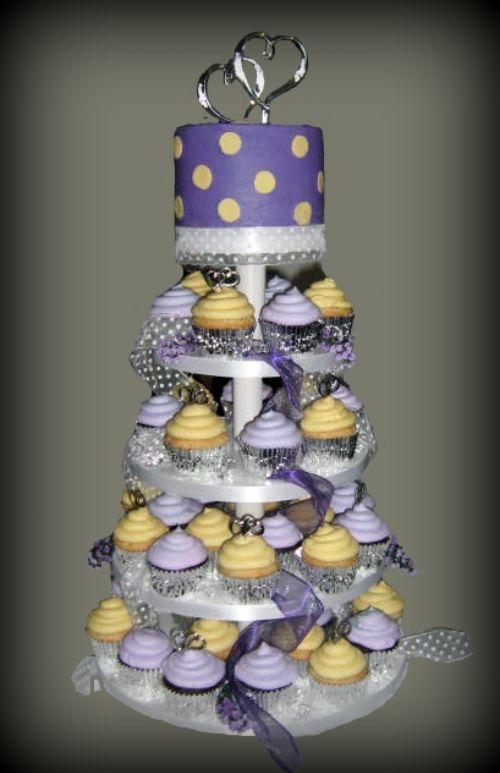
I need to do about 200 cupcakes for a wedding for my cousin in the fall and I see all these beautiful stands on here, but wow are they expensive!!! Do any of you make your stands and if so, are you willing to share your instructions? Otherwise, would it look alright to use clear plates and clear 4" pillars or is there too much space between the tiers? I noticed most stands have a middle pillar too. Just looking for advice and a way to save money! ![]() Thanks!
Thanks!


If you know someone handy with woodwork you could have them make you something. I saw this someplace (probably etsy) and asked my dad to make it. I called out the dimensions and drew up the scroll edge. I had him make the separators slotted so it can break down and store flat. Painted it white and add ribbon with double stick tape so I can change it out.
I hope that helps!
Afunk -that is a lovely stand. I will see if my dad can look at at the picture and figure out the dimensions etc. Thank you soooo much for sharing!
I made my own out of foam core board and cut out the circle sizes I wanted, then I used the styrafoam pieces for the middle. I used hot glue. I covered the middle stryafoam with ribbon and the sides of the core board. You can use two core board pieces hot glued together if you want it heavier duty. You probably could also use the cardboard rounds (a few of them glued together)
The only bad thing about this one is that it doesn't collapse down. I can take the pieces apart though and then reglue it if needed.
http://www.cakejournal.com/archives/how-to-make-a-cake-stand-for-cupcakes-or-mini-cakes
Here is the link I followed when making mine!
here is a pic

http://cakecentral.com/cake-decorating-ftopict-22674-stand.html
I'm currently working on convincing my father to make this one... Antonia was nice enough to give a detailed breakdown of hers
HEre are some cc links... hope this helps get you started if you want to make your own.
http://cakecentral.com/cake-decorating-ftopict-22674-cupcake.html+tower
http://cakecentral.com/cake-decorating-ftopict-667715-cupcake.html+tower
http://cakecentral.com/cake-decorating-ftopict-672752-cupcake.html+tower
http://cakecentral.com/cake-decorating-ftopict-671033-cupcake.html+tower
http://cakecentral.com/cake-decorating-ftopict-623452-cupcake.html+tower
http://cakecentral.com/cake-decorating-ftopict-657449-cupcake.html+stand

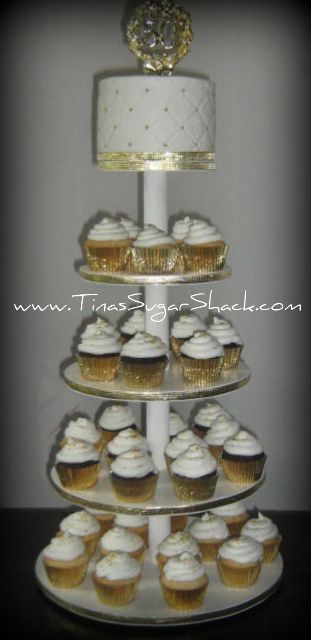
Here are the instructions for this one:
I bought MDF wood (medium density fiberboard) you could use plywood or anything else you wanted to use. MDF is very heavy, I bought 1/2" thick, but again any thickness you want is fine (I got 1/2" thick so I could use ribbon around the edges). I used my cardboard cake boards as a template to trace an outline onto the wood. Then using a jigsaw, I cut them all out, cutting just on the outside of my outline.
Once they were all cut out I used an electric sander to sand the edges up to my outline, making sure they were nice and smooth and that the whole thing was evenly round.
Then I used a drill and drilled a hole into the center of each round I had cut out (the hole needs to be just slightly bigger than the size of your center rod, my center rod was 3/8").
Then I bought a length of dowel that was 2" in diameter (I think it was a 2 or 3 ft. section), and cut it into 4" length and some into 6" length (for when I need more space between the layers of the stand). i drilled a hold through the center of each of the sections of dowel (it's easiest if you start on one end and drill a hole to the center, then flip it over and drill from the other side to the center, until your holes meet), the hole doesn't have to be "perfect" but you should attempt to make it at straight as possible, you can adjust the dowels before tightening the stand if they're not perfectly straight.
I bought a 3/8" nut for the bottom of the stand and a 3/8" t-nut for the top of the stand (this is a nut that has a flat top with three teeth that you pound the nut down into the hole and the teeth grab into the wood making it a permanent fixture with the wood, since my top is almost always the 6" board I just put the t-nut into that board and it allows a cake to be placed on top without interfering).
Then it was just a matter of screwing the center threaded metal rod (mine was 3/8" in diameter) into the bottom tier of the stand with the regular nut going underneath the bottom board (the nut will still stick out so I cut an extra 8" round and cut a large hole in the center to use as "feet" for my stand to sit on to alleviate the fact that the nut sticks out of the bottom, or you could just glue on some permanent feet, but I wanted to be able to change up what size the bottom layer would be depending on the numer of cupcakes i was using the stand for.)
Then just slide on one of your dowels onto the metal rod, then slide down the next sized board, another dowel, etc. until you've reached the desired height of your stand. Once you have the top board on (you'll have to thread it down because of the t-nut) and everything is nice and tight, then take a marker and mark the top of the top tier on the metal rod (there is no measurements for the metal rod because it all depends on how thick your wood is and how tall you make your dowels)...then remove the boards and dowel and cut the metal rod with a hacksaw a couple threads below your mark. You don't want the metal rod to stick up but you want enough that it can screw into your t-nut on top.
Then you can prime and paint the stand, I use spray paint and spray primer, for paint I use a semi-gloss so it's easy to wipe clean once it's been used. It's best to do several coats so if you get a scratch on the stand it won't show as much. In order to attach the ribbon to the edges (double sided tape won't stick to mdf) I use a hot glue gun, or extra strength glue dots for a more shear ribbon (note, when I use a sheer ribbon, I put a white satin ribbon on first, then the sheer ribbon because the edge of the mdf board doesn't take the paint as well as the rest of it)
Hopefully these instructions are clear enough, if you have any questions feel free to pm me or email.
Good Luck,
Tina
Wow! Thank you everyone for the tips and help! KHalstead - thank you for taking the time to type all of those detailed instructions out. Not only are you a talented cake decorator but also a carpenter!!! ![]()
I will let you know how this works out. I am not good enough with a jigsaw, so I will be begging for some help from my dad or husband!
Thanks again! I don't know what I would do without this site!

Try the Crystal Palace Cupcake Tree. It comes in round, square and floret styles and can hold 8 to 200 cupcakes (2 to 6 tiers). It's gorgeous and folds flat for storage and transportation. www.crystalpalacecupcaketree.com. ![]()
Quote by @%username% on %date%
%body%