


I am currently taking Course 3 at Michael's and Tuesday is our last class. I've made my cakes, one is covered in MMF and I still need to cover the other one. So I've made about 4 fondant (from box) roses and they look awful. Should I continue to make pitiful looking roses so I have something to bring to class or just wait so she can show me at class on Tuesday and then try making them again at home after she shows me.


1st of all, maybe they aren't so pitiful as you think!
2nd - I would continue to make them, because that is still practice. Then you can go to the class and fine tune it. But in the end, it comes down to practice!

Keep practicing! Like flamingobaker said, maybe they aren't as awful as you think! Besides, if you keep going and bring them to class, your instructor will be better able to help you (if you still need it), by seeing what you've done and how you've made your roses. Don't worry. With practice and guidance, you'll soon love your roses! ![]()

I don't use the rose cutter, and i don't put one pedal in side the other, i use about 10 circles, and two tiny ones, if you go to u-tube you can see how everyone makes them and pick the one that works for you, the rose cutter is to cumbersom sp for me, they break, i personally don't use the wilton fondant for cakes taste's awful, i use mm fondant

There are some tutorial links here that could help you. After you get the knack you will love doing roses, just wait till you try calla lilies they are super easy and look fantastic , keep trying you'll get it. post a picture I'm sure you'll get a ton of advice.

Keep making them. You will never have time to make them in class and they won't be set up and you'll be squishing them as you try to use those you can get made. But no way would you manage to make more than a couple in class. Without seeing what you've done, the one thing I found when I was in Course 3 was that as I was practicing I learned that I had to roll my fondant thiner than I began doing. Roll til you can see through it, then begin working with it. And, as someone else said, if you have them done, your instructor will be able to see where your problems are and guide you from there. But keep in mind, the more you practice, the more you'll find what works for you.

the wilton way where you have to take the cutter and cut the slits b/w the petal is a waste of time*. Buy the FMM 5 petal rose cutters through GSA. They are awesome.
Remember too when you are pulling your petals up #1 petal goes around the cone. Then #3, #5, #2 and #4. When doing the next layer turn your petals over. And attach your petal b/w two of the previous.
Qs:
Are you using the dogbone tool to soften the edges and make small cups on the petals?
Make sure your cone is neither too small or too large.
Tip: I use a piece of thin foam (you can buy at any craft store - in the kid craft section) with a hole in the middle to support each layer of petals so they dont break from the middle.
* I say "waste of time" if you are having to make a ton of roses there is no shame in using a cutter. For you to go through this hard way first is good (you gain a great appreciation)...everyone does it. Tonedna does a great youtube on what you are learning and as mentioned above she does mention the cutters.

I second the mention of tonedna's rose tutorial on youtube. My flowers grew by leaps and bounds when I started using her technique. My first flower was made using the Wilton book and it was pretty pathetic. My second flower was made using Edna's method and WOW. What a difference.
I was just thinking of what I wrote above while I was putting my son to bed and thought it wasnt descriptive enough go here for what I was just "touching base" on (these are good videos by Judy Brosco):
For the cone (shows two different methods):
http://www.youtube.com/watch?v=NrgfIiOY6fc&NR=1
For the bud (shows the cheap white foam I was talking about - its worth a million$):
http://www.youtube.com/watch?v=c6teAcewmZY&NR=1
- also the ball tool (not dogbone - sorry) is metal I love the ones from the clay section - donna dewberry's - they are my favorite tools to use on gumpaste
and the cutter I have has the wavy tips at the end of the petals LOOVE those too
Heres taking the bud and making it into a medium rose:
http://www.youtube.com/watch?v=8Im_zVSkkZU&NR=1
Heres the full rose:
http://www.youtube.com/watch?v=wzZY6NFyEkY&NR=1
Heres the calyx (her cutter is a wilton cutter in the rose set found at most craft stores):
http://www.youtube.com/watch?v=H-js9xcKGsU&NR=1
tip: DONT use egg white...use vodka (or any clear liquor but not rum) let me know if you need me to explain why
tip2: in the videos above the petals could be a bit thinner. The thinner you can get it the more realistic the rose becomes. Her base could be pinched a little more as she works along with each layered petal but thats probably b/c of the paste not being very thin
tip3: you could even put the paste "over" the flipped over cutter and take your rolling pin to roll over the paste to get a cleaner cut (tonedna describes this basic technique in some of her videos)
tip4: her calyx is an easy way but there are "mexican hat" techniques that are great too (research this or let me know if you need guidance if you come up empty)
tip5: if you master the above videos (and believe me its not hard and you will feel on top of the world!!) I would then suggest looking at Tonednas video on her Calla Lilly and take notice of her dusting technique. Dust your roses with a darker shade of dust than your rose. My favorite are light orange roses dusted with orange petal dust from GSA
tip6: get rid of Wilton gumpaste. Make your own by taking your fondant (upgrade that too to at least Satin Ice) and mixing it with Tylose powder (both found on GSA). Theres other techniques - I like Tylose
Tip7: Dont store your formed roses lying on their side on a hard surface. Having the wire (if wired) stuck in styrofoam
Tip8: When hanging roses to dry upside down you can snip/cut makeup white sponges (found at Target/ Walmart) to tuck b/w petals to give them a more open full look.
Tip9: Cut down on sticking by dusting your surfaces with cornstarch or a 50/50 mixture of PS and cornstarch. Put (1 to 2 inches worth) this in a knee high stocking and knot the end some what close to the mixture. Dont fuss with that wilton pouch.
Wanna go rogue and not use any tools at all? Try this (pinch/cut off the bottom when done with top of rose of course for roses to be placed on/near cakes - hide the bottoms best you can when arranging):
http://www.youtube.com/watch?v=CBWYlklg6AU&feature=related

All good advice but I would like to add...keep one of your first roses and then in a year or two compare them to what you can do after experience. My first ones were awful but I loved the last ones I did. This isn't a very good picture but you can see the difference. Oh, and in case I haven't improved as much as I thought, the first ones are on the left ![]() .
.
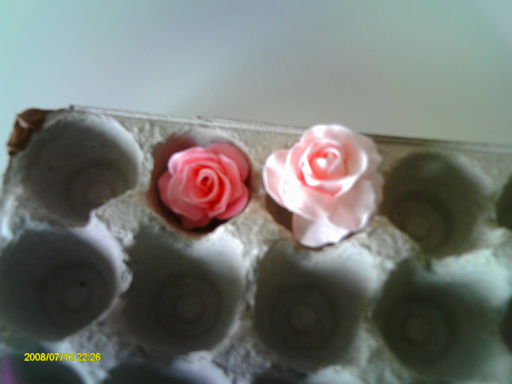
All good advice but I would like to add...keep one of your first roses and then in a year or two compare them to what you can do after experience. My first ones were awful but I loved the last ones I did. This isn't a very good picture but you can see the difference. Oh, and in case I haven't improved as much as I thought, the first ones are on the left
Um, well heck yeah you've improved. Your first ones were very nice already, but now they are very realistic looking. Beautiful.
I think it's a great idea. I wish I had kept my earlier ones for the same thing. When I learned to make them I kept my first ones to compare with my finished ones for my final cake and saw a big difference already. Hopefully I've improved since then too...... lol I love making roses and want so much to just get them as beautiful as some that I see. I know I have to get a larger cutter to get them more realistic. One of these days I'm going to just get that done, and sit and play with roses to my hearts content.
Quote by @%username% on %date%
%body%