


Royal Icing Transfer (Rit) Pictorial!
Decorating By cakehelp Updated 18 Jan 2015 , 11:53pm by PattyCakes4All

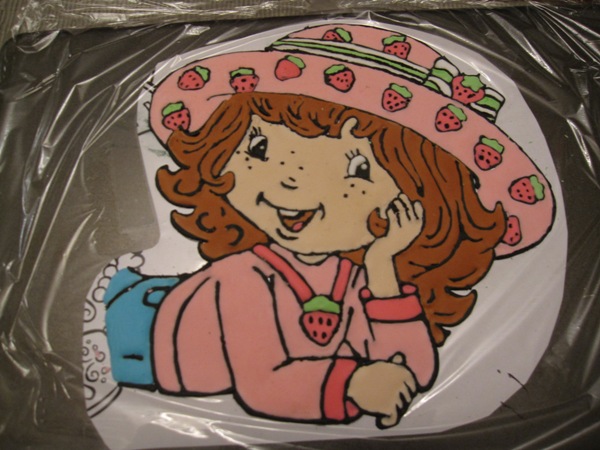
Well, I tried a RIT for the first time on Wednesday. I'm fairly happy with how it turned out but now I'm petrified to take it off the plastic wrap! Are there any tips that I should try? It's taped to the back of a cake pan so I'm thinking that I'll have to put something over it (like a magazine?) to support it while I flip the pan over but then I'm concerned that the RIT will break in the process! I spent way too much time on it for it to break!! If I can get it on the backside successfully I would like to reinforce it with more royal icing as it will be going onto a buttercream cake. Is this the best way for me to get the RIT off the plastic wrap? Thanks!!

Well, I tried a RIT for the first time on Wednesday. I'm fairly happy with how it turned out but now I'm petrified to take it off the plastic wrap! Are there any tips that I should try? It's taped to the back of a cake pan so I'm thinking that I'll have to put something over it (like a magazine?) to support it while I flip the pan over but then I'm concerned that the RIT will break in the process! I spent way too much time on it for it to break!! If I can get it on the backside successfully I would like to reinforce it with more royal icing as it will be going onto a buttercream cake. Is this the best way for me to get the RIT off the plastic wrap? Thanks!!
Wow, your transfer looks amazing! I know how you feel about removing it, that part is the hardest ![]() The transfer looks really big, is it? The bigger it is the harder it is to remove it. I have never done any piece larger than about 15 centimeters (approx. 6 inches). At least you don't have any fragile pieces sticking out so that will help you.
The transfer looks really big, is it? The bigger it is the harder it is to remove it. I have never done any piece larger than about 15 centimeters (approx. 6 inches). At least you don't have any fragile pieces sticking out so that will help you.
If you put a magazine ontop of it it will break for sure. I will try to explain how I would do it, hope you can follow. First of all, if the plastic is taped to the cake pan, you need to remove the tape somehow. Cutting it away with an exacto knife or something is probably the safest way. If you mean that the paper with the image on is taped to the cake pan, then you don't have to do anything.
Alternative 1:
Carefully drag the plastic so that the bottom of the transfer will get closer to the edge of the cake pan. Once you have the egde of the transfer on the edge of the cake pan slowly pull the platic downwards making the transfer slide off into the air. It will be sticking out from the edge of the pan. Take something that is flat and hard and will stay flat, like a chopping board or something, in your left hand and carefully support the part that is hanging out while you continue to drag the plastic with your right hand, sliding the transfer onto the chopping board. Once the whole transfer is on the chopping board, the plastic will be gone. I would then carefully just slide it onto the buttercream without trying to reinforce the back. If you can get it on the cake without breaking it, it will not break while it's on the cake.
Alternative 2:
Lift the cake pan up with one hand (left if you are right-handed). Take something hard, flat and non-heavy, like a piece of cardboard maybe in your other hand and hold it ontop of the transfer, close to it but not letting the weight of it rest on the transfer. With a quick movement, flip the whole thing over and lay it down on a flat surface (not letting the weigth of the cake pan ever rest on the transfer), the transfer is now face down on the parchment paper. The plastic can now be removed, and if it breaks do as in alt. 3.
Alternative 3:
This is what I usually do, but I don't know where the RIT size limit is for this type of lifting.
Take a hold of the platstic with both hands at the top of the image, drag it slightly towards the edge of the cake pan, so that the plastic is not sticking. Carefully lift the plastic with both hands, dragging it upwards and towards you at the same time. Once you have it free from the cake pan, hanging in the air you carefully lay it down (face down) on a piece of parchment paper. When it is laying down, you can remove the plastic. If it breaks, you can push the pieces together where they cracked. Then you can fill in the back. If it was broken and you pushed it together, the cracks are usually not noticable. Mine break all the time, and I still use them.
Anyway you try to remove it, it will break if it is not completely dry. So, make sure you have left it to dry long enough. How long depends on the size, the bigger it is the longer time it takes.
I hope this helps you a little. It is hard to explain in words how to do it... Please post your experience when you have gotten it off the plastic. I would love to hear how it turns out. And remember, if it breaks it can usually be fixed.
Good luck!
/Sara
Wow! Thanks for all of your help! I don't have to put it on the cake until Saturday so I will let it dry for a few more days before I try to remove the plastic. It just seems so fragile and yes, it is big - about 17 cm x 17 cm. I'll definitely let you know how it goes! Thanks again!!

One thing I've done before is flip it onto its right side (right side will be facing down), take the plastic off the back (I usually pat mine w/ parchment on top of the back so they are level). then lay a tuff board (they are the ones that are grease resistant & VERY light weight). Put a hand lightly on the tuff board then flip & remove the plastic on the top (right side up now). then it will slide off the tuff board easily onto the buttercream. Don't underestimate though b/c it will slip off & break b/c those boards aren't like cardboard, they are almost "slick".
You'll be able to pull it off. Like cake help said, they can be "pieced" together if you have to. One thing you might do (I do all the time) put the RIT in the oven w/ just the light on. It produces more heat than a cold oven but not so much it cooks it. good luck

So glad I saw this post!!
I saved the original RIT tutorial that was posted and I went to check now and it has "gone"!!
Thanks for posting again Sara, I will really have to make sure that this gets kept in a safe place now...
Many thanks....


I get a lot of questions on the royal icing transfers I put on my cakes. I took a lot of pics a while back when doing some, and I finally got around to putting them together. I hope I have explained everything, but I probably didn't
http://www.cakecentral.com/modules.php?name=gallery&file=displayimage&pid=1443615
/Sara
I just found this thread so I haven't read through it yet so I don't know if this has been addressed or not but the link you posted is not working. Says "specified photo does not exist." Is there another link?

Very nice looking transfers!! It's awesome that cakehelp was able to post the tutorial. It's great to have this broken down in steps. Everyone's cakes are beautiful.
As a Wilton Method Instructor, I teach this method during Course 2. Only we use a product called Color Flow (does not contain cream of tartar that meringue powder does) Most everyone falls in love with this technique and uses it most regularly.

Thanks so much for the wonderful tutorial! I am going to have to try this out soon. These would be great for cookies!

I get a lot of questions on the royal icing transfers I put on my cakes. I took a lot of pics a while back when doing some, and I finally got around to putting them together. I hope I have explained everything, but I probably didn't
http://www.cakecentral.com/modules.php?name=gallery&file=displayimage&pid=1443615
/Sara
I just found this thread so I haven't read through it yet so I don't know if this has been addressed or not but the link you posted is not working. Says "specified photo does not exist." Is there another link?
They wouldn't let her post it Bob so the tutorial is on page 2.

this is awesome!!! and just in time for my daughters birthday next month!!! Thanks.. .could you please PM me the pictures so i dont lose the tread, or even email them to me... you are awesome!
this is awesome!!! and just in time for my daughters birthday next month!!! Thanks.. .could you please PM me the pictures so i dont lose the tread, or even email them to me... you are awesome!
Thanks! The pics are on page 2 of this thread, you can download them from there. Just left-click and choose save.
I get a lot of questions on the royal icing transfers I put on my cakes. I took a lot of pics a while back when doing some, and I finally got around to putting them together. I hope I have explained everything, but I probably didn't
http://www.cakecentral.com/modules.php?name=gallery&file=displayimage&pid=1443615
/Sara
I just found this thread so I haven't read through it yet so I don't know if this has been addressed or not but the link you posted is not working. Says "specified photo does not exist." Is there another link?
They wouldn't let her post it Bob so the tutorial is on page 2.
I tried to edit my first post to say where the pics are, but I can't figure out how to do it... ![]() I cannot find any button or anything to press for edit... Maybe it's because I'm tired, haven't slept a full night in several days. To many cakes to make
I cannot find any button or anything to press for edit... Maybe it's because I'm tired, haven't slept a full night in several days. To many cakes to make ![]()
Can anyone tell me how to edit the first post?
THANK YOU so much cakehelp for this thread! I tried my hand at RIT last night for the first tme and it came out so much better than I thought it would and it was soooo easy! I looked at them this morning and they came right off the plastic wrap with no problems! ![]() I love techniques that are easy but make me look like a genius to non-cakers!
I love techniques that are easy but make me look like a genius to non-cakers! ![]()
I will post pictures in a few!
kathy 777..........go to page 2 of this thread and you will see the tutorial!!

thank you so much for sharing this tutorial! ![]()
thank you for this thread...it helped me a lot!
hi everyone, i need some help pls!!! k so i made a RIT of a thomas the train, and i have noticed that when i was doing the flooding, the black outline was breaking on me, so i will go over it again, just to make it stronger, now im soo worried that it will break on me, will it be ok if i just cut around the wax paper and place it directly on a buttercream cake?? sorry i know in the tutorial you said to use plastic wrapm but my wilton instructor told us to use wax paper, is this now ruined???
thanks in advance!!
baby

you could do this with candy melts and chocolate as well on wax or parchment paper.
Has any one tried this process with candy melts?! I have a bunch of candy melts left over, so I was wondering if I could put them to good use!
Sounds like you didn't make the outline thick enough. What tip did you use? I used a 3 and very stiff RI and it worked real well.
i used a number 2, should i just go over it again? also, can i put it on the cake with the wax paper??
hi everyone, i need some help pls!!! k so i made a RIT of a thomas the train, and i have noticed that when i was doing the flooding, the black outline was breaking on me, so i will go over it again, just to make it stronger, now im soo worried that it will break on me, will it be ok if i just cut around the wax paper and place it directly on a buttercream cake?? sorry i know in the tutorial you said to use plastic wrapm but my wilton instructor told us to use wax paper, is this now ruined???
thanks in advance!!
baby
Sounds like you didn't make the outline thick enough. What tip did you use? I used a 3 and very stiff RI and it worked real well.
i used a number 2, should i just go over it again? also, can i put it on the cake with the wax paper??
I use a number 2 tip if I want a thick outline, and there is not too much detail, but for most of my transfers I use a number 1 tip. So, I don't think it broke because it was too thin. I have no idea what happened to you. I accidently break the outline in places sometimes by bumping into them with the tip while flooding, otherwise they tend to stay intact. But it sounds like your flooded colors stayed where they were supposed to? If the outline breaks, the flooded areas can drip through. If everything stayed in place I would just go over the damaged areas and fill in the outline.
I think you can do them on vax paper, but I have not tried. I imagine it will be a bit more difficult to get it off without breaking it. I think people do it with candy melts on wax paper though.
If you are worried about it breaking you can do as you suggested, cut around it and put the whole thing on the cake. Just remember to remove it before cutting 
/Sara
thank you soo much sarah!! yes the flooding did stay in place!! ill just go over it again, the cake is for friday, it should be dry enough by then?? ill post a pic when i get home from work
thanks again!!
Yes, it should be dry by friday, unless it is really, really big ![]() Yes, please post pics, I would love to see.
Yes, please post pics, I would love to see.
/Sara
I've done many with candy melts. There are cakes in my pics. My most labor intensive was the nativity cake. Whimsical Bakehouse does these all the time
you could do this with candy melts and chocolate as well on wax or parchment paper.
Has any one tried this process with candy melts?! I have a bunch of candy melts left over, so I was wondering if I could put them to good use!
I haven't done it myself but I've seen Jennifer Dontz do them with candy melts -- she makes it look sooo easy! ![]() I know Sugarshack also did a carousel cake using transfers done from candy melts for the horses. Very cute! If I can find my pix of Jen's cake (she did a demo cake) I'll post it.
I know Sugarshack also did a carousel cake using transfers done from candy melts for the horses. Very cute! If I can find my pix of Jen's cake (she did a demo cake) I'll post it. ![]()
So I used the tutorial and made a great Tinkerbell transfer. I put it in the butter cream and it bled through within 2 hours. So I immediately took it off and put sugar cubes in the cake and put the RIT back on it. I thought I read that someone put on on buttercream and it did not bleed after 3 1/2 days. Any suggestions???
Well, I finally finished my cake with the Strawberry Shortcake RIT. Thanks cakehelp for your instructions and help - it worked perfectly!! Initially I thought I was going to have a problem taking the RIT off the saran wrap but it was just stuck to the pan. Once I got the saran loosened off the pan the wrap came off without any problems. I also put the RIT on the buttercream about 8 hours before the party and put the cake into the fridge until the party started. There was no bleeding issues but the transfer did cumble as I cut the cake which was not a problem. I'll definitely do this again for another character cake! Thanks again for all of your help!!

Quote by @%username% on %date%
%body%