


First of all, I want to thank Couturiere, for sharing with us her wonderful cakes. As soon as I saw her Legally Blonde, I just felt in love with her cake, and I wanted to do something alike. Her Chihuahua is really something!
So, I made an easier sample, which I decided to share with you all ![]()
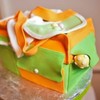
I baked a rectangular cake, I cut it in 3 pieces, piled it with ganache, and then carved it. [/url]
I used the ribbon cutter to pattern the fondant (MMF), and cut it with a pizza cutter to fit each side of the bag.
Then, I applied some buttercream to the cake and applied the mmf.

Then I made a "string" out of mmf and glued it with water on the joint parts
Always using MMF I also made the strap
To simulate a zipper I used royal icing with a #1 tip in an icingbag. I reshaped each "teeth" with my fingers.
Then I painted it with golden edible dust with vodka.
With the remaining of the carving process together with buttercream, I made cakeball dough. I made the chihuahua head, covered it with MMF, and then, because I had no brown color, I used instant coffee to color it ![]() It gets really shinny (too shinny for my taste).
It gets really shinny (too shinny for my taste). 
I made the colar and the legs with mmf too. And once again I used the ribbon cutter. 
I made a kerchief with a very thin mmf layer. Then I pressed some patterns and painted it.
And my little girl, to whom the cake is for (7th birthday), dusted the whole cake with pearl dust
You can also see the picture I uploaded in CC in this link
http://www.cakecentral.com/modules.php?name=gallery&file=displayimage&pid=1320113
Thanks for looking and reading!
I hope it gets useful for someone!![]()
![]()
![]()
![]()
![]()
![]()
![]()
![]()


What a great tutorial! Thanks so much for posting it!!!


Wow! maybe I could try it too!
Can you or anyone tell me what kind of cake should we use to make this? Pound cake maybe?
Thanks!
Well I used my favorite cake. I just posted the recipe but it seems to take a few days to appear. So I shall write it here.
The recipe is an old English Victorian one, and it is by far, my favorite one
But it's not in cups...
For this cake I made 2 times these quantities
200g of chocolate (take a piece for the toping, like 40g)
100g flour
1 teaspoon baking powder (optional but better)
250g sugar
125g butter
6 eggs
I start by heating the oven an putting inside a bowl with the butter and chocolate. Then I beat the egg whites until picks are formed and then let them aside.
Beat very well the yolks with sugar, then mix the melted butter and chocolate. Once it's all very well mixed, fold in egg whites and flour.
Not very hot oven (160ºC / 325ºF), until the stick comes out clean.
Take it from the pan and spread on top the rest of the chocolate melted with a table spoon of butter.
Very moist but firm. Better the day after.
In case you want to see the recipe later, it's under the name of Victorian Chocolate Cake

Well, the recipe is finally out in the recipe pages.
So just in case someone would like to save it, here it goes
http://www.cakecentral.com/cake_recipe-7404-0-Victorian-Chocolate-Cake.html
II would like to thank you all, once again, for all your nice comments.
Obrigada, as we say it here in Portugal ![]()

Quote by @%username% on %date%
%body%