


I'm new to cake decorating; I've just completed Courses 1 and 2. I can make flowers and basket weave and that sort've stuff. My question is: Can anyone tell me what the best method is to making a professional looking themed birthday cake (e.g., Sponge Bob, Scooby Doo, Elmo, etc) without using the stars. I've seen beautiful cakes that looked so professional with a picture of Sponge Bob. I ran across the Frozen Butter Cream Transfer idea last night. Is it easily done? I've had no luck at all with using piping gel on a traced sheet of waxed paper. My main intent in getting into this was to make cakes for my grandchildren. Now that I'm involved, I want the cakes to be beautiful and somewhat professional looking.
Betty Jones

Yes I love doing fbct. It's a nice way to copy pictures in detail. Just make sure it's thick enough to put on a cake without breaking, but not too thick that it sticks up too far of the cake. Give yourself plenty of freezer time. Following the directions on this site is what I always do. Good luck!
Shelleylynn

Yes, I love the frozen buttercream transfer method. Just be sure to follow the directions exactly. Take a look at my gallery. The spiderman cake and the Dora cake are fbct.

when you use the gel trasfer method, you pipe your outline and let it dry a little, then place your parchment paper with your outline onto your cake and with a brush or your finger,
brush along the outline to press it into your cake, or follow the outline with your finger to do the same thing.

I like the FBCT a lot. (I like the look of chocolate transfers too but chocolate and I don't get along...if you are interested, you can search for threads in the forums...). In my gallery, I have a few FBCTs if you want to look - Elmo and the fire dept. graphics like the maltese cross, a fire hydrant, etc.
Try something simple for your first one - they turn out great.
Here's a link with really good directions on how to do the FBCT. Yes, I've used it a lot it works great.
http://sdbytracy.com/frozbutter.htm
I forgot to mention one tip:
Use saran wrap instead of parchment paper.
I read she says in the instructions to print out the image in reverse/mirror. Does anyone know how to do that? I would love to try this (thanks for asking bjones3) I had never heard of this before.

I read she says in the instructions to print out the image in reverse/mirror. Does anyone know how to do that? I would love to try this (thanks for asking bjones3) I had never heard of this before.
Your printer may give you the option...or open the picture up in Paint and click Image..then flip/rotate and flip it around! Then print it that way.
I have done quite a few FBCT's they are soo fun and soo easy and look soo good..they are my favorite!!
The best way, IMHO to do a FBCT is to do it really thick..then put it on a crumb coated cake only...then you can ice up to the fbct and smooth the whole thing..so it is all the same height...hope that makes a little bit of sense!!


I've seen some beautiful ones here on CC but have not had any luck myself with the FBCT. I tried one last week of Tinkberbell and although the face came out decent (which is where I would have figured having problems but didn't) the body outlines were very messed up. Seems they didn't really stick enough to the wax paper and may have shifted during the "color fill" stage. Are there any tips for doing the outlines?
Craftyones65, most printers give you a mirror print option in the printer properties. Try pressing Ctrl+P to get the print window and then choose either properties or check the options for this. HTH
Thanks for the help...I can't wait to try one. I only decorate for fun and practice. Seems silly but I'm excited today cause I've always had a problem figuring out where to take my practice cakes. Called the local daycare in town and she was very happy when I asked if I could take in my practice cakes. May need to try one of these with an elmo picture....hehe


As far as the printing in reverse goes, if there is no writing, then it really doesn't matter. But if there is writing in the image you use, you definitely have to reverse it somehow. You can usually find the option in the Print box when you click on Print from the File menu. Another thing I do sometimes is to take a page that I have printed and flip it over so that the blank back side is up, then I fold up a paper towel and dip a bit into some vegetable oil, and I brush it onto the back side of the paper. It will make the image visible from this side of the paper, then you can add the wax paper/parchment/plastic wrap/whatever you use and go on to the next step from there.
Also, I forgot to add that...between colors and stuff, I'll dip my finger in powdered sugar and pat the icing down and smooth it a little...it removes a lot of the airbubbles that way....kind of the same concept as tippyad...helps the FBCT meld as one..never had the outlining seperate doing it this way!!
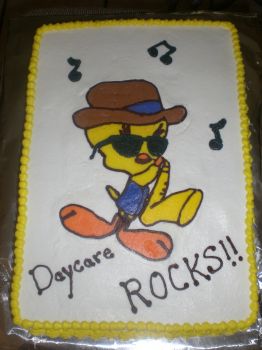
I tried it and love it!!! It's a very cool idea...thanks so much for starting this forum. I've never inserted a picture but I'm going to try. Donated this one to our local daycare.
Quote by @%username% on %date%
%body%