


I am going to attempt my first MMF thursday. I am actually going to be making a go kart cake that BJFRANCO did and the fondant will be used as the road and will need to be black. First of all what is the best way to make black MMF? And second, I need other colors too like orange and blue. When I am melting the mm do I place portions in seperate bowls to make each color? I dont understand the best method for doing that! Thanks so much for anyone who can help with this weeks challenge!

The best color for black, is Americolor. It works best to add it in the beginning with the liquid to melted marshmallows. It takes a LOT of black to get black fondant.
Break the MMF recipe down into half or quarters. It reduces easily, and color the smaller batches at the beginning. It is a lot of work to add color to already made fondant.
You could also paint the road black with charcoal dust mixed with a tiny bit of lemon extract or vodka.
MMF in general: don't add all the sugar the recipe lists. Save some back to add while kneading. If you add unnecessary sugar, your fondant will be dry and crack when you to to use it. Shortening can help that.
JoanneB-can you fly to Kentucky and help me make it!!! ![]() I am so nervous. So when you suggest breaking down the MMF recipe you mean make a half batch solely for black. Then make a fourth of the batch for orange, and another fourth of a batch to make blue? Is that how I understand it? And at what point do you knead it? I printed up the tutorial and I did not see where they mentioned kneading it, is it after you have placed the color in and it forms the dough, then knead? OMG I am stressing myself out. I am going to have to have a back up plan for sure!!Thanks for your advice!
I am so nervous. So when you suggest breaking down the MMF recipe you mean make a half batch solely for black. Then make a fourth of the batch for orange, and another fourth of a batch to make blue? Is that how I understand it? And at what point do you knead it? I printed up the tutorial and I did not see where they mentioned kneading it, is it after you have placed the color in and it forms the dough, then knead? OMG I am stressing myself out. I am going to have to have a back up plan for sure!!Thanks for your advice!
Kentucky is a bit far just now...relax it isn't that hard. If you think that you need a LOT of black, make a 1/2 batch. It lasts a very, very long time (double wrapped and in an airtight container) so start now if you can. Then you will have time for a plan B.
http://www.cakecentral.com/cake_recipe-2137-23-Marshmallow-Fondant.html
This recipe can be cut into 1/4 ths easily. Weigh the marshmallows.
Like it says in the recipe, start with only about 1/2 to 3/4 of the sugar. I stir it until it holds into a mass. I put some of the reserved sugar on the counter, and dump the mass onto it. Watch for hot marshmallow spots, and Knead the mass until it is smooth. If it looks like it is holding together, move the extra sugar out of the way, grease the counter and knead it some more. It should NOT be sticky, but don't make it so dry it is cracking. Let it rest at least an hour. If it is dry, you can knead in a tsp or so or shortening. that will help with the elasticity. You should not have a problem with a small batch.
Sorry JoanneB- didnt' mean to make it your problem. I have a few days to thoroughly think it through and practice it! I am just a little stressed because I have never made fondant, I dont have a thick 12'' round cake board to deliver it on yet, and I have to purchase everything I need still. But I can do it. Thank you for your help again!

hi
this is the small mmf recipe i find it is great if you are making accents for your cake in different colors.
1 cup of marshmellows
1 tablespoon of water
1 to 1/2 cups of confectioners sugar
melt marshmellows and water in microwave for about 20 to 30 seconds.
stir to combine water and marshmellows then add your color, the color this turns into will be the color you get after adding the sugar.
add some of the sugar and stir it as much as you can, then use crisco on your hands and knead in as much sugar as it requires to get a dough like consistancy.
thats all, its very quick and easy to make, i can make six batches of this in about a hour.
kylie

If you didn't mind chocolate on your cake, you could add melted unsweetened chocolate to your MMF (proportionate to amount of MM and sugar, 1 square for a large recipe), and then add your black food coloring, it will take a lot less and probably taste a lot better. There is a thread on this in the Cake Decorating Forum right now, so I'm just passing on the info from there.
Janice

Something else you might consider is to "paint" your black instead of adding it into your fondant. I've seen this done by the pro's on the food network. they seem to do this with darker colors. They just use food coloring pastes or powder food coloring.
Jacqui
princess3
i just melt the marshmellows and water in the bowl then add the sugar to the bowl and stir then i use my hands in the bowl just to combine as much as i can then i tip it onto the counter and knead the rest until it looks like dough.
kylie
Here is a link to a helpful webpage that I saw someone post on here once:
http://whatscookingamerica.net/PegW/Fondant.htm
One think I have done differently though, I use cornstarch to keep everything from sticking, especially when rolling out the fondant to cover a cake. I guess I just can't stand the idea of all that greasy crisco. ![]() Just think of how you'd sprinkle flour on your counter and rolling pin when making biscuits or kneading bread, only with cornstarch.
Just think of how you'd sprinkle flour on your counter and rolling pin when making biscuits or kneading bread, only with cornstarch.
What I did use Crisco for though, was to give the finished product a shiny look, as it has a matte look originally. If it's for figures or pieces that are going to dry, let them dry out first and then "paint" a thin application of Crisco on to make it shiny. (This might look good for a car.)
Another idea for asphalt: If you color your fondant with black food coloring (So far wilton's black has worked fine for me), I bet it would look great if you picked up some of that large granule decorative sugar (Like you see on the top of Perkin's muffins!) and color that black. Coloring sugar is easy, just take a few spoonfools in a small bowl, and a few drops of food coloring or a dab of coloring paste and mash and fluff it in with a spoon until it's blended. Putting the black sugar on top of the black fondant would look great for asphalt, I'll wager. You could either paint on some water to moisten the fondant so the sugar adheres, or use the all purpose "glue" of mixing a touch of powerdered sugar, a drop of whatever color you're gluing to, and enough water to give it a good consistancing to apply with a paintbrush.
Monica you can't see me but I am blowing kisses to you!!!! Thank you so much for all the wonderful tips. I am nervous but anxious to do it. There is another thing I would need to know, as I will probably pm the maker of the cake I am going to do, is how do you cut it into the shape you want. I need to make some orange cones. Do I just pull a piece and roll it until it forms one do you think? And the road wraps around the two stacked layers. It is bjfranco go-kart cake if your interested in taking a look! I wrote down everyones notes they gave me so I should be ready to go!
Well, as I am not sure what you are or arent ok with, I'm going to go ahead and outline every step of what I would try if I were to take a stab at this cake. Sorry if I'm saying a bunch of stuff you already know, heheh.
2 OR MORE DAYS AHEAD
1) Make MMF
If you can do the quarter or half batches, thats fine. I'd suggest doing a quarter batch where you add the black coloring during the marshmallow meltdown, just to make life easier. The rest of the colors is up to you. I personally would probably just knead in color to chunks of plain white mmf as needed, to avoid the hassle of measuring out all those quarter batches of orange, green, blue, red, and white, particularly as you only need small amounts of each of those colors.
2) Make figures.
Usually you want to make figures at least a day or two ahead if not sooner so they have time to dry. Drying makes sure the figures dont get literally "bent out of shape". To help them dry hard, try sprinkling a pinch of Wilton's GumTex over the chunks of fondant that you are working with and kneading that in. It helps it dry firmer, and GumTex is so easy to find that even my local Walmart stocks it.
Traffic Cones: Sprinkle some cornstarch on your work surface and rub it around to keep the fondant from sticking. Don't forget to rub some on your rolling pin too, and roll out a thin layer of orange fondant. Cut out squares approximately 1 inch in size. This is the base of the cone. Smash tthe rest back into a ball, and eyeball breaking off a chunk for the cone. Sometimes cutting a small square of parchment paper and placing that ontop of the fodant ball before rolling it around with your fingers helps avoid that lumpy look you often get when trying to roll out any kind of tube like shape, as it disperses the weight of your fingers a little bit. No big deal though. When you have the cone shape, just "glue" it to the base with a dab of that paste made out of a bit of powdered sugar and water. Then you can cut out small rectangle of white fondant to glue around the tip of the cones. That part will probably being annoying as hell, as trying to delicately work with pieces that small tends to be. ![]()
Cars: I'd probably just eyeball the general shape of the cars. MAKE SURE THE CARS DO NOT EXCEED 2 INCHES WIDE so they fit on the road! The wheels could probably best be made by rolling out small, equal sized balls of black fondant, then gentle mashing them down betwen the counter and something flat like the bottom of a glass. That would create a wheel shape , which could be glued onto the car. The steering wheels look like you would roll out a tiny tube of black, bent into a U shape and stuck onto the car. Make the heads out of balls of colored fondant, and the masks out out little bits of black fondant pasted onto the head. Quick tip for all this pasting: mix up a little of the glue, only just liquidy enough to pipe a drop out without it going all runny. I like to mix up a little bit, then put it in a parchment bag with a number 2 or 3 tip so I can pop drops of glue precisely where I want them when I'm doing a lot of gluing together.
If you want to do the little happy faces on the flesh colored fondant balls and dont feel like buying markers, you can always tint a little glue black and just paint that face on with it using a fine tipped paintbrush.
And remember, painting crisco on dried fondant makes it shiny and cool!
1 DAY AHEAD
1) Make Buttercream
If you make it the day before you're going to decorate, it's one less thing for you to worry about. I just put some saran wrap over the mixing bowl, stick it in the fridge, and take it out in time to soften the next day.
2) Bake Cakes
You should have no problems with baking the cakes the day ahead, and then just putting some plastic wrap over them. Not only does this give you the day of to focus only on your decorating, you'll have time to actually do something about any unforseen problems. (Like ONE cake pan baking up all funny and lopsided while all the rest come out fine. Is it just me or does this always happen? lmao)
OMG IT'S D DAY
Here were my observations about the this cake:
1) Carving
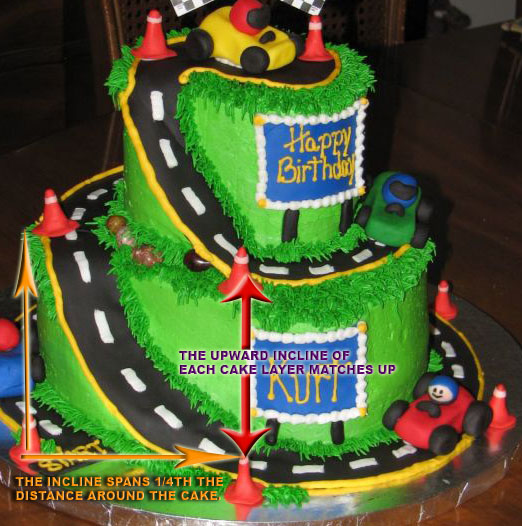
The first guideline I would use is that the slope for each tier covers a quarter of the distance around the cake. SO if you separate the cake into 4 quarters, you know exactly where the begining and the end of each slope should be. Also, the begining of the slope for each tier matches up, so this gives you another guideline to check yourself against.
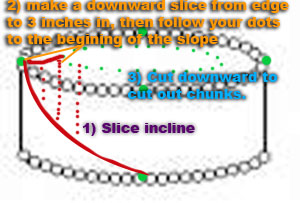
Now, we can reasonably assume that the road is probably 2 inches wide. My guess is that to give you a little room for piping grass or a yellow border, you'll probably want to carve 2.5 inches of width on the slopes. You can try to eyeball this whole thing, but I vote for being safe over sorry. Bust out that ruler lady! In the second picture, you can see how this will be a lot easier if you measure out the quarters. I'd use a few dabs of your buttercream or some dots of your "glue" just to mark the edges where one quarter starts and the next begins, showing you exactly where to start carving. Then, turn the ruler around, measure 2.5 inches in, and use another dot of icing to mark. It would be wise to continue to make additional marks 2.5 inches in around the entire quarter which is making up the slope, so you can keep your carving uniform.
1) For the actual carving, I'd start by cutting the slope into the cake side with a SERRATED knife. Since you marked the begining and ends of the quarter with icing, you should be able to eyeball how much to curve and where to stop. Just take it slow and easy!
2) For the next step, cut into the cake from the top, along the icing dots you made 2.5 inches in. Try not to cut too much deeper than where your downward cuts from the top will meet your sideward cuts from the slope, but it's not really a big deal if you go to far. The whole thing's going to be frosted.
3) Now all that is left is to point your knife to the center of the cake, and slice down to free the unwanted chunk of cake, creating your slope. I recomend trying to cut out chunks a couple of inches wide at at time, so you can feel your way through it and see if you need to cut a little deeper anywhere to free the chunk.
4) You now have a blocky wedge infront of the begining of the slope. Just use your knife to kind of round off that edge, creating a natural oval shape for this side of the cake.
5) Repeat process with the 2nd tier. When complete, place the 2nd tier on top of the first, being sure to lineup the slopes as shown in the picture.
2) Decorating after the cake is frosted
For the road: You'll probably want to play it safe with how much road you cut. I'm not sure how to guage exactly how many inches you'd need, but I think, what, 25 inches plus the fat piece at the end sounds safe? Remember to use cornstarch on your work surface. Roll out your black fondant into a loooooooooong tube, almost as long as you'll want to cut it, but still fat enough to make 2 inches when you roll it flat. And of course, then proceed to roll it flat with your rolling pin. Don't stress any white marks from the cornstarch, you can rub that out later.
You could use a ruler or other straight surface and a pizza cutter to cut one side of your long strip into a straight line. Then, starting at the begining, measure 2 inches across, make a mark, and then go up a bit and make another mark 2 inches in. Lining your ruler up against those marks, you'll be able to slice a clean and uniform 2 inches all the way through to the end, which you'll of course want to leave fat for the finish.
To actually get your road onto the cake, you'll want to roll it onto your rolling pin. Start with the begining, literally the start line, and roll the road strip up until you reach the end, the fatter finish area. To actually unroll the road onto the cake, here's where I'd probably bully my reluctant husband into holding the rolling pin by the handles and slowly unrolling it so that I could use both hands to place the road precisely into position. when you reach the end where it wraps around the cake, use scissors to snip off the road so it stops an in or two before reaching the begining of the first incline, as seen in the picture.
Don't forget to smack said husband in the hand with a spoon when you catch him trying to sneak frosting from the bowl. (You knew that was going to happen, right?)
If you're going to do the sugar crystal thing for the road, this would be the time to do it. Otherwise, you can go straight to adding the white strips. This is easily done by using the pizza cutter or fondant cutter and ruler to cut a thin strip of white fondant, slice it up into the rectangles, and glue them to the road. Not sure what size tip was used for the border. 6 maybe?
For the Signs: Easiest thing to do would be to cut the rectangles out for the signs, and pipe the text on before gluing it to the side of the cake and piping the border dots on.
--------------------------------------------
Note: I know the really crappy diagram I tried to draw says 3 inches in, but I changed my mind and think that 2.5 is probably the safer bet. Now why did it put the attachments in the opposite order I added them? Pfft. The bottom one should be first.
No really, thats a bad diagram! ![]()
Anyways, as mentioned, I've never done this cake before but I hope these ideas will be of some assitance to you.
Monica-
OMG..OMG..OMG... I cannot even believe you took so much time out to do this for me! Step by step process and diagrams. How on earth did you do all this? Thankyou so much for that, I am going to print this out for sure!WOW! Thankyou Thankyou Thankyou! You are a blessing to help this way!

Quote by @%username% on %date%
%body%