

Has anyone ever made letters out of chocolate and placed them on the top of a cake? kinda like the monograms people use on wedding cakes?
I am looking for ideas for my sister's baby shower which will be pink and brown themed and I want a cute different cake. I found on the web that is simple but really cute. It is a two tiered round cake and the baby's name is spelled out on top. I'm not sure what was used.
I thought maybe they could be made out of chocolate (molds) and stuck into the cake a little... not sure if this is possible... I'm not a cake maker just here for ideas.
Thanks in advance!

It would be easy to get this look. Write the letters in the style and size you want them to be. Cover with wax paper. Melt your chocolate (I would use CandyMelts...no tempering required) and spoon into a decorating bag with a #2 or #3 tip. Trace over the letters with the melted candy. Let harden. Carefully peel the paper away from the letters. Flip the letters over and re-pipe. This will make them sturdier. You can use more candy to "glue" the letters onto lollipop sticks, which you can then insert into the top of the cake. Or, what I've done, is pipe a stick of the melted candy right onto the design. It will be all one piece and easy to place.

If you want the front of the letters to have a nicy shiny look, pipe them with the candy melts/chocolate onto acetate (a clear report cover will do nicely) or onto the shiny surface of freezer paper. The letters will only be as shiny as the surface their piped on to--wax paper has no shine.
HTH
Rae
This is really easy to do with chocolate. I actually just did two cakes using this method. The thing to remember is that when you're piping letters, the nice, shiny, flat side is "face down" on the acetate or waxed paper (I actually use clear vinyl that I got at a fabric store . . . gives you the same shine as acetate). Either way, when you finish the letter and flip it over it will actually be in reverse so you want to print the letters out backwards before you even pipe over them so the finished chocolate letter comes out the right way (hope that made sense!). Secondly, make them pretty thick because they'll be fragile so once you pipe the letter, let it set up and pipe over it again. You can do this as much as you want until it's thick. I HIGHLY recommend making two sets - since it's quick and easy to do you want to have a back up because chocolate does tend to break easily.
with the two cake I just did, when I piped the letters I added about a half inch "tab" to the bottom of each letter with chocolate. This "tab" is what was inserted into the cake to hold up the letters. Like someone else mentioned, though, you could easily use wooden skewers or lollipop sticks or something like that to give you leverage.
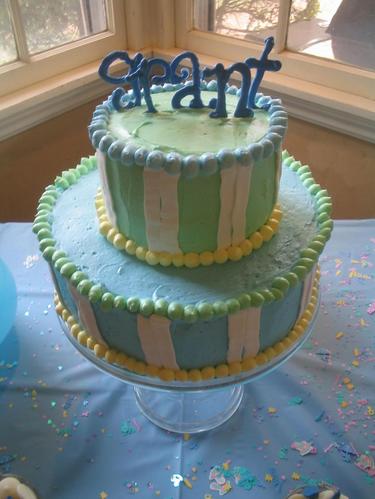
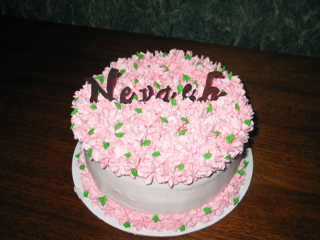
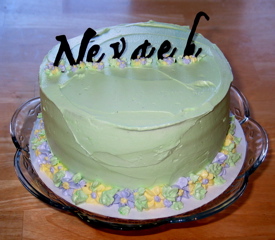
Here's a couple of pictures of my chocolate letters:
Thanks again for the advice so far. I really appreciate it. I am not a cake maker or decorator. When I finalize the design I want I will get the cake maker to bake and decorate the cake like I want, all except for the chocolate letters... I was thinking I could make the letters and then put them on the cake myself.... not sure if that is a good idea or not.
Since I am kinda clueless about the cake making terminology what exactly do ya'll mean when you say piping the chocolate?
Also how do you come up with the letters? Just print out letters in a font and size that you like and use that?
By the way if anyone has any other ideas for cute and different baby shower cakes please feel free to give your suggestions. The colors will be pink and brown.
Thanks! Hope to suggestions!
Piping is using a decorating bag (whether filled with buttercream, melted chocolate, royal icing, etc . . . ) and to decorate with it. In this case, it means to melt the chocolate and pour it into a decorating bag. You can use a very fine tip (#1 or a #2) on the end of your bag and you trace the outline of the letter. Once that sets (only takes 10 minutes or so for it to set) then you fill in the outline with the melted chocolate. When I do chocolate transfers, I use parchement bags because they're easier to handle and I don't use a tip . . . I just cut a very small hole in the tip.
For the letters, you can absolutely find a font you like on the computer and print it out. Remember, with letters you want to print them as a "mirror image" so that the letters aren't backwards after you pipe them. You'd take the page that you printed out and lay a piece of waxed paper over it (or clear vinyl or acetate - these have shinier finishes and so will the chocolate as a result but using waxed paper is totally fine). Once you lay the waxed paper down, you'd outline each letter. Let it set and then "fill in" the outline with the chocolate. You want these to be a bit thick so they don't break when you try to peel them off of the waxed paper so after the whole thing sets again (so it's hard to the touch) you can pipe over it again. When the whole thing sets again, gently peel it off the waxed paper and flip it over. The side that was face down on the waxed paper will be smooth and will be the front.
There are a lot of helpful tutorials in the files regarding chocolate transfers - if you do a search using "chocolate transfers" you'll find a lot of info. good luck!

Hrllo rapollet
Since you don't have much experience using chocolate, I would suggest that once you have piped the letters (in reverse), place a flat tooth pick on the back of each letter: half on the chocolate, half off, with the flat end on the chocolate. (I use the large ones normally use for club sandwiches.) The toothpicks are thinner than lollipop sticks, so you can make a smoother surface; and you can handle the placement of each letter by holding the toothpick.
Hope this helps.
ciao


Phyllis, Thanks! I just used a drop flower tip and piped different sized drop flowers all over the top, overlapping so that there was height and depth. Very easy!
Fooby, You really do need to just add the color a few drops at a time and see where it gets you. Keep adding until you get the color you want. Black is a hard color to achieve but like you said, using chocolate candy melts first (as opposed to the white ones) allows you to use a lot less color.

Yes, you can get the candy melts at Michael's. They are in the cake decorating aisle. You can get a bag of pink or brown. I have a pink and brown cake in my album, but you can also search for those colors in the galleries, and a lot of pictures come up. Good luck!
you can find candy melts even in your local walmart there are often not a whole lot of choice in color but you should be able to find choco with no problem and there may be some pink left over from valentines or already set out for easter.
Blakescakes I love what you said about pipeing the letters on a shiny surface I would have never thought about that myslef great tip.
Quote by @%username% on %date%
%body%