


I Just Don't Get It!!!! Topsy Turvy Madness!
Decorating By imartsy Updated 29 May 2007 , 3:38am by 7yyrt

Okay I just don't get it. I'm desperately trying to follow the topsy turvy article but I'm trying to do smaller sizes.... I've posted a couple times about this disaster....
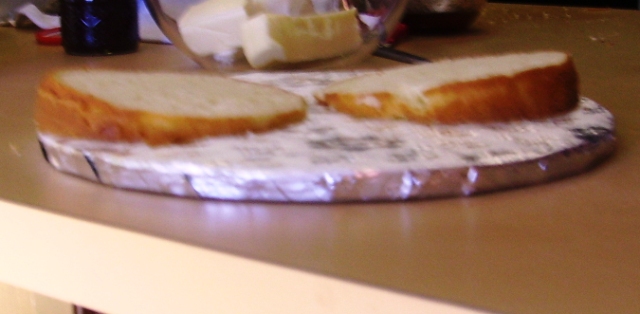
I'm trying to do 8-7-6, 6-5-4, 4-3-2. Well I messed up and torted the 8 inch wrong - straight instead of slanted...well I thought I saved it - I just kinda cut the whole thing at a slanted angle....
So then stupid me does the same thing w/ the 6 inch...... okay so I do the same thing again - cut it slanted.
So if you're still following - I've got the 8 on top of the 7 & 6 and I don't quite get the stacking - I stacked them so that they were all with the biggest parts to one side.... so then I trimmed it up by cutting it all in so that it was all a bit "flush".... okay works out pretty well
Then I go to do the 6-5-4 and it's slanting like crazy! I mean it's toppling over! I've stuck two dowels in it in desperation but I don't think it's going to hold..... and there's no way I can put a 4 in & 3 in on top of a two..... just NOT working....
So what am I doing wrong??? How have I screwed this up so badly?? ![]()
Oh by the way - I used cake mix w/ the durable cake recipe

i tried once months ago and miserably failed. however, i am getting the nerves up to try again.by looking at the picture, i would say that the middle one should have a slice cut off the bottom from left to right at an upward angle. it would not tilt so bad. honestly i think the top tier will be too narrow and flimsy to hold up, especially with the weight of fondant.

imartsy,
So sorry to hear about your misadventures ![]()
However, I did find a website with many examples of whimsical cakes and pricing info.....
http://www.pollyscakes.com/2004/home.cfm
Thought the $10.00+ per slice might inspire you ![]()
That must be the reason they also call them Mad Hatter cakes -- because they make you crazy trying to do them! LOL! Good Luck!
Theresa ![]()

I'm not sure I am following how you carved the cakes. But, after carving the cakes to shape on the sides and bottom, and then cut the slanted tops, did you cut a circle out of each lower cake top so the upper cake would "nest" inside it? At least that is how I did mine, still a mess with all the carving, crumbs everywhere. But I did 3 layers to each tier, let's say we are working on a 6" upper cake that fits onto a 10" bottom cake. I would have carved the bottom of that 6" cake so that it is shaped rather like a flower pot, in other words it is smaller at the base than at the top. Then cut the slanted top. I also cut a cardboard circle for each cake that measures a bit smaller than the base of the cake.
Now, on the lower 10" cake, I would cut out a hole the same size or a tiny bit larger than the base of the 6" cake, make it maybe a 1" deep cut. Now dab and try and smooth a bit of icing inside that hole on the 10" cake, then the 6" nests inside the hole. I iced my cakes separately after carving, covered them in fondant and then nested them together and doweled with lots of doweling. The most important thing I found was the cakes really need to be frozen before carving them. They hold together better and you have a lot less crumb to clean up.
When you are asembling them, even if by mistake you have the slant going in the same direction on two of the cakes, all you have to do is turn the upper cake with your hands until it is at an opposite angle to the lower cake.
And, so what is the solution to these whimsy, wonky, mad hatter type cakes? The solution is to not cut the cakes at all, use styrofoam blocks between the tiers, cut the stryofoam at an angle and set straight, flat cakes on them and then dowel. You get the same slanted look to the cake but it is really an optical illiusion, the slant is only in the styrofoam. They are called "Crooked Cakes."
Here is one of my favorite cake designers website. Michelle Pack and one of the cutest crooked cakes I've ever seen. Look closely and you will see that each cake is a flat cake, no slant, no carving. On this cake she covered the styrofoam wedges in icing to resemble a tree stump.
http://www.cakestrings.com/crooked%20garden%20tiers.jpg
I like the wedge idea - I just don't have any at the moment! and I'd love a visual of that - I've ordered Colette's book from the library but it hasn't come in yet.... I think she does that technique
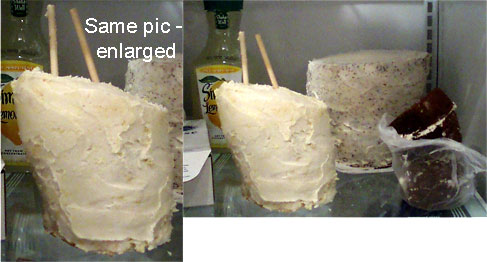
It looked better in the fridge today - like it was holding it's shape - but now I've got these dowel rods sticking through it....
I think my cakes defrosted too much and maybe that's what made that one layer tilt and almost fall over???
I'm surprised at how tall it is...... I have not cut the "nesting" part out of the cake yet b/c I didn't know if the middle layer was going to stay up at all! (the yellow layer). Do you think I can still use it even though I stuck two dowel rods into it? Since it's very well chilled now (stuck it in the fridge overnight) do you think it'll be okay? Or will I have to rebake??
Shirley your idea may be better - I did layers in graduating sizes. It sounds like you do 3 layers of cake and then carve to get your shape.... I'm not really sure how you're supposed to do it with the graduating layers - and how you're supposed to stack them... but even with the graduating sizes it seems like you're cutting off a ton of cake. I just don't get it. Like do you try to stack it all in the middle of each layer or do you off-center it?? (i'm talking about the layers - not the tiers - hope that makes sense).
And I was going to do it all in buttercream..... do you all think I can salvage this??? Or should I give up now? I have that third tier on the right hand side of the pic too - it's a 4 in & 3 in.... the 2 in was way too small and couldn't hold up the weight of the 4 & 3 in.... so I just scrapped it. Can I do that third layer? Or am I at the point where I should just throw in the towel??? HELP!! ![]()
Of course you can "save" that cake. First though, the dowels do not appear to be straight up and down. This will give you lots of problems with slipping and sliding later on, when you've stacked one on top of the other. You now need to take the second layer cake pan (the bottom most part of the second layer) and draw a circle on the top pf the bottom layer so the second layer has a place to sit. It really isn't as hard as it looks. Be brave and do it. Are you doing fondant or buttercream? If it's fondant you'll want to cut a circle of fondant to place in the "hole" you've made to place the second layer in. I then backed off and took a look, are things straight up and down? Is the cake centered? If yes, do the next and upper most layer the same way. I put fondant on each layer before I stacked them, and will do the next one the same way it was easier for me. If you're doing buttercream you can completely assemble the cake and then ice. For peace of mind put in a center dowel, top to bottom. These cakes are fun and stressful.
Yes, I did bake each tier with 3 pans of the same size, rather than graduated. That suggestion of using the upper cake pan to draw the circle on the bottom cake for the nesting part? That is what I did on my first one and it was a mistake for me because I had forgotten that I carved that upper cake into a flower pot shape, meaning the bottom was now more narrow than the top. So, when I went to nest that upper cake I found that the hole or nest was too large and I had to fill some of the space with fondant to cover up the difference in size. My cake layers were each 1 1/2" thick, so the finished tier would be 4 1/2" tall plus a tiny bit more considering the filling and icing. In the photo your appear to be much taller, I would have a hard time balancing them on top of one another too. I think now that your cakes have chilled overnight and you dowel well it should be alright. Do you have to transport this cake in a car? That would be my only concern.
On that crooked cake with the styro wedges, I had forgotten that Michelle took Colettes class on a Day Of Sharing or ICES event, can't remember which, and that is where she learned to do the styro wedges. Colette has diagrams and instructions for cutting the wedges and doweling the cake in her book "Cakes To Dream On."
I usually find when I am trying something for the first time that it is a learning experience. You will probably find as you go along that you would do something different next time that will make it easier to get the look you want without as much stress. I'm sure this cake is going to be great when you finish it and all of the guests will be wide eyed trying to figure out how in the world you did that. I wish we could all be there to help you out with this one.
Thank you so much you guys! (or gals rather) I really appreciate your help! I'm going to give it a try and see how it goes - I may be going to the foam wedge option next time....
I am doing all buttercream w/ maybe some fondant accents. I get scared doing fondant sometimes b/c people here hardly seem to know what it is and I don't want to waste time & money w/ fondant for them to then not eat the cake... know what I mean??? A few accents will get them started and then later as people come to accept that fondant is the next big thing - then they'll be ready ![]() LOL!!
LOL!!
Thank you all for the support - I will let you know how it turns out!
Your welcome. That is not so much the voice of experience speaking, in that I have only done two whimsy cakes, ever. But it is what I learned by my mistakes as I went along. In the future I really think I would go with the styro wedges, it just makes much less mess and seems sturdier and safer to me.

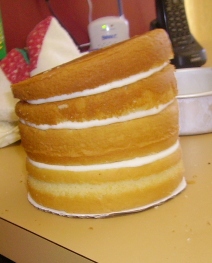
What I did was four layers in each cake the first two were like regular cakes the top two I cut them across (see the picture) then the wide parts on same side, cut a hole on the bottom cake added the dowels like a regular stacked and stuck the top cake in the hole make sure you leave enough room for the top cake because once it is iced it is thicker therefore it won't fit mine almost didn't but I scrape the bit of icing off and the border hid it, I did it like this cause every other method was too difficult and the tapered look like it gets wider as it gets taller just didn't work for me!!!! plus I don't like the way they look hope this help I'm very new to this so may be you shouldn't listen to any advice I give I'd just though I share my picture so you can see how my cake went and may be it helps you

imartsy,
So sorry to hear about your misadventures
However, I did find a website with many examples of whimsical cakes and pricing info.....
http://www.pollyscakes.com/2004/home.cfm
Thought the $10.00+ per slice might inspire you
You never know what you can find while reading through the forums thansk janh

I like the wedge idea!!! I love this website.
You have no idea how glad I am this helped you! PM me if you have any questions, i can get into some serious details!!! don't forget a dowel down the center too!!
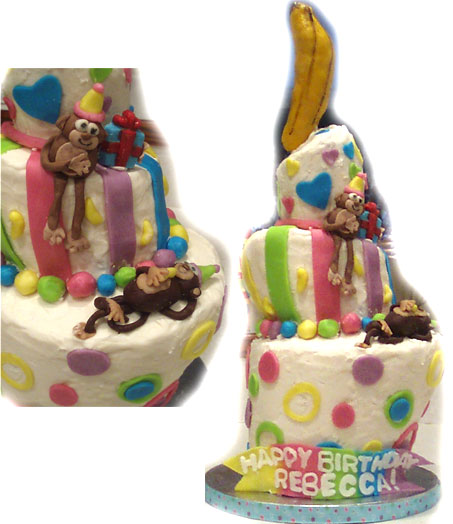
Only the grace of God held this cake together to the delivery site!! At 2am the middle tier had a huge chunk fall off. I glued it back together with buttercream. Thankfully it tasted good in the end! I wish I'd had your pictures before I started icingandsprinkles! I would've gone with your method rather than the one in the articles. In the end I have no idea how you are supposed to cut these things....
And I don't think I'll ever use chocopan again - I tried to do it to make the monkeys - they kept falling apart! I tried making chocolate candy clay and that ended up hard as a rock.... I couldn't figure out how I was going to use that.... and my MMF was sooo greasy.....
Thankfully God was with me in this cake! Praise the Lord it made it to the site, got RAVE reviews (even from the staff at the bowling alley) and everyone seemed happy! YEAH! ![]()

I am so glad your cake held together! (mine did not!) Did you transport it together? And also, did you decorate it when it was together?
Thanks
Julia
The cake is great!!! Wow your banana is awesome! Look for an excuse to try again try a very small two tiered to become familiar. I don't see myself making another one of these unless is for another one of kids...
Good luck to you
thanks so much you all! yes i transported it all together. It was nerve racking! I was holding on to the banana the whole way - that's my center dowel! I was so afraid to cut it after I got it in (and after it first went crooked and punched a hole out of the bottom tier) - so I didn't cut it - the "banana" covered it up! And gave me something to kinda hold on to.
It may be awhile before I do another but I will! I like how it ended up and people were impressed by it - so we'll see - but I'm definitely doing it a lot differently!
Thank you all for your sweet comments! AND your help!
Great info- glad I read this thread. I'm excited to try a whimsy cake- love them! Icingandsprinkles, your photos are so helpful. Thanks. I also don't prefer the way the smaller base/wider top looks.


This is a very interesting and educational thread for me. Thanks for all the great insite to creating a Topsy Turvy. One day soon I hope to try my hand at one but reading this post makes me a liiiiittttttttttllllllle bit nervous about it. I'll keep reading and learning! ![]()
Great info- glad I read this thread. I'm excited to try a whimsy cake- love them! Icingandsprinkles, your photos are so helpful. Thanks. I also don't prefer the way the smaller base/wider top looks.
Beware I am not very good I took pictures of what worked best for me I am far from writing a tutorial it just a combination of all the methods I saw, I tried whimsical bakehouse (not slanted enough) got the collette peter's book but didn't want to use wedges, and the tutorial here on cake central it's just way too intimidating!!!! I wish someone would do a tutorial for a small topsy turvy cake so I modified all I saw it worked me, ask lots of question before you get started!


Quote by @%username% on %date%
%body%