


Anyone Interested In Coach Cake/items As They Are Created?
Decorating By Methos Updated 31 Mar 2014 , 3:52pm by cookies007

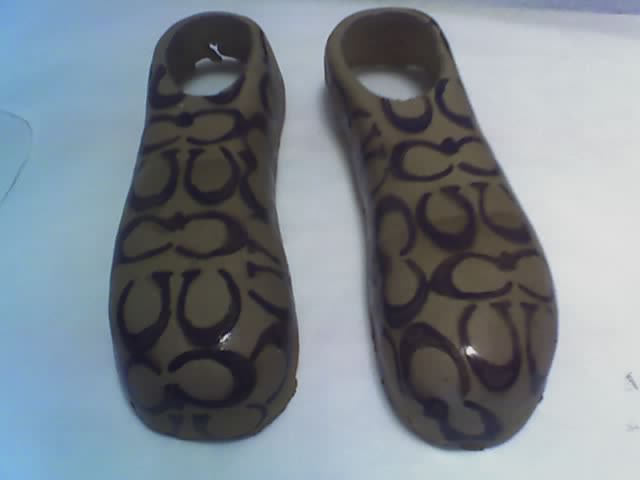
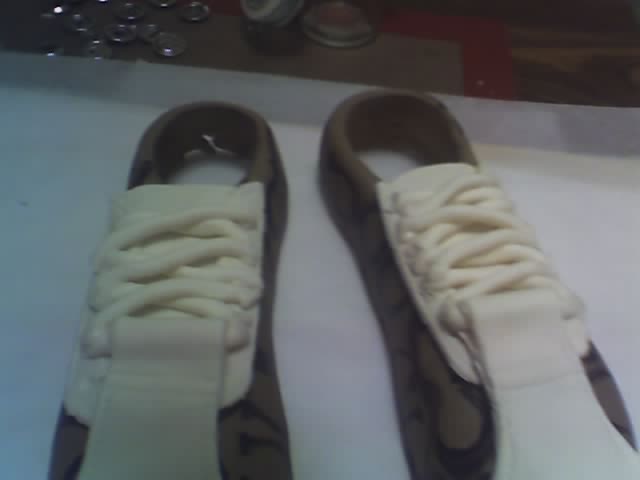
I am in the process of making a Coach Handbag cake with sneakers and Clutch (I think that is what they still call it?)....I have taken photos of the creation of the sneakers step by step and was wondering if anyone had a interest?....I gathered a few tips from other postings such as: Engravers MT font is the Coach "C" (though you have to "crush" the font a bit to get it close to the actual), Printing the font after flipping it in "Paint Program"...covering it with packing tape and cutting it out as a stencil. (all these ideas have made it sooooooo much easier to get a great head start on the items!)...if there is a interest I can keep posting the pictures and getting input/ideas that may help future creations.....I am attaching the first photos and look forward to the comments.
Mark


Yes Please keep posting ! I would love to have it ! THANKS !!

I would love as well to learn something new! Thanks for posting!!

I would also love to see all of the steps. Thank you for sharing.


Oh, heck yeah! Thanks for sharing this with us!
Theresa ![]()

Thank You!!! Yes! I'd love the instructions. I tried making a Coach Purse a few months ago and I totally screwed it up. I couldn't get the "C"'s right. The Coach purse turned out to be a goofy looking purse. The girl was still thrilled with it but I wasn't.
Thanks for sharing.

wow this is wonderful. I haven't heard of the sneakers but I love to learn new things. Thanks for sharing.


I wonder, is frisket food safe?? It would be much easier to use than packing tape!! then again, is packing tape food safe.... not that most people would eat the shoes!
(frisket is an art supply used for masking for airbrushing generally... just curious)


WOW!....I never expected that response.....I would like to address one of the postings first. I mentioned that I covered paper template with packing tape and cut it out. This was used as a shield / template for the airbrush only. I pride myself on EVERYTHING except the cake board being edible. This makes it much easier when I deliver the item. I just have to say "Yup, you can eat everything".
Back to the steps:
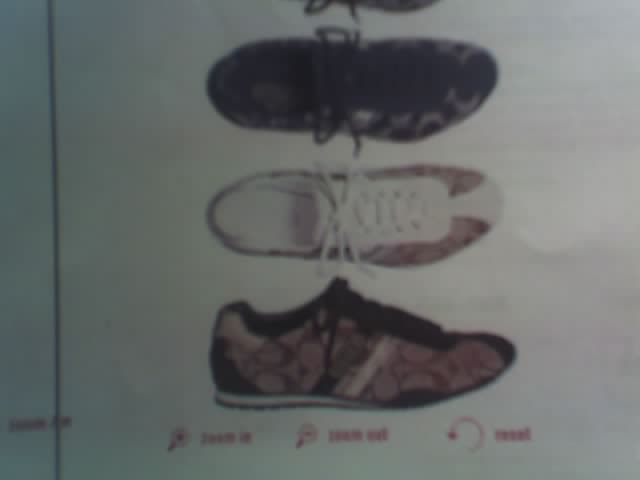
The first thing I do is always get photos of what I need the final product to look like and confirm with the client that this is what they want. Usually, I will have the customer sign off on it. Saves arguments later.
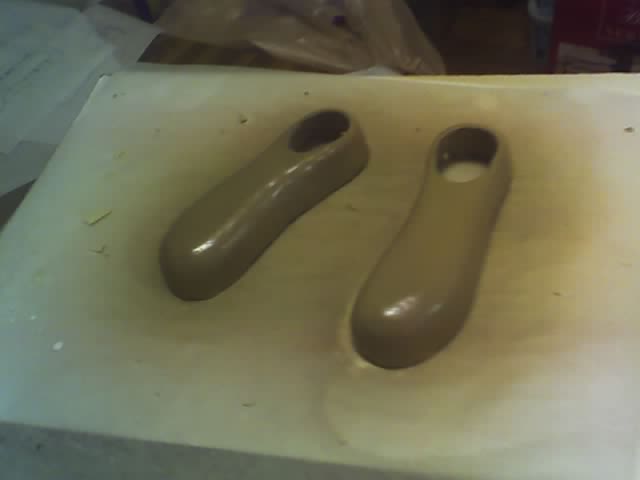
in this case I knew that I would have to create a "form" to shape the gumpaste over to maintain the shape of the sneakers. In this case I used what is referred to as "wet foam". It is used in floral arrangements and can be found in any art supply, floral supply shop. It is basically styrofoam that can be soaked in water....it has smaller air pockets then standard styrofoam and I found it is easier to shape. This also allows the gumpaste to dry faster as the form pulls all the moisture out faster then air drying. I use a hacksaw blade to get the general shape and a exacto knife for later adjustments. Below is a photo of the basic form I made. I will make the next step a new post.

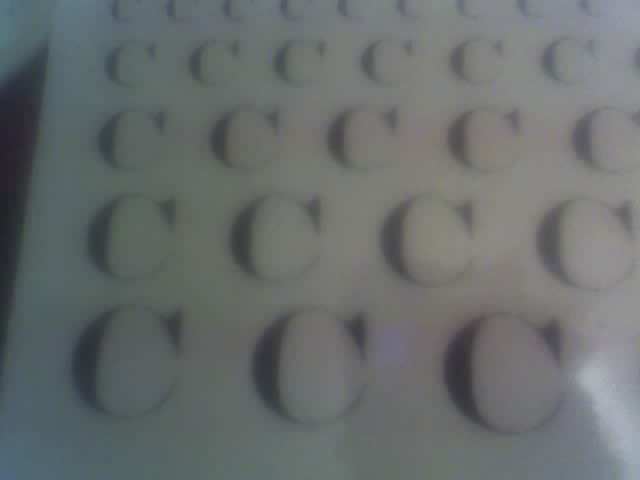
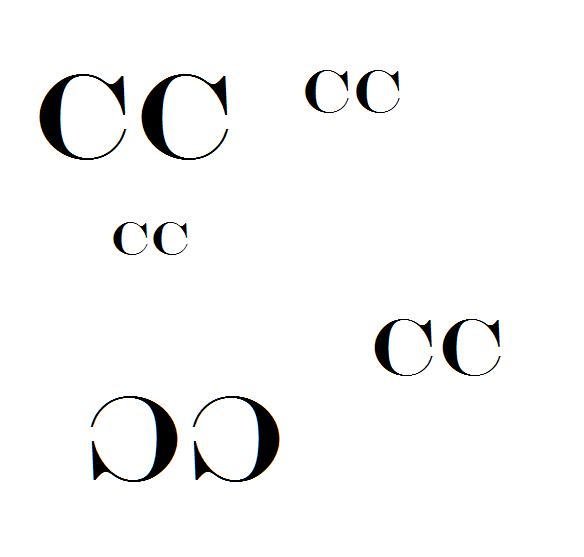
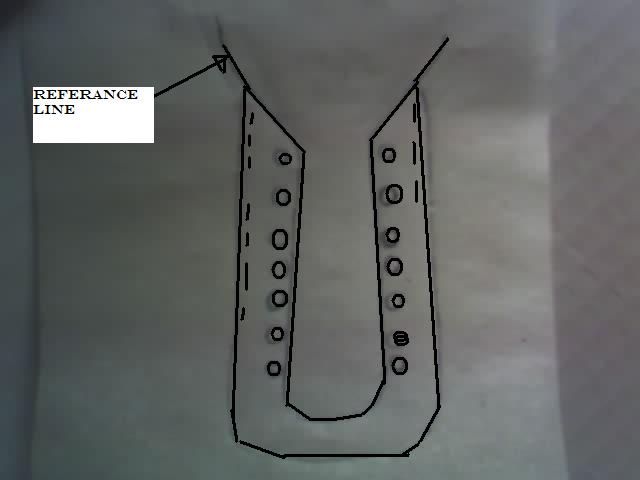
the next step for me was to create the templates I would need while waiting for the shoes to dry enough to be removed from the forms. In a previous thread someone mentioned that "Engravers MT" is the font for the Coach C's. So, I used WORD to set the font in different sizes and printed it out to be traced onto a template. (I use a item called "plaid"...it is a plastic sheet designed for creating stencils for wall appliques) I got it at A.C. Moore and it is VERY reasonable at $1.49 for 3 6X8 sheets. Since I had already cut out my stencils I used a black marker to recreate them to save you time should you need them. Below is the majority of my stencils. When I was ready to paint them, I simply cut them as small as possible and rechecked the Coach website to make sure of which way the C's were arranged to be as accurate as possible..( I tend to be as accurate as possible....almost O.C.D. about it). Since airbrush graphics dry very quickly, it only took about an hour to apply all the C's. After they dried I simply went back over the C's with a fine brush. The backround color you will have to improvise. I used Wilton brown and a liquid whitener (also from Wilton) mixed with vodka. ( Some don't like to used vodka but, it dries clear and no alcohol remains. Water increases your drying time and additional coats may cause runs or sags)...
Mark

I will continue on tomorrow with the steps and patterns, order of assembly. I thought you might like to see them as I move thru the steps. The laces are actually thru the toe cap, just like the real ones. To remain as accurate as possible. The client knows COACH better then anyone....and I love to challenge myself!
Mark

Thanks for the directions! I look forward to the other posts! They look great already!
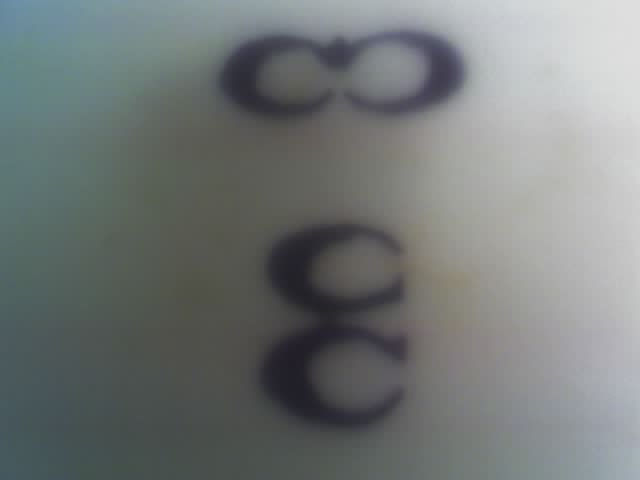
I have already said I am a perfectionist...So here is more of the templates I used. (I tried to make them more legible by darkening the lines) Since there has been so much interest in this post. Feel free to ask questions as we go. Since I may not explain the step as well as some may need.
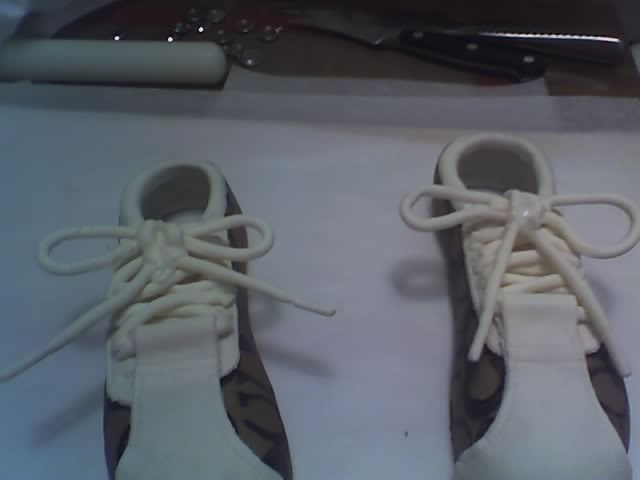
On the tongue, Eyelet piece, toe cap. I used a item from a craft shop for marking fabric to imitate the stitching on the actual leather piece. I believe they called it a "stitch wheel" ( it looks like a old western spur with a handle). Once the tongue was cut out of the gumpaste, I used some royal icing to secure it to the sneakers. Since this has to curve to lay right on the sneaker, it must be done when the gumpaste is malleable. While this is setting, I cut the eyelet overlay piece, applied the stitching, and used a #3 round tip to cut out the eyelets and a clay stylus to surround each eyelet with a shoulder.
Again royal icing to secure it to the sneakers, then comes the toe cap. (This is where you have to take your time). Once cut, the stitching was applied, before applying it to the sneaker I took a short piece of dowel to wrap the gumpaste around to maintain a hole to pass the laces thru. This I let dry on the sneaker overnight to nake sure it was not too flexible or hardened to the point where it may break when trying to get the laces thru.
More steps tomorrow.
Mark

I think this is great! just wondering if you have thought of contacting CC and turning this into an article? I think you have done such a good job with description and pictures/hard work that an article or instruction would be really nice. kudos to you.
I have not contacted CC about making it a article. However, it will show up on the search engine when Coach is entered as a keyword.....I will post more steps over the weekend....I had to get my band ready for a parade this weekend....and since they are "High Maintenance" I have not had much spare time.
Thanks for all the input! 
Mark

Ok...I left off with placing the inner tongue and securing the eyelet piece with royal icing. My next step was to recreate shoelaces. For this I used a clay gun to push the gumpaste thru on to a sheet of waxed paper in a straight line. Once cut loose from the clay gun I took a strip of unbroken staples (Yes I said Staples) and softly rolled them over the gumpaste to create the textured pattern on the shoelaces. ( I said before I am very detail oriented)....Once I was happy with the texture I pushed it thru the hole in the toe cap and trimmed it at each eyelet using a stylus (Clay detail tool) to "tuck" it into the eyelet. A few drops of royal icing in the eyelet and surronding the lace (wipe off excess with a small paint brush).
Once I had all the X's in place I formed and shaped the bows in the waxed paper and filled any spaces with royal icing, to make it look like I actually tied the icing.( I tried to really tie them....it got UGLY in my kitchen and the finished product was less then acceptable)... Again I left them set overnight. The next morning, While the icing was still "forgiving" I used some royal icing on the back of the bows and "gently" placed them on the sneakers. (this may take a bit of time to get them to look correct in placement).
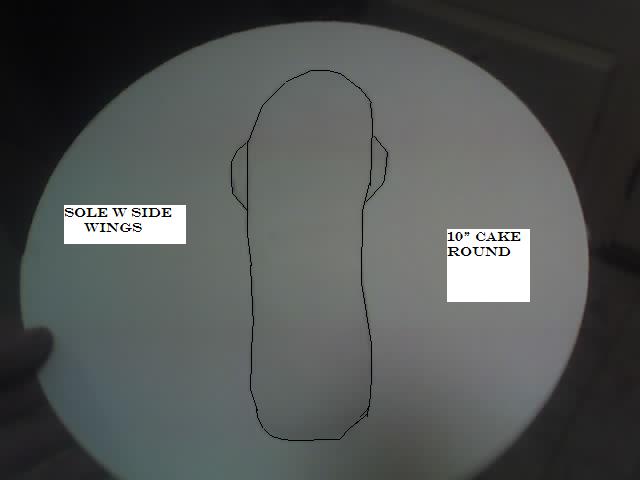
I left them alone for a few hours, (I had to finish a birthday cake and deliver it).... While finishing delivery and set up of the birthday cake I was contemplating the easiest way to make the soles and inner liner look correct. I have already posted the template for the sole with the side cover/wings. You will have to improvise your own tread pattern (If you want to put one on at all). What I came up with was, to take the "sole template" use the heel section and add approximately 1/4" to the outer edge to give you a small amount of extra to roll up inside the sneaker just as the real innersole does. I rolled it about 3/16" thick (thicker is more forgiving and less chance of breakage later on) and placed it inside the sneaker. Coat the outer edge of the sole with royal icing to secure the sole in place. Also, you will want to put some to secure the inner sole in place.
Place the sneaker, with the inner sole in place onto the sole. Wipe away all excess of icing and fill all spaces as needed since this is going to be visable to EVERYONE. The only area left to be placed is the leather covering at the very back of the sneaker, between the sole and the achilles tendon area. This piece there is no template for since each sneaker will be different depending on how patient with drying you were and how close you cut them to the template. I used a piece of parchment paperand a soft pencil to mark the pattern I wanted. You will NOT be able to place this piece until the sole and innersole has dryed sufficiently to allow you to pick them up without fear of pieces falling off. Again I used the stitching wheel to make the seam look realistic, put some royal icing on the inside of the heel cap (if you put the icing on the sneaker it may be too much and will smear your "C's") so use a small amount to start, you can always go back and brush some in areas not covered.
Your next step is to place them someplace SAFE, and DRY. I say this because I am currently "fixing" one of the sneakers after a friend came in and decided they wanted to take a closer look and picked the sneaker up....the sole was not fully set, it was set enough however, to break the toe cap as it fell off.
Any further detail items are at your own discretion. Since the originals have a small leather angled "garnish" with a COACH logo angled on the side of the sneaker. The need for this "item" depends on how you are going to place them in regards to the cake or area of presentation. In my case they are actually a afterthought for the design, and the customer removed them from her sneakers since she "Did not like them there" (and I thought I was a perfectionist!).
That completes the sneakers..... I am working on the templates now for the next item...(the Clutch/checkbook/creditcard holder......or as the guys would call it "A VERY overpriced wallet"....LOL!)....I will post the templates and photos of both, the steps of this item and the NEW pics of the finished sneakers (post repair). Since I am getting closer to the delivery date for the purse... I have to start the clutch this week. I have to make this close to the delivery date so it remains edible. (this is the customers "personal cake" for the party)...The purse cake is for the guests.
If anyone has any questions, feel free to either post/ask them here, Private message me or you can email me at [email protected] .
I will be glad to help in any way I can.....Since some of the steps are "tricky" or hard to explain/understand. (depending on your level of decorating ability).....
I would place this "project" as a medium-proficient level effort. Or about a "6" on a 10 scale ![]() with 1 being easy and 10 being hard...... I always like to challenge myself and I am sure others will try it..... The project has been fun thus far, and with each project we get better at what we do!
with 1 being easy and 10 being hard...... I always like to challenge myself and I am sure others will try it..... The project has been fun thus far, and with each project we get better at what we do!
Just remember to allow yourself extra time on more difficult projects allowing room to repair/modify any unexpected issues, ![]() check with the customer often as the delivery date approaches (things change everyday)..... and MOST important..."HAVE FUN DOING IT!"
check with the customer often as the delivery date approaches (things change everyday)..... and MOST important..."HAVE FUN DOING IT!"
Mark
Quote by @%username% on %date%
%body%