

I've read a lot about using a flower nail to get a level cake instead of a heating core. How exactly do you do this? Is it a lilly nail or the rose one? And, does it have to be metal? If so, where do you get one of those, I only have a plastic one. Thank you so much in advance. I LOVE this site and am totally ADDICTED!!! I have my first wedding cake for a friend in a couple of weeks and am trying to get ALL the tips I can!!!

1) yes has to be metal ...like the ones for roses.
2) my local wal-mart even has the metal ones (crafts dept./cake aisle) and so do most hobby/craft stores
3) grease it up just like do the pan.
4) place it in center of pan with flat end down and point up. -- pour in batter and bake.
HTH

You must use a metal flower nail available at Michaels or anywhere they sell Wilton cake supplies.
You just grease and flour it thoroughly invert it onto the bottom of your baking pan, then pour batter around it. Bake cake as normal. Wait 10 minutes, flip cake onto cake board, pull out nail. Quick and simple.
Good luck!
*I always over-fill my cake pans, so that they rise above the edge, so I just lop off the top of the cake and then flip.

I did this just about a month ago. You use a Wilton flower nail no. 7 or 9, grease it, turn it upside down in the middle of the pan, then pour your batter over it. It works great! It doesn't leave a big hole in the middle of the cake like the heating core. Then when the cake is done, just pull it out!


You could but you don't need too. Be sure that when you bake cakes larger than one cake mix to use 2 nails. Evenly spaced so that the cake bakes evenly. HTH>

I haven't tried this yet. I've been wondering - doesn't the batter wind up flowing underneath the flower nail?
hardly at all...just be sure the nail is in first and pour batter around it.
most flower nails have a very flat surface that fits tightly against the pan bottom.
Thanks so much for all your replies! I'm glad I didn't just wing it...I would've ended up using a lilly nail, that probably would've melted AND left a hole in my cake!!! ![]()


I haven't tried this yet. I've been wondering - doesn't the batter wind up flowing underneath the flower nail?
hardly at all...just be sure the nail is in first and pour batter around it.
most flower nails have a very flat surface that fits tightly against the pan bottom.
I do the flower nail trick all the time now, but a couple of times I forgot to put it in BEFORE I poured the batter! So I sprayed it with pam for baking and stuck it in anyway. It came out fine. Still ended up on the bottom without any cake underneath. Worked great!
I think I'll do it this way everytime now. It's easier and I don't have to worry about the nail moving while I pour the batter in.

I have to tell ya that while I love the flower nail trick, I had nothing but bad luck the first three times I tried it. It kept falling over and I had to dig it out of the cake.
So then I got smart and cut two strips of parchment and poked my greased nail through it. Then I dropped it in the bottom of my greased pan in an X shape, with the tails hanging over the edge. Fill it up with batter and bake as usual.
Since I started doing this, no more digging for flower nails! ![]()

I took some pictures when I worked on my last cake of using the flower nail. I am working on an article to turn into Jackie and Heath, however between going on vacation, computer problems, then trying to get a new computer set up again i havent' had the time I was hoping too. So here is part of a picture that I will be using in the article. (hopefully they post, I haven't been able to put my photo program on this computer yet and am trying to use what I have atm)
Hope this helps to give a visual. It is pretty close up but hopefully it gives you the idea. I hope withen the next week to have the article submitted so you should be seeing it soon.
Leily
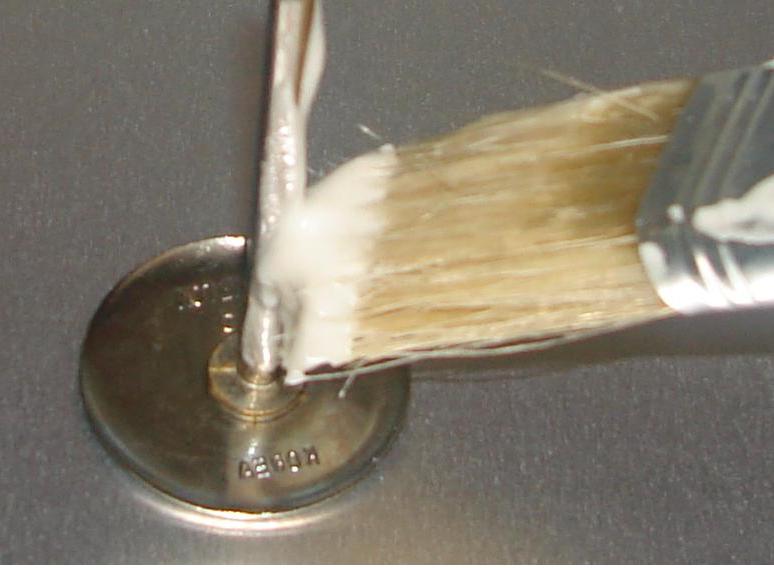
OK so finally kinda figured out the current program I have to modify my photo, but I couldn't actually resize my picture so I just cut part of it out to get a close up. In this photo I am greasing my nail before I add the batter. The overall picture shows more detail and I have more pictures to go along with it to show some other tips I use when prepping my pan... but that will be in the article.
HTH
Leily
Debiashwood, or anyone else...when baking, say a 14" round, how many nails do I use? You said multiple, but I just don't know if that means 2 or more?
I usually dip the top of the nail in cake batter so it will stick to the parchment, that way I don't have to worry for it getting misplaced while pouring the batter. I don't even grease it but there was no problem at all. I think greasing it is better 'cause you know that it will not stick to the cake.


Just wanted to add....when I use the nails, I cut a square of wax paper or parchment and push the nail through it. That way the paper touches the batter, not the metal nail. When I invert the baked cake, the little wax paper squares are stuck on the cake, but peel right off with no problem.
I just baked a twelve inch cake and used 4 nails, one in the center and the other placed in a triangular position around the center nail. It worked great!! I used to use the heat core, but no more. The nails worked super!!!

ACan any one advise me how to use a flower nail in a topsy turvy pan.... I have today made to topsy turvy tiers and both have sunk in the middle .... Would love to get this cake right as I have to make the real thing for New Year's Eve party .... I have only just started baking cakes. I have altered my normal recipe on the second try this didn't sink as much but still has a nice little dent in it ..... Many thanks

I have used flour nails in Fat Daddio’s topsy turvy pans without any problem. I have the Ateco heat core nails which have flat bottoms and don’t rust, but are similar to flour nails. To keep the nails in place during baking, cut a parchment circle to fit the bottom of the pan. Poke holes in the paper where you want the nails to be. Grease and flour your pan. Set the nails in the pan, pointed side up of course, and place the parchment paper over the nails, so they poke through the holes. (I have never bothered to grease the nails). The parchment holds the nails in place, and after baking when you turn out the cake, they are easily removed as the base is outside of the paper. If that doesn’t help it may be your recipe. Are you using doctored cake mixes? That was one reason I abandoned cake mix based recipes. Good Luck!
AI bake from scratch .... Made the same mix again and bake in a normal pan no sinking ... So the only thing I can think is that is the topsy turvy pans and not cooking even ... Going to try the flower nails at the weekend ... Thank you for your help xxx
The topsy turvy pans are very deep. Dont' fill the pans too much. That slows the cooking time and may be the problem. Use regular round layers of cake of the same diameter or smaller to stack under the topsy turvy layer to get the height you need. In the photo, each tier was 4 layers of cake. The largest tier was a 12" topsy turvy pan. The 2 regular round layers below the top were the same diameter as the pan (ie. 12") and the bottom layer was smaller (ie 10"). After stacking and filling, the sides are carved inward to get the desired shape. The smaller bottom layer can be the guide as to how much to carve inward, and is also a guide to keeping the base round.
If the top still sinks, it's OK as long as it's cooked. Just level the top (which will be the bottom when inverted) before assembling. HTH


I really like this trick too although 2 of my nails that I just bought last week have rusted. I think maybe they are not dishwasher safe? I've heard that you can put them in coke to make the rust dissolve but haven't tried that yet.
I've never heard the Coke trick, but you can remove rust from metal (flower nail, bicycle spokes) by rubbing with crumpled aluminum foil.

Quote:
WooHoo....this was awesome, with just one small adjustment needed on my part. I baked pound cake so I could make Petit Fours using Ddangles tutorial.
http://cakecentral.com/a/how-to-do-petit-fours-my-way Thought I'd try this method to bake the cake flatter. Used two 8" nails in the 9"x13"x2" pan. Forgetting to cut the baking time and/or lower the temp, duh, it was overcooked. (my fault not thinking). It was as flat as a cake box! unbelievable.
one nail probably would do it, I still can't believe my eyes.

I just learned a new, (to me), trick from another site. I've always used flower nails but needed to use a deep ball pan the other day and a nail wouldn't work in this instance. I was concerned that the center wouldn't get done and it wasn't conceivable that I could really use a bake even strip. So I took a piece of aluminum foil and folded it over on itself several times until it made a rather thick 1"x about 6" piece. Sprayed with Pam and placed in the bottom of the pan, I held it while I poured the batter around and...voila´--- a custom sized "flower nail". It worked perfectly. This could be used where deep topsy turvy pans are used.
Thought I'd just pass this info on...
Jan
Yup, you've got the visual, only it is a flat, 1" thick candle. :) The same principle applies: conduct the heat to the center. I wish I could take credit for it. It really works. Some responders in that thread worried that the foil would fall over and get buried in the cake as it rose. I had no problem with that. Needless to say, I was delighted.
Jan
Quote by @%username% on %date%
%body%