

When you use this technique, do you stop and start all over the cake or try to do it in one continuous pattern? Some of the cakes I have seen with it in the gallery it looks to be one continuous pattern but I would think that would be very hard to do.
Thanks.
You try to keep it in one continues pattern if possible~

Hi... here is are the instructions from the Wilton book:
Position bag at a 90 degree angle.. hold tip close to cake so icing attaches without scraping cake with tip and without flattening icing strings..
Beginning and ending at edges, pipe a continuous string of icing, curve it up, down and around until the area is covered. Make certain strings never touch or cross. Don't leave any loose ends! Stop pressure: pull tip away.. Hope this helps!!!

The key to it is that you want to keep your lines from touching or crossing lines. And you want to think crusive s's and r's when doing it.
If you are just doing the top of a cake, and start from the side and end up going back to a side, then I would start a new line, but generally you want to try to keep a continous flow.
What if you are doing the sides and top? Would you do the top and then the sides separately? Or do you try to go up the sides, onto the top, and then down and up again? Does that make sense?
Also, if I was going to do this technique on a 2 tier stacked cake, would I stack the iced cakes first and then decorate only the part of the bottom tier that is sticking out from under the top tier?
Can you tell I'm still very new to all this ![]()
I love doing cornelli lace. This sounds awful, but I always think of it as 'worm trails' ![]() with no lines touching. I use it quite often.
with no lines touching. I use it quite often.
Be sure your icing is not to stiff. (Hard on the hands, if it is.) I load my piping bag 2/3 full, making sure that it is free of air. I twist the top and put a twist tie on it. Then I place my hand about 3 - 4 inches from the bag tip, squeezing the icing that's in the bag above my hand, farther into the top of the bag. (This makes it so that I don't have to reload my bag so often.) I don't have to be concerned about it coming out the top of the bag, as it might hang over the back of my hand. The twist tie prevents the icing from escaping the bag. I still have enough icing in the lower part to have complete 'pressure' control and as I need more to pipe, I just squeeze more down from the top. Place your cake higher, so that you don't have to be bending over.... so that it's comfortable for you.
I start at a lower edge (base of tier) and just start piping, making sure that my tip doesn't touch the cake icing. Being relaxed while your piping, and not trying to rush it is a help. Every little curve is rounded, meaning no pointed / sharp turns.... If you want to practice this, before piping it, just take a pencil or pen and do it on paper.... using the photo in the Wilton Yearbook, as your example. It reminds me of doodling. The pattern looks a little like puzzle pieces. ![]()
I find it easier to do the sides first and then do the top.... BUT; you want to pipe up to the top of the tier and just go a little over the top edge, here and there, not ending the trail, through. You want the pattern to be random (over the edge). Keep doing this around the cake, trying to "not paint yourself into a corner." So to speak. If my hand gets tired, I just end a trail at the bottom edge. Then, when you're ready, just start up another trail from the edge. As you come close to finishing the sides just take your trail to the top of the cake. You'll want to lower your cake so that you are above it..... a normal height so that you can see the entire top and it's comfortable for your arms. Just continue the trail on the top, coming close to your previous 'side' trails. You don't want to see an invisible line where you came up from the bottom. Go all around the top and by the time you get the top covered you will be returning to the spot where you came in to go to the top. Otherwise, you can end the trail, at the top where you KNOW that other decorations will cover the ending icing string.
Cornelli Lace is not hard, as long as you don't have your icing too stiff. It's just a little time consuming. But... it's very delicate looking. The customers love the look of it. It's especially pretty when it's put on the bottom half of the side of a wedding cake, with a garland separating it from the top half. Hint: Always do the cornelli lace first, then pipe the garland.
Hope this helps. Have fun.

I agree with NightIcer, make sure your icing is not stiff. I add a little corn syrup to my icing when I do cornelli lace and stringwork, it seems to work really well for me!
Thanks everyone.
NightIcer, I appreciate your in-depth instructions. I am going to print them out so I have them handy when I get up the nerve to try this technique. Do you have a photo to post where you used this technique? I'd love to see yours.
Thanks.
About your question of when to do the lace work, before... or after stacking cakes:
If you are doing a 'stacked' constructed cake, meaning one tier sits directy above another tier and no space is in-between.... you would ice and stack the tiers first. Then, as you already mentioned, just pipe one tier at a time. Start at an edge and just start piping the ''trails''.
If you pipe the lace first, you will just be covering up all that piping with the upper tier; and you would probably get your fingers into the lower tier, as you let go of the upper one while you are placing it. Then you have to do repairs to the icing. Not a big deal, if the tiers are just iced. But.... it is a big deal, if you have already done your lace work and you've just gotten your knuckles into all your piping. ![]()
Now... if you are putting a cake together (like a wedding cake) that you will have space between the tiers by using "hidden pillars" or some other pillars that allow you to see the tops of the lower tiers, when the cake is finished, you would pipe your cornelli lace first. Then you install your pillars in your 'already marked' spots. (It's harder to pipe around those 4 pillars that are sticking up above your icing. They are in the way.)
I'm sorry that I don't have any of my photos on my page in The Gallery. KarenOR was kind enough to upload my "Whopper Burger" cake (with French Fries in a Burger King carton) into her Gallery for me. I don't use a digital camera. I get my 35mm pictures developed at Wal-Mart and I get a disc made with those, plus I have the paper printed photos. I don't have a scanner, either. ![]() KarenOR said that if I had trouble uploading, she could help me. I have LOTS and LOTS of pictures. I've been doing cakes for 18 years. I used to specialize in the 'custom' birthday, and etc. type cakes and have done cake sculpting. I now only take orders for wedding cakes and grooms cakes. I also do gumpaste work. Hopefully, one day I can direct you to more of my photos.
KarenOR said that if I had trouble uploading, she could help me. I have LOTS and LOTS of pictures. I've been doing cakes for 18 years. I used to specialize in the 'custom' birthday, and etc. type cakes and have done cake sculpting. I now only take orders for wedding cakes and grooms cakes. I also do gumpaste work. Hopefully, one day I can direct you to more of my photos.![]()
NightIcer, thank you for all of the helpful information. I really appreciate your effort to describe in such detail!
I'll let you know how I make out! 
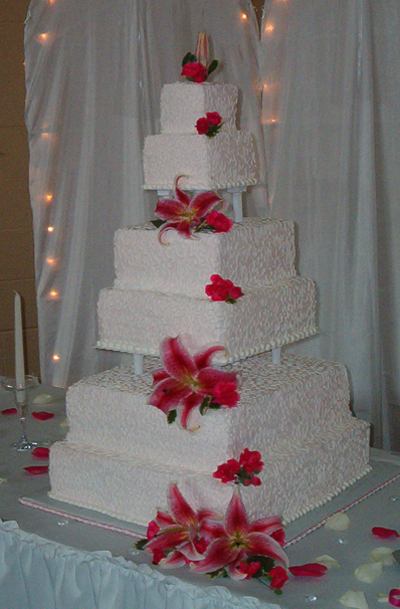
Beautiful work, BJsGRL....
Thanks for putting your pictures in here. It's much easier to learn how to do something when you can see the end result.
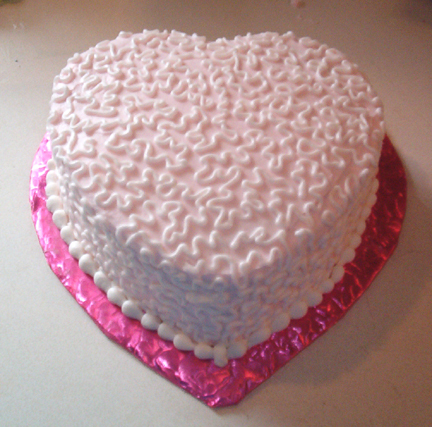
Projectqueen, please notice how GJsGRL has the cornelli lace over the edges. There is no break in the pattern on the heart cake. It flows beautifully. When you are piping the trails, you are always looking ahead as to where you go with your piping tip. That's the tricky part ![]() I always feel like a chameleon. One eye on my icing tip and the other one scouting out the path I am going to take.
I always feel like a chameleon. One eye on my icing tip and the other one scouting out the path I am going to take. ![]() LOL
LOL
Again, you can practice with a pen and paper if you are still nervous about piping it. You'll find, it easier after you just jump in and try it. You can also practice on a box, or a baking pan using 'practice' icing, if you like.
BJsGRL gave a really good example of tier separation AND stacked construction; with the big beautiful wedding cake. Cornelli lace is a really good techinque. When you use it, you don't have to use a lot of other decoration, unless the bride wants it; as in her cake, it speaks very well. It's impressive and classy.
Another option when using cornelli lace is to mark a band in the middle of the sides of each tier. You can put a ruler up to the cake side (parallel to the cake boards) and take a toothpick, scoring lines in the icing, on each side of the ruler. Then just pipe a ribbon of cornelli lace between the marks. Then using the same #2 tip to pipe a little border to cover the indented lines. It will look like a delicate ribbon going around each tier. (Just another option that is pretty, and very time saving.) Whatever floats yours, or the bride's boat, if you are decorating a wedding cake. You can also have your icing in white, or another color, and having the lace in another..... or use the same color for both, but one is lighter than the other. ![]()
Thanks again BJsGRL for the excellent pictures.
As always, you ladies are a wealth of information.
I am considering trying out this technique on a 50th anniversary cake for my parents. I'm pretty new to the cake decorating and have only made pretty basic cakes for family and friends so far.
I thought the cornelli lace would be pretty and elegant for a 50th. I was thinking of 2 stacked rounds, maybe 6 & 8" or 6 & 10 in ivory bc with white cornelli lace and some gold somewhere. Maybe some MMF pearls somewhere, too. (Or a MMF bow on top, but that's a whole other set of questions... ![]() ) We'll see. Right now I'm trying to figure out the techniques and thankfully I have until April to make this cake.
) We'll see. Right now I'm trying to figure out the techniques and thankfully I have until April to make this cake.
Thanks again.
Projectqueen, there is a great tutorial on here about fondant bows!!!
Also, Earlene has awesome directions for pearls:
http://www.earlenescakes.com/prlinstruct.htm
Good luck, and we're here for you!

projectqueen, here a link to the tutorial on fondant bows:
http://www.cakecentral.com/article17-How-to-Make-a-Fondant-Loop-Bow.html
HTH!
Quote by @%username% on %date%
%body%