


AMy first tip is to practice; don't just try to make your final figure first time round or at least make several of the same parts i.e. make 6 arms, two heads etc and pick the best ones.
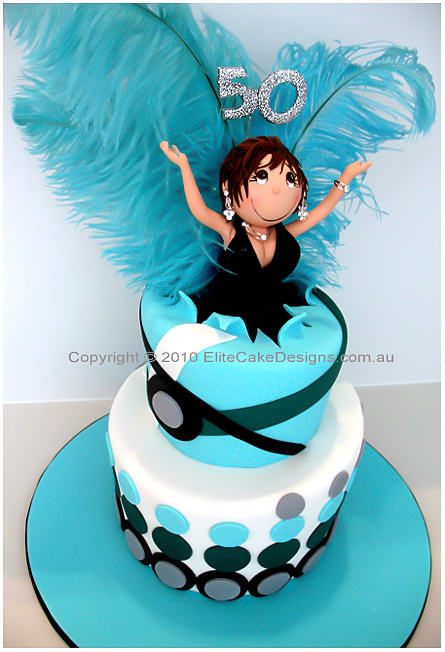
You could always ask the original creator for some tips since their copyright is on the pic- I can’t really tell you exactly how to make this figure but I can help you with that type of ‘bursting’ figure:
1- draw your cake tier sizes on a piece of paper exactly to scale - no need for detail just use outlines 2- draw your figure where you want her on the cake exactly to scale (no need for detail you just need to know the size you have to make the body, head and arms) 3- figure out what length of support she needs- you will need a dowel that goes from the cake board to halfway through her head, draw it on your sketch and cut a dowel to length (using a pencil sharpener on one end helps but add an extra 1cm to you length if you do this) 4- stick you support into a piece of styrofoam as thick as the depth you plan to make your cake (if you are making a couple of bodies so you can choose the best its handier to make each one on its own support) 5- use gum paste/fondant with tylose and/or modelling chocolate/candy clay to make the body directly on your support, you could make an all pink body then make the dress flat and wrap it round- this gives a seamless look but is fiddly to get right so it sometimes helps to make a paper or felt template first that won’t stain your nice pink fondant. 6- check you have made it to scale using your sketch! 7- roll a ball for the head and check it for scale, make spares, I usually at least start 3 heads, if one goes great I ditch the other two without finishing them. Dry the heads at least over night so the don’t distort when handling to decorate, I usually leave them 3 days. don’t dry them on a flat surface or you'll get a flat bit! Don't dry on a very thin skewer either as if she is big the weight will pull the head down until the skewer ends up poking out the top! 8- make lots of arms and insert a cocktail stick before leaving to dry, you can usually dry these flat 9- after a few days assemble using sugar glue and foam/paper towel supports and leave her overnight so all the parts are firmly attached 10- start on your details! you can pipe RI for hair or roll little thin sausages of fondant, I always hand paint eyes- google 'cartoon eyes' for some good ones to copy- use a good thin brush or an edible marker. Little flower cutters are good for earrings and necklaces.
Hope that helps :-)

Quote:
My first tip is to practice; don't just try to make your final figure first time round or at least make several of the same parts i.e. make 6 arms, two heads etc and pick the best ones.
You could always ask the original creator for some tips since their copyright is on the pic- I can’t really tell you exactly how to make this figure but I can help you with that type of ‘bursting’ figure:
1- draw your cake tier sizes on a piece of paper exactly to scale - no need for detail just use outlines
2- draw your figure where you want her on the cake exactly to scale (no need for detail you just need to know the size you have to make the body, head and arms)
3- figure out what length of support she needs- you will need a dowel that goes from the cake board to halfway through her head, draw it on your sketch and cut a dowel to length (using a pencil sharpener on one end helps but add an extra 1cm to you length if you do this)
4- stick you support into a piece of styrofoam as thick as the depth you plan to make your cake (if you are making a couple of bodies so you can choose the best its handier to make each one on its own support)
5- use gum paste/fondant with tylose and/or modelling chocolate/candy clay to make the body directly on your support, you could make an all pink body then make the dress flat and wrap it round- this gives a seamless look but is fiddly to get right so it sometimes helps to make a paper or felt template first that won’t stain your nice pink fondant.
6- check you have made it to scale using your sketch!
7- roll a ball for the head and check it for scale, make spares, I usually at least start 3 heads, if one goes great I ditch the other two without finishing them. Dry the heads at least over night so the don’t distort when handling to decorate, I usually leave them 3 days. don’t dry them on a flat surface or you'll get a flat bit! Don't dry on a very thin skewer either as if she is big the weight will pull the head down until the skewer ends up poking out the top!
8- make lots of arms and insert a cocktail stick before leaving to dry, you can usually dry these flat
9- after a few days assemble using sugar glue and foam/paper towel supports and leave her overnight so all the parts are firmly attached
10- start on your details! you can pipe RI for hair or roll little thin sausages of fondant, I always hand paint eyes- google 'cartoon eyes' for some good ones to copy- use a good thin brush or an edible marker. Little flower cutters are good for earrings and necklaces.
Hope that helps
Thanks the information :D :D cool !
Quote by @%username% on %date%
%body%