


Hi everyone. I need to get this ruffle effect on a cake tier. Does anyone have a tutorial or an explanation for how this is done? It looks to me like the fondant (?) strips are attached while the paste is still soft.
I've attached a pic and a link to one on flickr. Thank you!
http://www.flickr.com/photos/aprilwallacecakes/7977134673/in/photostream/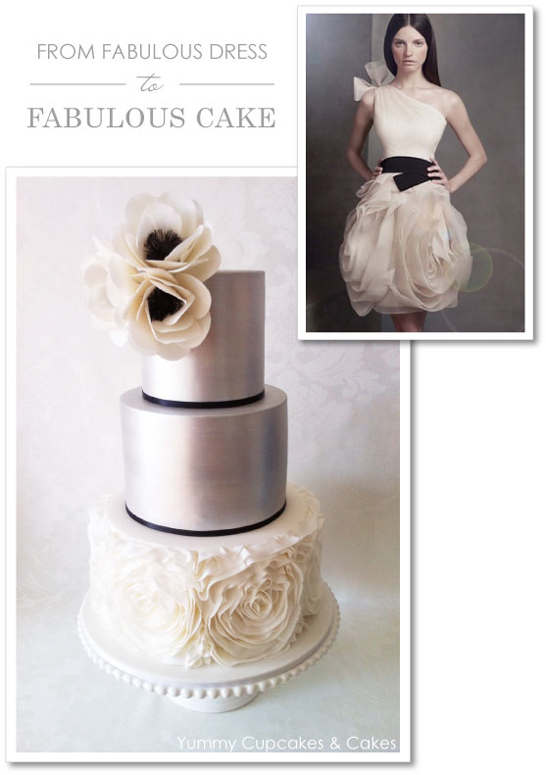

I did a similar ribbon cake and I had to ask that same question! I ended up using 50/50 gumpaste and fondant. I first cut out large circles to use as a base for each fIower. Then I rolled my 50/50 really thin and cut into strips. I ruffled the edges and used gum glue to attach to the circle. I started in the center and wrapped it around. It took many strips to make just one flower. I overlapped the strips a little bit when wrapping. I used a tool to go back and "fluff" it to where I wanted the ribbons before it dried. I hope that makes sense!
Thank you for your response Jimbos76. Do you have a link to that thread? For clarification: the circles were on the cake, then the strips were attached to them? Did you have to support the ruffled edges from 'flopping' or leaning? As for the point where the strips were attached to the circle did you have to fold the edge a little to get some surface to stick them on the circle? Gosh, I hope my questions make sense.
I made the flowers on the counter flat and then when they were semi-dry I attached them to the cake. Semi-dry was to ensure I could curve the flower to lay on the side of the cake correctly. I did start out folding down the side of the ribbon to give it something to grab to but that was a pain so what I did was use the end of my paint brush and used it to kind of stretch and poke the edge of the ribbon to the circle base. The ribbons will kind of fall in all directions once wrapped and that's when I went back and poked around to fix them. It's dries quickly so I didn't have issues with the ribbons flopping down once wrapped and fixed. I will try to post a picture! Not sure how to find the link :/
Found it! Isn't it funny how we used almost similar words to describe the thread topic ![]() The photo you posted is almost exactly like my sketch-- even the colors. SMH, there's nothing new under the sun.
The photo you posted is almost exactly like my sketch-- even the colors. SMH, there's nothing new under the sun.
http://cakecentral.com/modules.php?name=Forums&file=viewtopic&t=747315&highlight=
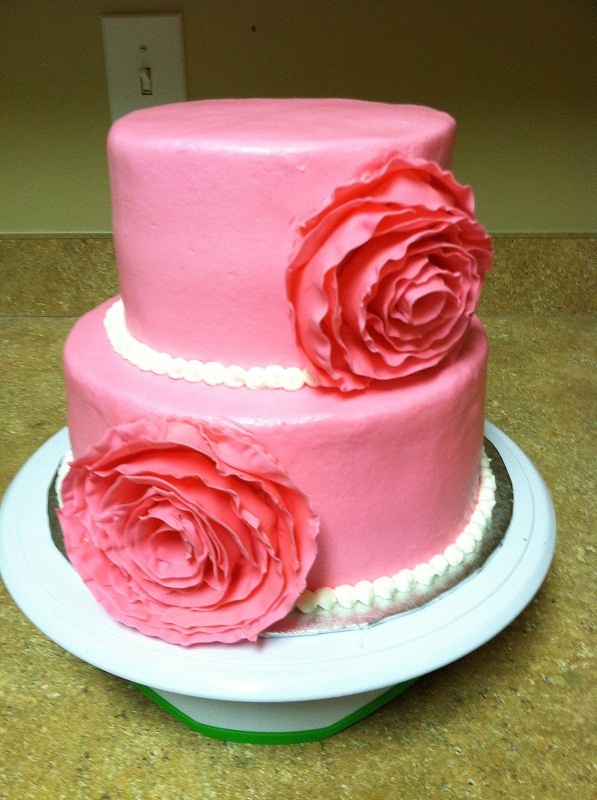
So I'm on my regular computer now. Here is a picture of the cake I did. My intention was to make the flowers go all around but once I realized how my ribbon each one took and how long it took me to make each one, I changed my mind! It was for a friend's bridal shower so it was fine. Thanks for finding the link!
Quote by @%username% on %date%
%body%