

I have a wide mouth bass cake that I need to make for next weekend and I was wondering what tools and colours etc would you use to make it look like this picture below. I will also be making lures and and the base will look like a wooden trophy board.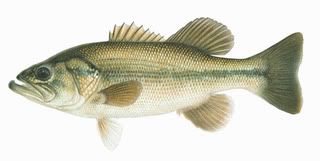
Bass fishing is a popular sport where I live so I have done several of these but it has been awhile since I no longer make cakes to sell except for just a few people. The fish itself is easy to cut out of a sheet cake. I used a crusting buttercream to ice with the fins modeled out of gumpaste. The fin between the head and the body doesn't lat flat so you may want to use a couple of toothpicks for inserting it into the cake. Now, I myself have never been up close to a live bass so the challenge was to get it realistic looking. I learned that taxidermy supply companies have a wealth of information available. If you search for taxidermy supplies, you'll see they sell stencils for coloring the fish; you won't need to purchase a stencil, just use the picture as a guide. I airbrushed my fish. You'll need to use a little pearl dust too. The taxidermy places also have photos of fake fish eyeballs which are good for getting the eye color right. You'll also notice that the mounted fish have open mouths unlike the fish in your photo. HTH

use your photo as a template. Hold it up to a window and trace the outline of the body and fins. Then go to office depot and have it enlarged so that the body from mouth to end of body, not end of tail fin, is 13 inches. Cut this out with scissors and lay on a 9x13 cake diagonally and cut around the body, not the fins, with a serrated knife.
Now that you have the body shape, go around the body and curve the edges by trimming cake on top and bottom.
Dirty ice the cake and cover in fondant, leaving a generous amount on the end for the tail fin. Cut a generous amount around that area and use a veining tool to create the texture or lines in the tail fin. I use my hands to create a groove for the gill, a place for the eye ball and create lips around the mouth. Now use a #12 tip on the end of your finger to imprint scales randomly on the upper and middle parts of the body, avoiding the head and belly.
Using the leftover fondant that is already rolled out, cut the remaining fins. Again use the veining tool to create the lines in the fins. To attach them, I make a short fat snake of fondant, shorter than the fin, brush water on the body and hold this in place for a minute. Then cut a skewer into four pieces and insert about three into the snake. Finally, lightly brush the top of the snake and the fish body with water and attach the fin, allowing it to rest on the skewers. Push the skewers into the cake just until they aren't visible under the fin, but still supporting the fin.
You should now have a nice looking white fish. Make an eyeball but dont' attach until you finish coloring to avoid overspray on it. I use a white ball of fondant, indent a hole in it and insert a small ball of black fondant. Then roll this ball between your hands and it becomes one ball with a black center. Once the fish is colored and you attach the eye, I brush piping gel on for a realistic appearance.
As for coloring, I prefer airbrush...but dry powder works too, just not as nicely.
I don't apply color to the belly at all. I layer my colors, starting with the lighter colors. I start with yellow and go to pink, then I use green with alittle brown added to get an olive green that is perfect. Then for the black I add alittle black to blue for a really nice shade of dark navy. To finish I brush everything but the black open mouth with a pearl to add a nice shine.
I hope this helps. I just taught this tonight....class went four hours! I was so tired. ![]() But it was so much fun! One of my favorite classes!
But it was so much fun! One of my favorite classes!
Quote by @%username% on %date%
%body%