

Please Evaluate And Assist This Fbct :--D
Decorating By Julie_S Updated 9 May 2010 , 11:19am by peg818
Hi,
I tried another FBCT today. This time I made some changes per everyone's instructions. It's getting better but still not totally the way I would like.
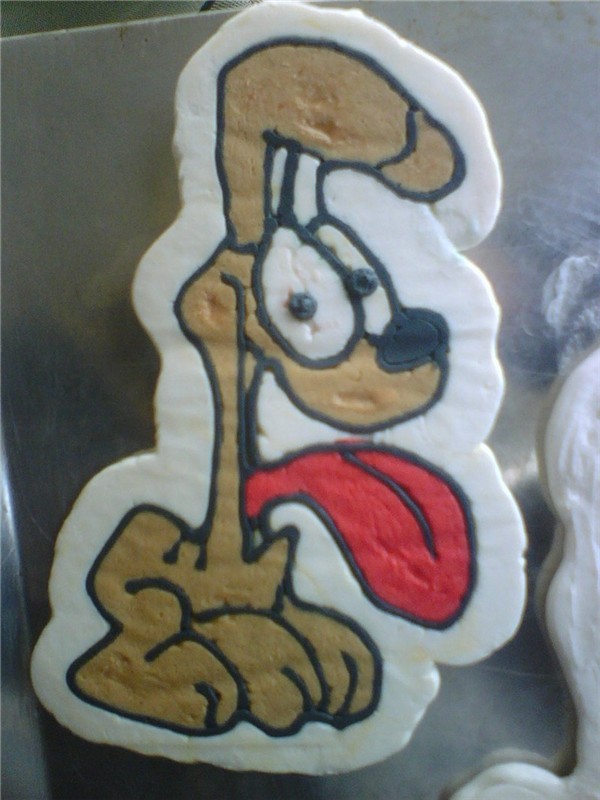
Picture 1 - Piping consistency: soft/medium - fill-in consistency - medium
You can see the wormy lines in the fill ins.
Picture 2 - Piping consistency: thicker than in picture 1 - fill-in consistency - very soft. There are no worms in the filling, however the few jabs that you see are a result of my using a wet paintbrush to brush over air bubbles. I won't do that again. This one is actually an improvement over picture 1. However....
It still looks sloppy and I have some questions.
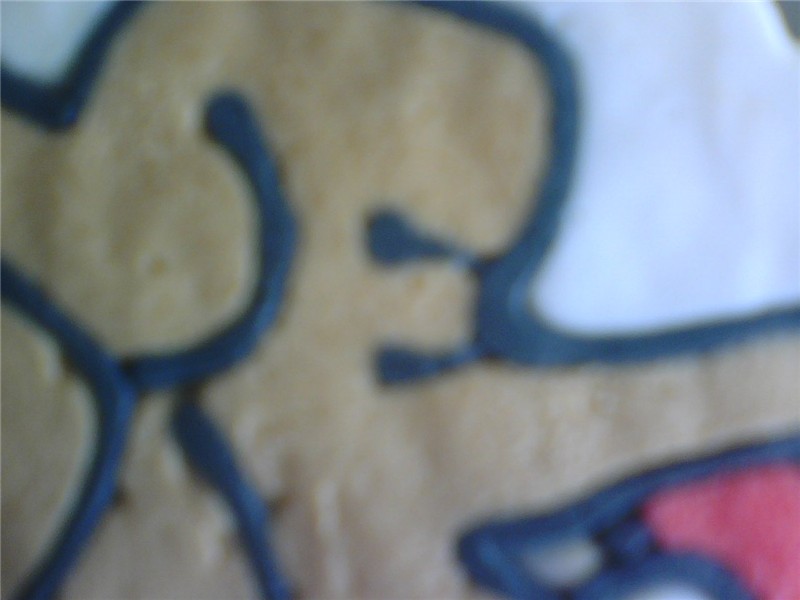
Look at picture 3- the close-up. The first thing I did was outline the entire Odie body. Then I attempted to do the lines and attach to the overall outline. How do you not get fat bulges like you see here when you try to connect the lines?
Also, when you put your final transfer on the cake, how do you get rid of the fact that your transfer is raised? I did not put a white layer on top of the back of the transfer but it still has height to it.
Thanks,
Julie
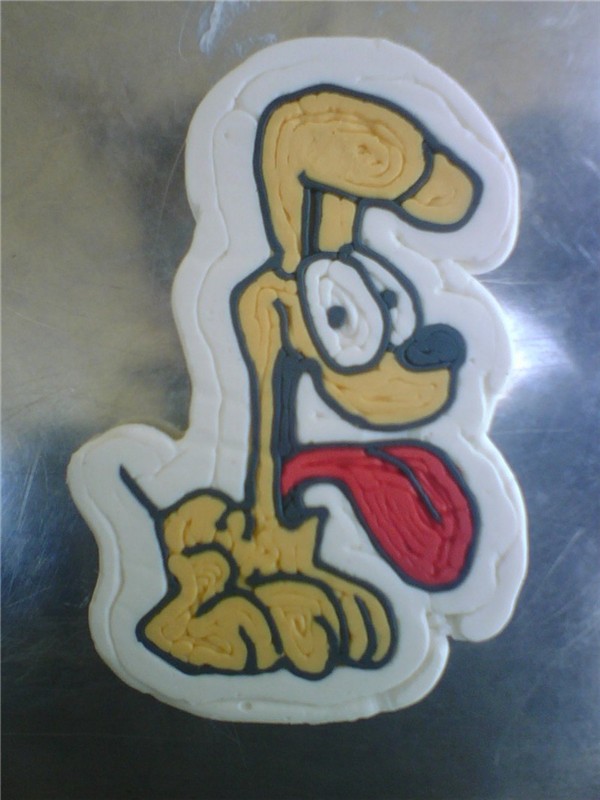
The picture in the middle (the improved one with no worms in the filling) has waves in it. Maybe this is why people put that final background cover over the top? But won't that shmush the outlines?
Oh and I let it sit in the freezer after I outlined.
Thanks again.
This is frustrating.
Well, actually when i have waves and imperfections in my fbt. i let my icing crust then throw a piece of viva over and smooth out the imperfections with my hand. I have found this to be effective for me. The one thing that you must not do, is move the paper towel around as some of the colors in the design do transfer to it.

I recently tried a FBCT and mine came out pretty good and not wormy looking. This is what worked for me.
I out lined with a #3 tip, med-stiff consistency icing. Then filled in with a thinner icing. (I did not freeze in between). and used #5 to fill in and I kept the tip burried into the frosting but not dragging or touching the tip to the wax paper.
I did put the final coat of bc over it and it didn't smush the outline or the picture, I just lightly smoothed it (make sure it's thin icing).
When I put it on the cake it was raised a little, but not much. It looked fine. You could always hide it with a border.
Good luck!
Well, actually when i have waves and imperfections in my fbt. i let my icing crust then throw a piece of viva over and smooth out the imperfections with my hand. I have found this to be effective for me. The one thing that you must not do, is move the paper towel around as some of the colors in the design do transfer to it.
Peg,
I just tried this with a store brand paper towel. I found that I could do it with the one where I used thicker icing for the fill in because it got firm after sitting a while. But the one where I used the thinner icing for the fill-in - that one is taking longer to firm up if it ever will and I just got icing on the paper towel because of it. Also, I wonder if Viva paper towels don't have impressions on them. I'll have to look a them next time I go to the store.
Thanks,
Julie
I recently tried a FBCT and mine came out pretty good and not wormy looking. This is what worked for me.
I out lined with a #3 tip, med-stiff consistency icing. Then filled in with a thinner icing. (I did not freeze in between). and used #5 to fill in and I kept the tip burried into the frosting but not dragging or touching the tip to the wax paper.
I did put the final coat of bc over it and it didn't smush the outline or the picture, I just lightly smoothed it (make sure it's thin icing).
When I put it on the cake it was raised a little, but not much. It looked fine. You could always hide it with a border.
Good luck!
tiffany,
Next time I try this I will pay attention to keeping the tip burried in the icing. Also, I will try smoothing over the top with thinned background color icing.
I've seen too many pictures of other's fbct's and many of them are not raised or at least don't look raised so I would like to know how people do this.
Thanks again,
Julie
Can you use a larger tip to fill in the colors?
I used #5 to fill in. I'd like to not go higher than that (bigger) because I don't have multiple tips in one size - only a few and in many of the spots, anything bigger than #5 would have been too big because the space was small.
Julie

After I flip my FBCT out and take off the paper, I leave it alone so the condensation will dry up-if there is any-and it will crust. Then I just use a VIVA and my fondant smoother and smooth it out. I kind of push it into the BC, too.

I have a question.. what is frozen buttercream transfer???? I have heard of most things.. have been doing decorating for over a year now and haven't been asked to do this.
It's when you take a drawing and trace it with outlining color in icing. Then you fill it in with appropriate colors. You put it in the freezer for a certain amount of time (some say 90 minutes), take it out, and then flip it over onto the top of a cake. Here's a youtube video so you can see it being done:
http://www.youtube.com/watch?v=CV2DZDuv9XA&feature=PlayList&p=6A2B6BAAE1E094AC&playnext_from=PL&index=27

Peg,
I just tried this with a store brand paper towel. I found that I could do it with the one where I used thicker icing for the fill in because it got firm after sitting a while. But the one where I used the thinner icing for the fill-in - that one is taking longer to firm up if it ever will and I just got icing on the paper towel because of it. Also, I wonder if Viva paper towels don't have impressions on them. I'll have to look a them next time I go to the store.
Thanks,
Julie[/quote]
The Viva paper towels do not have any impressions on them. They are the only ones that are completely smooth and they are awesome!!
to avoid having the transfer raised up off the cake, i do the whole top of the cake as a transfer, then smooth with the viva (yes viva cause there is no design on it) OR if i have a large sheet cake, i will do a section then smooth the edge into the icing.
Quote by @%username% on %date%
%body%