


My First Fbct -Please Help Me Save It!
Decorating By cakesrock Updated 20 Feb 2010 , 6:40pm by TexasSugar

Hi all,
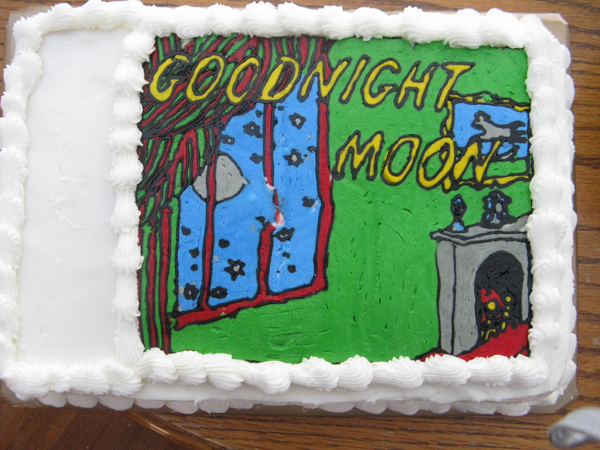
I've attached the photo of my first FBCT. Love the technique and it's pretty forgiving, as I thought it would look even more like it was done by my 4 year old. I don't have the steadiest hand... But I still had some real challenges, as you can see the window pane is all messed up and the moon is not really that round.... It took me a long time and I really don't want to re-do it. Maybe it was too complex a design for my first? But how can I fix that or cover it up - any ideas??
Also, I followed the directions in the tutorial, but became confused the last 2 steps when it says to pat down. The icing kept coming up on my spatula! Hence the bad smears. Then the last step says to 'edge it' and spread the icing the color of the cake over the back. Firstly, not familiar with edging something and thought I did it, but apparently not. Then I had the same thing happen- icing kept coming off ! And, as you can see the green wall looks lousy... the biggest tip I used was a 3 - could that be the issue? Maybe I didnt' let it harden enough before doing the last 2 steps?
Appreciate any advice and suggestions! ![]()

Sorry I cant offer much help but will keep an eye on this thread because I too had trouble with this. I thought I was the only one that was a bit confused by the end steps of the tutorial. My transfer also came out distorted but as it was the last minute, had to use it anyway. I think the step that says to smooth the back was what caused it to distort, the pulling. Hope someone can offer some helpful advice.

First let me ask is this for a paying customer??? Then let me say that when you PAT it down for me a VERY hot dry spatula works best. (again everyone has their own likes and dislikes) I think a very small tip on the moon to make the outline a little more clear would help and the same with the window pane. just as if you were doing it from the fromnt side. Really that would be the easiest thing. I hope you arent getting more confused...Let it ALL dry a bit then softly take a paper towl (viva is best) and pat it down JUST A LITTLE so it matches the flatness (is that a word) of the rest of the image.
To big of a project for a first...NO the next one will seem SO simple now..
PM me if I can help any more.
Thanks so much for the advice, tirby! Yes, it make PERFECT sense. I agree, the next one will seem easy. I had a hard time getting my head around the 'layering' but I got it now! I still have the colors, so I'm tempted to try this again, but it's the time I lack, with a full-time job and 2 little ones of my own...I think I will try your suggestions...
No, it is not for a paying customer. It is for my friend's daughter's 1st b-day, though, so just as important! But I feel a lot less pressure when I volunteer to make cakes for friends and this is why! It is a chance to try new techniques too. Thankfully, people who don't decorate cakes aren't as particular as us!
IF it were a paying customer I would say redo. But PLEASE take this little piece of advice that my Mentor told me..."1.There is always a back to a cake and 2. it's not how perfect you are it's how well you can cover"fix" a mistake"
With that said of course most of us tend to be our own worst critics... But then again thats probably a good thing.
ALWAYS step back and take a little break..When you go back it never seems so overwhelming.
Sometimes I just get on CC and talk it out.
PM me if I can help at all. I would love to see the "finished" product.
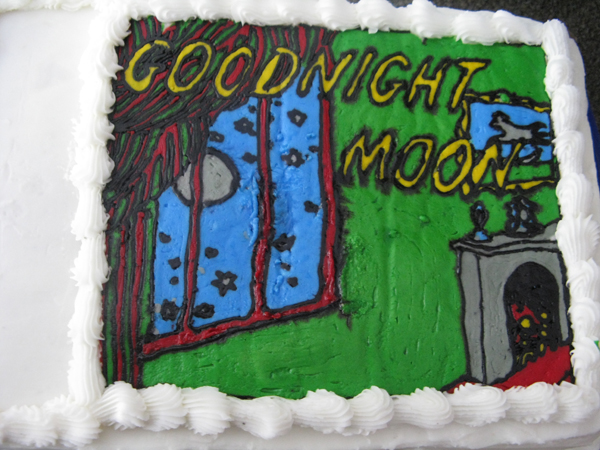
Good advice about the repairs, but I couldn't save it in the end - at least not to my standards (see photo). The colors actually ended up running too? Not sure why?
I froze the cake, then put on the FBCT, then froze again immediately. Then I took it out and defrosted it on the counter and it ran. Maybe I should have defrosted in fridge? Or is refreezing out of the question? I need to know, as I'm going to do it again. No biggie - that's why I did it so far in advance - I wanted to see if it would work out the first time.
I hope for better results next time. But I am wondering about timing here. I'd like to re-do it in the next few days and re-freeze. Will I have the same issue with running again? The party is March 13th.
Thanks again for your helpful advice! ![]()


When you froze your cake and took it out, was the cake covered in anything? Condensation will form on the outside of something. If you put your cake in a box and wrapped that box, then when you take it out of the freezer keep the wrapping on. The condensation should then form on the outside of the box rather than on the cake itself.
My guess is the bleeding colors were from condensation. Maybe a fan on it while it was thawing would have helped??
As far as your transfer, I do my slightly different than some of the how to's out there. I never use a spatula on on. I pipe my outlines and details then fill in around and over the details with the icing. I use a soft medium icing. For the outlines it is usually a tip 3, the details a tip 1 or 2. For the fill in, anywhere form a 3 up to a 8 depending on how big or an area I need to fill in.
To help avoid the wormy lines, like in the green section I try not to pipe lines, but actually let the icing build out and around my tip as I go.
When I am done I will pipe icing on the back in any low spots, then I lay a piece of wax paper on it and lightly smooth it out. Don't press to hard, as you don't want to mush around the icing underneath, but enough to get a mostly flat surface.
After putting it in the ove for 10-15 mins I pull it out and flip it over and run my finger over it (over the wax paper) then freeze it again until I need it.
Don't forget once it is on the cake and has crusted you can always take your viva paper towel and smooth over it too.
The FFA emblem in my pictures (yeah I know I refer to that one alot) the first time I did it that night (had down it twice before on other cakes) I forgot to flip the image to start with. Do you know when I realised this? Right before I was going to put it on the cake. First time took me 2 hours because of all the detail. I left my house after that and went and had dinner out just cause I needed to get away. So I come home, take the left over icing and do it again, only took 1.5 hours that time. Stuck it in the freezer and went to bed.
The next morning I get up and put it on the cake. I get the camera to take pictures. I dropped the camera on the cake, and lens lands on part of the FBCT. Thankfully it was toward the edge and not in the middle so it didn't do as much damage as it could. I took a toothpick and picked away the smushed lines, re-piped and did as tirby said earlier, used a viva paper towel to smooth it so the lines were flush with the icing and looked like everything else.
As I said this was not my first one, not even my first time doing this exact design. I'm a firm believer that sometimes things are just going to go wrong. And with me usually once one thing goes wrong other things do to. It seems like all the diasters end up happening one cake. And was Tirby said sometimes we just have to walk away from a project for a while then come back to it.
The cake was for my SIL who is an AG teacher, so I knew she'd understand if I couldn't fix it perfect. I delievered the cake to my brother and told him, "I am not doing that emblem again. If she wants it again she is paying dearly for it." I have not been asked to do it again.
All that said, for your first one, and a detailed design like that, I think you did a great job. Keep trying this techinque. Each one of them, like everything else we do, will get better.
Edited to add: I think the cake in my photos is the first time I did it and not the cake I dropped the camera on.
black has a tendancy to bleed. I put the black down and let it dry. Then finish my transfers... I do not put it back in the fridge at all. the condensation is usually what makes it happen. a fan to help it dry a little might help. Also I wouldn't do it to much in advance. Transfers (for me) are not placed on the cake untill the day before its due, any longer than that and colors bleed.
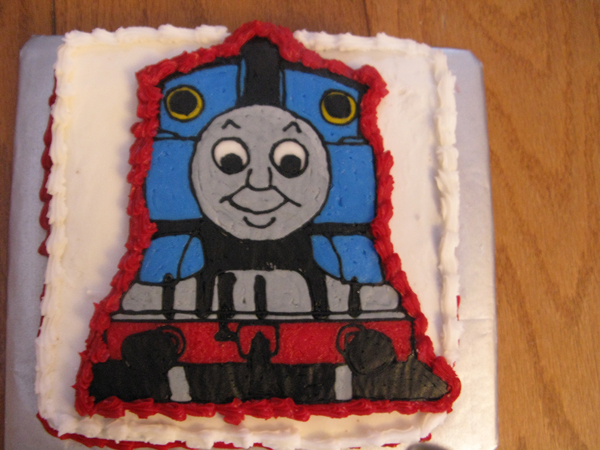
I did my 2nd FBCT on a little cake for my kids as a practice. My kids finally agreed on Thomas, since one wanted Hot Wheels and the other wanted Dora.
I applied a lot of the advice from everyone and it really helped. I let the black outline harden, then I did the rest of the transfer, then let that crust. I was able to pat that down with my finger instead of using the spatula, which avoided the smearing I had last time. Then I put a layer of white icing (same color of my cake) on the back and smoothed it. It worked a lot better and I didn't get the smearing. I decided I should avoid freezing it again, as I didn't want it to run.
The larger areas still have a bit of the 'wormy' look, so I'll have to work on that. ![]()
Quote by @%username% on %date%
%body%