

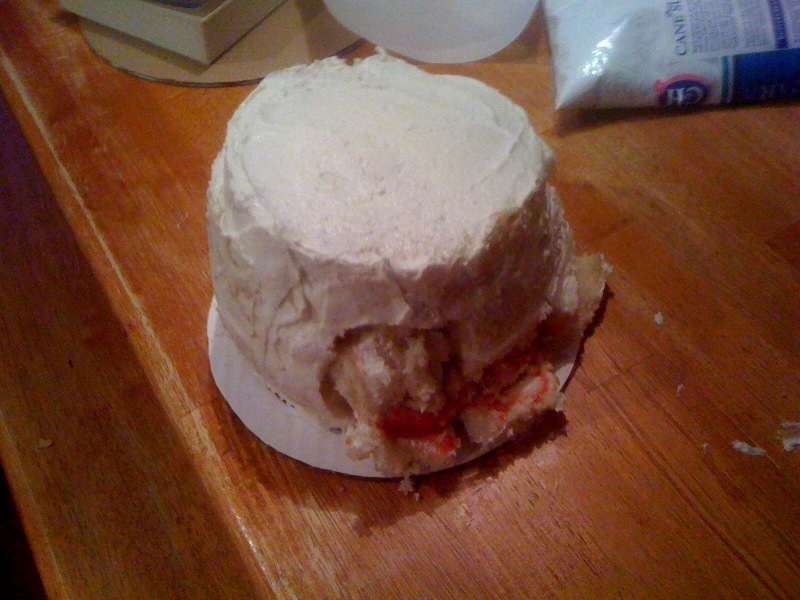
I'm trying to figure out what is wrong with my cake. I was watching Sugarshack's buttercream DVD today and the cake looks so nice and sturdy. I'd like to get my cake more like that. Any suggestions would be much appreciated.
I've been using the WASC cake recipe. It turned out pretty good when I was at my in-laws at a bit under 5000 feet. Now I'm home at nearly 7000 feet, and I'm having problems.
The last time I baked it, I made a bunch of adjustments for the altitude (less baking powder, more flour, less sugar, XL eggs, and I think a little extra liquid). We also started out at 350 instead of 325, because that is also recommended for high altitude, but we did end up turning it down because the top seemed to be getting done while the middle was still very liquidy. It seemed to take forever to bake (I don't have an oven thermometer even on my own oven, but this time I was also baking at a friend's house). Oh, and I was using the Wilton flower nails in the middle).
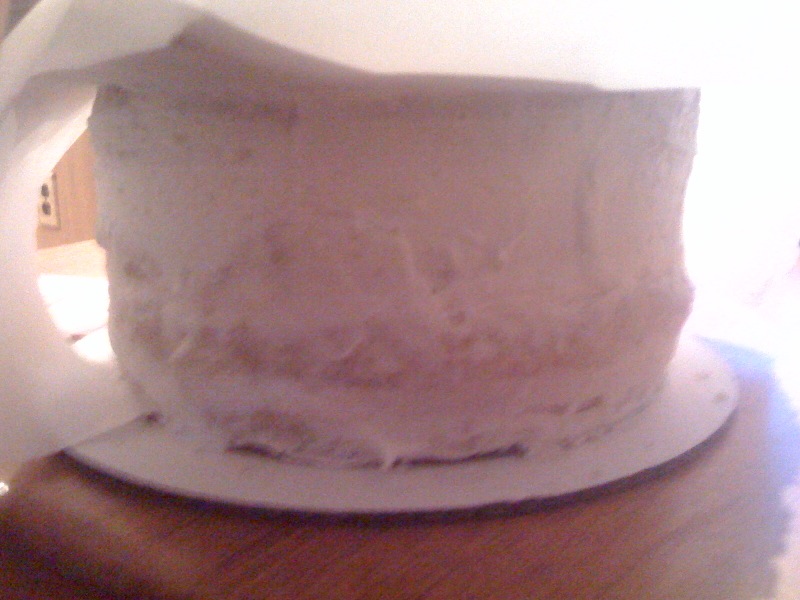
We had used parchment rounds in the bottom of the cake, so the bottom was fine, but even though we ran a knife around the edge, the corners where the edge and bottom meet broke off.
We wrapped it up after it cooled down enough to handle and froze it (that's supposed to help you have a moist cake, right?).
We thawed them, wrapped. The first one we started to level and torte at about 20 minutes. It was still too solid to really work with well, but the edges and top where I placed my hand to steady it were too moist and would stick and come off.
On the other hand, we also made Darn Good Chocolate Cake, with the same high altitude adjustments, and it turned out much sturdier.
Let me know if there's any details I forgot to include, and again... thanks for any help (please note... the photos showed up in the reverse order to what I intended them to).


I don't know anything about the altitude. But I just watched the same video and actually Emailed Sharon and ask her about her cake--I thought the same thing, it just looked SOOOOOO perfect! She uses the WASC also! But she said that cake is really easy to undercook, because I told her how I was having issues with it not being as easy to move around without freezing it! She said she doesn't freeze her cakes even!!!

Couple of tips, its a long list so bear with me here.
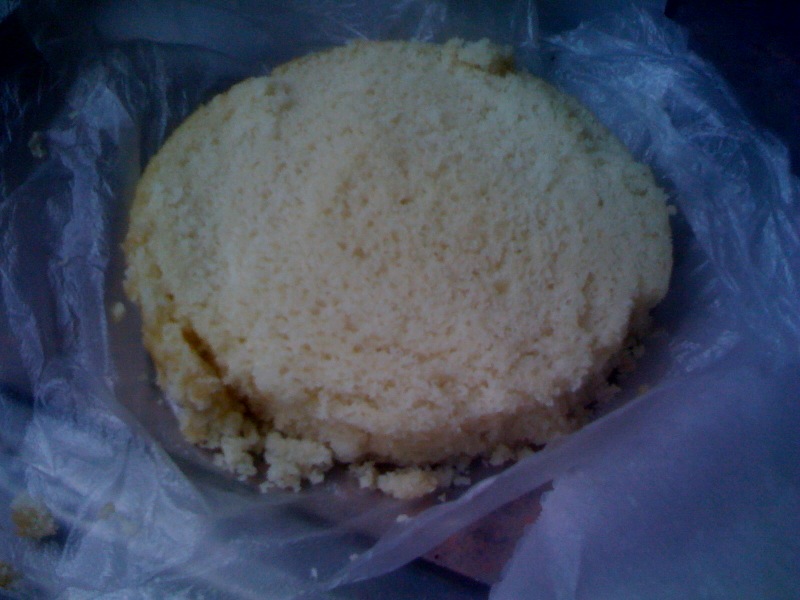
1. Sift your cake mix. I see quite a few large holes in your cake, if you sift your mix you get a smoother batter.
2. I use the homemade pan grease, equal parts oil, shortening, and flour. I mix it right up in the pan too. 1 tsp of each and then mix it around with a paper towel making sure to get it in the corners very well.
3. I dont freeze, but I do refridgerate. Turn out almost immediately after you pull from the oven. I barely let the cake cool before I turn it out onto a cooling rack from the pan. This could have been part of the corner problem.
4. If your BC is too cold it doesnt spread well. Microwave it for a few seconds to bring it up a little higher than room temp. Especially in the wintertime when your house might be a little colder/draftier.
5. When I make BC for a dam I usually add an extra cup of PS to the BC recipe, just for dam BC. It needs to be super stiff. I pipe it on with a large round tip, but you can just cut a large hole in the bag.
6. Level your layers after they are cooled by sticking them back in the pan and just cutting off the part hanging over the top. This will insure a good 4 inch tier, each layer being 2 inches, and helps you to easily level without expensive equipment (Indy Debi trick) *You will need to fill your cake pans pretty full so that you can get the cake to go up over the pan line.
7. I bake with a flower nail in the middle of all cakes. It just helps to cook the cake more evenly so that the edges dont dry out. This will reduce your baking time as well because it will cook the cake more evenly.
8. After filling your cake, check to make sure that it is completely level again before you put on the crumb coat. You might just need to shave a bit more off of the top to level it. Also trim the sides with a knife so that they are straight up and down. If you use Wilton pans this is important because the sides arent completely straight in those pans. This can cause bulging too.
These are some easy tips that help immensely.
Thanks for the tips!
Couple of tips, its a long list so bear with me here.
1. Sift your cake mix. I see quite a few large holes in your cake, if you sift your mix you get a smoother batter.
I usually do, but I was doing this with/for a friend, and sometimes she just plowed ahead... hmmm... we did sift the dry ingredients for the WASC cake, though, but come to think of it, somehow we ended up mixing the wet and dry backwards and that made the batter go together kindof weird... maybe that had something to do with it.
2. I use the homemade pan grease, equal parts oil, shortening, and flour. I mix it right up in the pan too. 1 tsp of each and then mix it around with a paper towel making sure to get it in the corners very well.
Well, this is a different recipe for homemade pan grease than I have used before... the one I've seen was equal parts oil and flour, no shortening. Every time I use it, the middle of my cake sticks to my pan and I lose a good hunk of the cake. We used parchment rounds and Baker's Joy.
3. I dont freeze, but I do refridgerate. Turn out almost immediately after you pull from the oven. I barely let the cake cool before I turn it out onto a cooling rack from the pan. This could have been part of the corner problem.
We left it in the pan for a few minutes, but not very long at all... it was still too hot to handle without oven mitts when we did.
4. If your BC is too cold it doesnt spread well. Microwave it for a few seconds to bring it up a little higher than room temp. Especially in the wintertime when your house might be a little colder/draftier.
I don't think this was the problem... we made it right before we used it, and she keeps her house warmer than I keep mine.
5. When I make BC for a dam I usually add an extra cup of PS to the BC recipe, just for dam BC. It needs to be super stiff. I pipe it on with a large round tip, but you can just cut a large hole in the bag.
We did do this (I was following the recommendation in Sugarshack's buttercream DVD). I think we actually got it TOO stiff, especially considering how weak the cake structure was.
6. Level your layers after they are cooled by sticking them back in the pan and just cutting off the part hanging over the top. This will insure a good 4 inch tier, each layer being 2 inches, and helps you to easily level without expensive equipment (Indy Debi trick) *You will need to fill your cake pans pretty full so that you can get the cake to go up over the pan line.
Since I used a flower nail, my cake did not rise enough for me to do this. We also had a huge problem leveling and torting. I tried using my large Wilton leveller, and the blade was bowing, so we ended up doing it by hand with a serrated knife. However, it stuck terribly to our hands while we held it in place, and stuck terribly to the countertop as well. This may have been a problem with my high altitude adjustments... the guide I was following said that if your cake ended up sticky, then there was too much sugar in it, so even though I reduced the amount of sugar, I may not have reduced it enough.
7. I bake with a flower nail in the middle of all cakes. It just helps to cook the cake more evenly so that the edges dont dry out. This will reduce your baking time as well because it will cook the cake more evenly.
We used the flower nails in the 8" WASC and the 10" Darn Good chocolate cake, but not in the 6" WASC. That's the one that collapsed, but I think that could also be contributed to user error. The cake was not chilled when I put the weight (a 10" round w/ a paperback on top of it) on it to try and get it to settle. I realized after the collapse that I really hadn't needed to worry about it, because the 6" cake would have already been the lightest one, so wouldn't have settled as much, and was also the top tier, so I didn't have to worry about anything being on top of it later. I should've just chilled that one.
8. After filling your cake, check to make sure that it is completely level again before you put on the crumb coat. You might just need to shave a bit more off of the top to level it. Also trim the sides with a knife so that they are straight up and down. If you use Wilton pans this is important because the sides arent completely straight in those pans. This can cause bulging too.
We tried to make sure it was level after adding each torted layer, but the torting itself didn't go super smoothly, so it may not have been enough to compensate.
I do use Magic Line pans, but with the edges that broke off, I would've lost way too much cake if I'd tried to trim it to be neat and straight up and down.
These are some easy tips that help immensely.
Both the 8" and 10" tiers did make it, and I took pictures of the finished product, if I can just find the adapter for the card so I can upload them to the right computer, I'll get them posted.
So, next time I'll make sure I put the ingredients together the right way, but I do think I still need to make some additional changes to compensate for the altitude and strengthen the cake structure just a bit. I just hope I can find a way to do it without compromising the moist taste that everyone loved so much.
Quote by @%username% on %date%
%body%