


I Am So Disappointed--Country Cake Cancelled
Decorating By dynee Updated 21 Feb 2010 , 1:31pm by dynee

I have been thinking about this country theme wedding cake since last October when I had a consult with the bride and groom and the MOB. Made them sample cupcakes and the whole nine yards. I am such a cake nerd that I had already ordered chocolate molds and leather design patterns, practiced the hats and boots. I got an e-mail from the MOB who was paying for the whole thing and the wedding is OFF! If you want to see the sketch, I had posted it on a design discussion way back then.
http://www.cakecentral.com/cake-decorating-ftopict-656839-.html
I had also practiced the bandana on a cake for my brother in my photos.

So sorry to hear that. I looked at your sketch and it looks awesome! Maybe you'll get to use it another time. I noticed you are in central missouri. I'm in southwest missouri!


Well thats too bad. Had they atleast given you a deposit already? (Is it non refundable)
And will that deposit have covered the materials already purchased?
But anyhow your sketch looks very nice, it would have been a nice cake.
Okay now thats me just being nosy
I know you didnt ask the MOB what happen as far as why wedding is off. But did she give hopes of maybe re-booking at a later time.
It is a gorgeous cake... you should go ahead and make it out of cake dummies for your portfolio! I'd love to see it!
Thank you all for your support. Yes, I had gotten a deposit. Since the wedding wasn't until March, I did return all but $50.00 of it which did pay for supplies I had bought special for this cake.
Jodi, that is a good idea, I'll see if I have some cardboard boxes the correct sizes(yeah, I'm the cheap one who makes the dummies out of boxes). I already know that a butter box is perfect for the hay bale because that is what I used to check the scale of the top boot.
And my SIL has asked me to make a sombrero cake for my soon to be three year old grand niece's birthday in July. I think the chocolate boot will still be good to create a vignette for that.
This spelling thing is getting so bad for me. Anybody else have that problem? I have been to www.m-w.com three times today. I used to be a pretty fair speller but I guess it's another muscle I don't use enough now days.
These are the new instructions for the grown-up boot. I changed the order to assemble so the shaft would be dry before attempting to add the toe piece. I have also had to modify the template to account for the heel because the shaft was more solid.http://www.cakecentral.com/cake-photo_1568302.html
Cowboy Boot
1. Prepare a board with 35 degree slant on one edge large enough to accommodate both soles with about an inch between. For glue, I use tsp. of Tylose mixed with 1/8 c. water( it keeps forever)
2.(I used chocolate fondant because I needed to use it up. Next boot, Id use gum paste.) Roll out fondant slightly thicker than normal and cut a sole piece facing in opposite directions for right and left boots and lay them over form with the slant being the distance from the back the size of the heel pattern. Allow to dry.
3.Build heels using ½ inch fondant. Cut out and then slant back of the heels like cowboy boot heels and set aside. When both pieces are dry enough, attach the heel to underside of sole.
4.Meanwhile, cut two of the boot tops(I have made a modification to cut back of boot top ½ shorter than the front and added a slant to the sides of the front to accommodate the ½ heel). And lay both on a curved form such as a small rolling pin to start a curve. Paint glue line along straight sides and join the front to the back to form a cylinder.(I didnt do it this way. This is the way I should have done it.) Carefully wrap the strip around fondant piece and plastic wrap wad to help keep it upright. Allow to dry until it will stand alone. When the sole is hardened, fit cylinder onto the back half of the sole. (note, the instep is an illusion, there will not actually be an opening into the toe of the boot)
5.Make a wad of plastic wrap for each boot, and cut two toe pieces. Cover one piece while working with the other. Use small brush to paint a line of glue (mixed around the front of the first sole. Using the ball of wrap to help support it, attach toe and side section, wrap it around the shaft and up onto the front section. Manipulate the throat section so it is more vertical than the toe part. Press around edges to help attach and then run stitching wheel around edge. Let dry for 15 minutes or so. If you wish, use a tool to place gentle folds over instep. Cut boot back section, paint line of glue clear around. The straight side will be against the sole and overlapping the side of the toe section and the curved side against the shaft. Finish with stitching lines. Cut straps and run stitching lines around. Overlap straps onto the top edge of boot at the join lines and attach one on each side.
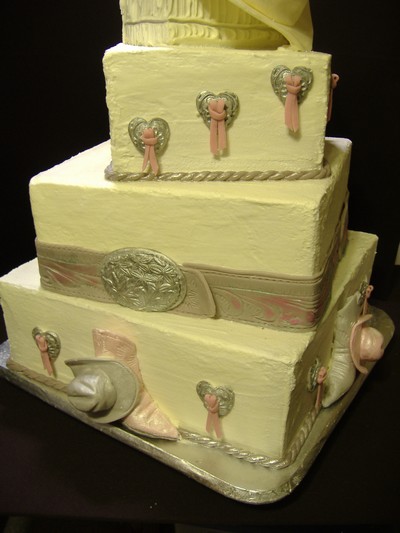
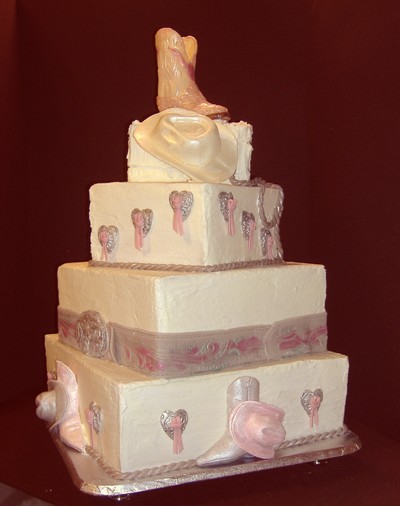
I finally got around to doing the dummy cake with the elements from the Cowboy wedding cake. I tried something different on my boxes. I first covered them in spackle, thinking it would save time and icing. That was a mistake. Apparently they stay wet longer and I had a real hassle with the boxes warping. Never had that problem with RI.
I made some changes that I preferred when the former client went with something else. I did the partial twist to the tiers so I could have more room on the sides and I only wanted to decorate 2 sides so I could use the back side for something else.
Quote by @%username% on %date%
%body%