


Hola nuevamente chicas!!!!
Hace un par de semanas que comence a tomar uno de los cursos que ofrece Michael's, el de Fondant y Gumpaste. Honestamente tengo que decir que personalmente no me gusta mucho el sabor del fondant so no lo utilizo mucho a menos que sea para hacer algunos detalles en los cakes. Lo que no se puede negar es que los cakes se ven tan bonitos, de manera q decidi comenzar a tomar el curso corto que ofrecen a ver que tal. Hoy fue el segundo dia de clase y aqui les muestro mi PRIMER cake cubierto completamente con fondant. Quede bn contenta con el resultado, yo pense que seria bn complicado pero ya vi que es mas sencillo de lo que pense. El cake es de tres leches con relleno de strawberry mousse. Aqui les dejo la foto. Como siempre todos sus comentarios y criticas son bienvenidos.
Cuidense y TFL!!!
Addie ![]()
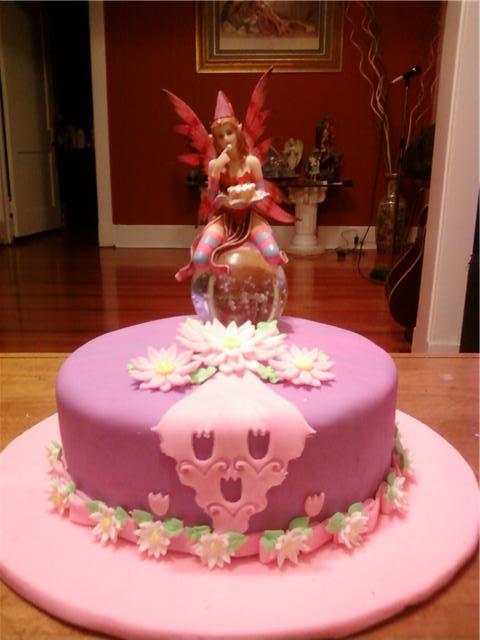


Te quedo muy lindo, y muy lisito tu fondant, felicidades pues no es facil la primera vez pero tu lo lograste y sobre tres leches!!! yo ni me animo a hacer 3 leches con BC, jajaja, y tienes razon el fondant de wilton es horrible, yo solo lo uso para hacer figuras, yo prefiero comprar el satin ice porque soy muy floja para hacer mi propio fondant ![]()

addie!! te quedo bello, super lisito, nadi epensaria que es el primero, las flores bellas, y el detalle del angelito se ve muy bien tambien, sigue adelante, yo los tome tambien, al final te daras cuenta que la mejor escuela y maestras estan aca en CC, pero siempre sirve unos tips y maneras de ver como lo manejan!!,.......coincid con patty, trata tu propio fondant, tambien uso el de michael foster, es muy rico y sencillo, aparte que te sale muchisimo mas barato que comparlo!! y tambien puedes hacer tu propio gumpaste!!......felicidades de nuevo!!

hermoso cake!!! te felicito para ser la primera vez!!! se ve que haces las cosas con mucha pasion..felicitaciones!!!!


Ok, primero que nada dejame de cirte que tu cake esta de 100 me encanto y eso de 3 leches cakes cubierto de fondant ![]()
![]() , nos tienes que asesorar en eso amiga que yo me muero por hacer uno de 3 leches con fondant. Felicidades tu trabajo es simplemente perfecto.
, nos tienes que asesorar en eso amiga que yo me muero por hacer uno de 3 leches con fondant. Felicidades tu trabajo es simplemente perfecto.
En cuanto a la receta aqui te pongo estas dos con ellas no tienes que buscar ninguna otra que son las mejores (en mi opinion claro) la de Michele's la uso para cubrir las tortas y la de Nicholas para el modelado y no tienes que mezclar 50/50 para modelado con esta receta simplemente la usas asi como es, cualquier pregunta me escribes y con mucho gusto te ayudo 
MICHELE FOSTER'S DELICIOUS FONDANT
Preparacion time: 10 min.
Tiempo de coccion: 30 min
Categoria: Fondant/gumpaste/sugarpaste
Introduccion
Estoy muy contenta de compartir esta receta! ha sido una gran mendicion para mi! es deliciosa, y puedes usar vainilla o algun otro sabor que deseek! He tenido muchas peticiones para compartir esta receta y Michele (aka sugarflowers) quien originalmente me dio esta receta, me dio permiso de compartirla con todos ustedes!
P.S. Esta receta tambien esta en su libro "The Sugar Fix" que pueden obtener en su website- junto con sus otras recetas.
Ingredientes
1/2 taza de leche
3 paquetes de gelatina (6 cucharaditas en caso de que desee hacer la mitad de la receta)
1 taza de corn syrup
3 cucharaditas de mantequilla sin sal
3 cucharaditas de glicerina
2 cucharaditas de vainilla (algunas veces yo uso un poco mas)
una pizca de sal
3-4 libras de azucar en polvo, (cernida cuando menos 1 vez)
* nota: todas las cucharadas and cucharaditas son al nivel no copeteadas (he tenido esta pregunta por algunas miembros de CC)
Direcciones
Combine leche y gelatina y dejela que se cuaje.
Cocine a banio maria (double boiler hasta que la gelatina se disuelva)
Aniada los ingredientes restantes (excepto azucar) y cocine hasta que la mantequilla ese casi disuelta.
Enfrie a que este tibia ( yo revuelvo periodicamente para que no se forme una capa en la parte de arriba y se haga grumosa)
Pase por un colador y ponga en un tazon en la batidora habiendo puesto 2 libras de azucar en polvo (una bolsa)
Mezcle lentamente hasta que este solo combinada
Use la herramienta de gancho para amasar (dough hook) aniada muchs mas tazas de azucar y mezcle a velocidad baja hasta que se conbine
Continue aniadiendo azucar hasta que se forme una consistencia que se mantenga su forma en el hook
Vierta en una superficie conazucar en polvo y amase.
Envuelvala en un plastico previamente enmatecado y ponga en una bolsa ziplock para el freezer.
Dejela reposar 24 horas antes de usar.
Tylose Gumpaste
Tylose is an alternative product to use in making gumpaste instead of gum tragacanth. The advantage of the tylose is that the paste is less expensive,, easier to make, holds up better in humidity and is whiter in color. The 55g container makes approximately 3 pounds of finished gumpaste.
The following recipe will make approximately 2 pounds of gumpaste.
4 - Large Egg Whites
1 - 2 lb. bag 10x powdered sugar
12 - Level teaspoons Tylose (Available in our online store)
4 - Teaspoons shortening (Crisco)
1. Place the egg whites in a Kitchen Aid mixer bowl fitted with the flat paddle.
2. Turn the mixer on high speed for 10 seconds to break up the egg whites.
3. Reserve 1 cup of the powdered sugar and set aside.
4. Turn the mixer to the lowest speed and slowly add the remaining sugar. This will make a soft consistency royal icing.
5. Turn up the speed to setting 3 or 4 for about 2 minutes. During this time measure off the tylose into a small container.
6. Make sure the mixture is at the soft peak stage. It should look shiny, like meringue and the peaks fall over. (If coloring the entire batch, add the paste color at this stage, making it a shade darker than the desired color.)
7. Turn the mixer to the slow setting and sprinkle the tylose in over a five second time period. Next, turn the speed up to the high setting for a few seconds. (This will thicken the mixture.
8. Scrape the mixture out of the bowl onto a work surface that has been sprinkled with some of the reserved 1 cup of
powdered sugar. Place the shortening on your hands and knead the paste, adding enough of the reserved powdered sugar to form a soft but not sticky dough. You can check by pinching with your fingers and they should come away clean. Place the finished paste in a zip-top bag, then place the bagged paste in a second bag and seal well.
9. Place in the refrigerator for 24 hours if possible before using to mature the paste.
10. Before use, remove from refrigerator and allow the paste to come to room temperature. Take a small amount of shortening on the end of your finger and knead this into the paste. If you are coloring the paste, add the paste color at this stage.
11. Always store the paste in the zip-top bags and return to the refrigerator when you are not using the paste. Will keep under refrigeration for approximately 6 months. You can keep the paste longer by freezing. Be sure to use zip-top freezer bags. If you will be freezing a batch of paste, allow it to mature for 24 hours in the refrigerator first before placing into the freezer.
Quote by @%username% on %date%
%body%