


Royal Icing Transfer (Rit) Pictorial!
Decorating By cakehelp Updated 18 Jan 2015 , 11:53pm by PattyCakes4All

So I used the tutorial and made a great Tinkerbell transfer. I put it in the butter cream and it bled through within 2 hours. So I immediately took it off and put sugar cubes in the cake and put the RIT back on it. I thought I read that someone put on on buttercream and it did not bleed after 3 1/2 days. Any suggestions???
I never do cakes with bc, so I don't really know... but could it be that you used non-crusting buttercream? I imagine that it would bleed easier on that than on crusting... was the transfer completely dry on the back when you put it on the cake?


can i use royal icing transfer on chocolate mousse? you think it will bleed? sorry if its been asked before... i need your opinion badly on this... got a cake order due this coming wednesday
It will probably dissolve, but I don't know after how long. I made som RITs a couple of years ago for a friend and she put them on top of a cake that was covered in whipped cream and it looked fine. I don't think she put them on until right before the party though. The liquid in whipped cream or chocolate mousse will make the RIT soft and crumbly and perhaps also bleeding. I'm sorry I can't really guess how long it can be on the cake and look fine, a couple of hours would probably be ok if the RIT is completely dry before put on the cake.

Hi guys, this is a great thread. I made a tombstone out of RI for an Over The Hill cake and I simply used wax paper. I'm wondering why you would specify plastic wrap for RITs instead of wax paper? Is there something about the plastic wrap that makes it better? In fact, I also did RI bicycles for my son's birthday and they just popped right off the wax paper. Can anyone tell me what's better about plastic wrap? Thanks guys!!

you could do this with candy melts and chocolate as well on wax or parchment paper.
Has any one tried this process with candy melts?! I have a bunch of candy melts left over, so I was wondering if I could put them to good use!
The book "The Whimsical Bakehouse" explains how to do this with candy melts. They seem to decorate a lot of cakes this way. They look so yummy!
Thank you for the tutorial by the way. Nicely done!
Thanks again, Cakehelp! I'm having so much fun doing these transfers. I used the technique for the plane cake in my photos. I'm waiting for a new transfer to dry now. It's a lot bigger and it's a design of the face of a friend. It's turning out even better than I hoped.
I thought I would post some things I have learned for everyone:
1. Do NOT place your transfer on buttercream (unless you know the cake will be consumed within the next couple of hours). The transfer looked perfect the first day on my buttercream cake, but the next morning it was melting, colors were bleeding, etc. It was fine because the cake was for my own family, but a good thing to know for the future.
2. I've been reading Toba Garrett's Professional Cake Decorating book, and she gives a great hint in the section discussing royal icing.
"When mixing food colors into royal icing, use a brand-new rubber spatula that hasn't touched any grease products. Any deposit of fat or oil on a rubber or offset metal spatula will break down the royal icing. Do not pipe royal icing on a buttercream-iced cake!"

New Member!!!
Thanks so much for this tutorial! I am going to be making my daughters 2nd b-day cake this weekend! I am so glad I found this now, so I can create the RIT this evening and have it be dried enough by Monday!
One question though...will a plain box mix cake be strong enough to support the RIT (I plan on sticking in the cake like you showed with Hello Kitty). My RIT will be Dorothy the Dinosaur and will probably be about the same size you showed. Should I docotr the cake mix to make it a bit sturdier?
I'll post pics as I go along!

I'm glad people are enjoying the tutorial! It's always fun to learn something new I think.
New Member!!!
Thanks so much for this tutorial! I am going to be making my daughters 2nd b-day cake this weekend! I am so glad I found this now, so I can create the RIT this evening and have it be dried enough by Monday!
One question though...will a plain box mix cake be strong enough to support the RIT (I plan on sticking in the cake like you showed with Hello Kitty). My RIT will be Dorothy the Dinosaur and will probably be about the same size you showed. Should I docotr the cake mix to make it a bit sturdier?
I'll post pics as I go along!
I guess it depends on the size (weight) of the transfer. I usually put a drinking straw in the cake, fill it with RI and place the stick that the transfer is on into the RI-filled straw. It feels "safer", so I don't have to worry about the transfers leaning their way out of the cake, although I don't really think they will especially now that I use ganache under my fondant.
If you have a fondant covered cake, put the transfer stick in (even without a straw) and secure it with a little RI I think you will be ok. A small transfer doesn't weigh much. But I still recommend the straw, especially to make you feel less nervous ![]()
Hi guys, this is a great thread. I made a tombstone out of RI for an Over The Hill cake and I simply used wax paper. I'm wondering why you would specify plastic wrap for RITs instead of wax paper? Is there something about the plastic wrap that makes it better? In fact, I also did RI bicycles for my son's birthday and they just popped right off the wax paper. Can anyone tell me what's better about plastic wrap? Thanks guys!!
I use plastic wrap because it is very easy to see all the details though it while piping. It is also very easy to remove. Plus, I don't think wax paper even exists here where I live, I have never seen it ![]() but if it works for you that's great. There is no special magic in the plastic
but if it works for you that's great. There is no special magic in the plastic ![]()
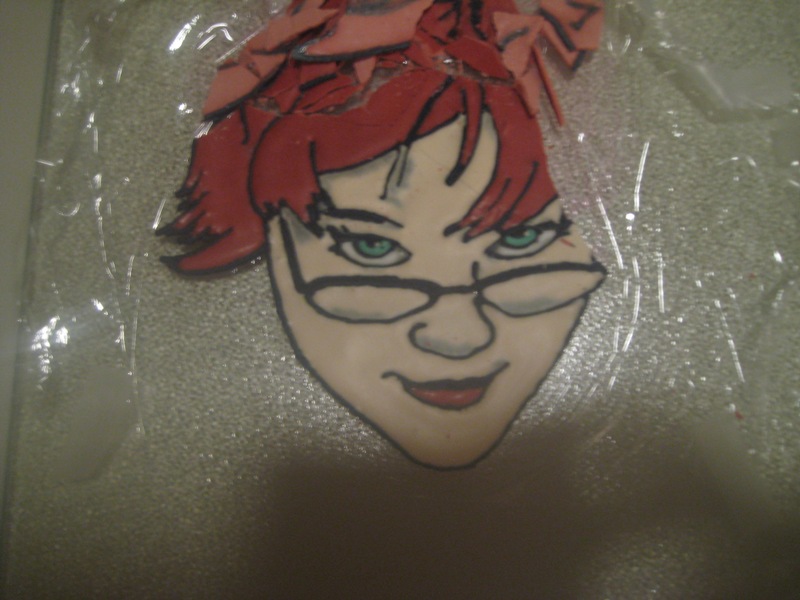
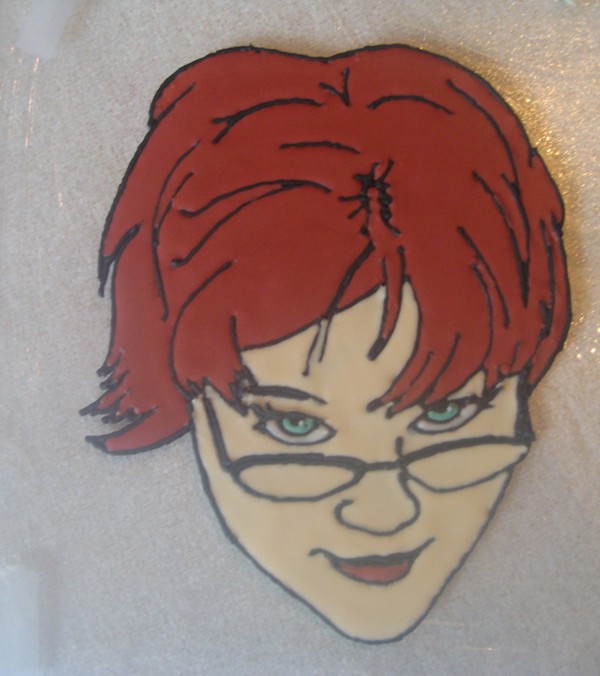
I have another question. I made two RIT of the face of a friend. I used the same icing to outline and fill each one. They both looked great at the beginning, but over the next two days, the black outline started to bleed color into the skin and white eye color. Oddly (and luckily) the bleeding wasn't nearly as bad on the second one I made and I was still able to use it. I was wondering if you could give me some advice about why it bled. It was my first time using black gel food coloring. Also, I waited about 30 minutes after piping the outline to fill it. Any thoughts would be greatly appreciated.
P.S. Just another observation. This transfer is all broken up because it had practically bonded to the glass cutting board beneath it. I think the reason may have been that I let it dry without the paper underneath it. I decided to do two transfers at the last minute, so I couldn't make a copy of the drawing. So, after I outlined the first one, I carefully slid the paper out and used it for the second one (leaving the paper under that one). Anyway, the second transfer that stayed on the paper lifted and transferred just fine.
I have another question. I made two RIT of the face of a friend. I used the same icing to outline and fill each one. They both looked great at the beginning, but over the next two days, the black outline started to bleed color into the skin and white eye color. Oddly (and luckily) the bleeding wasn't nearly as bad on the second one I made and I was still able to use it. I was wondering if you could give me some advice about why it bled. It was my first time using black gel food coloring. Also, I waited about 30 minutes after piping the outline to fill it. Any thoughts would be greatly appreciated.
Your transfer looks beutiful  I'm sorry you had problems with it. I have problems with the black bleeding somtimes too. For me if it happens it usually happens when I flood the back for standing up transfers. As a general rule I think that the more runny the icing, the greater risk for bleeding. Even if you have piped the outline and let it dry completely, if the consistency of the flooding icing is "too" runny it will cause the black to soften or melt a little and the colors can bleed. The lighter the color the greater the risk. So, with flesh color it is easy to have bleeding.
The problem is: If the icing is too runny you will get bleeding and if it is not runny enough you will not get a smooth surface. I really don't have a solution. It is also strange that the second one bled less.
quote="letsgetcaking"]
P.S. Just another observation. This transfer is all broken up because it had practically bonded to the glass cutting board beneath it. I think the reason may have been that I let it dry without the paper underneath it.[/quote]
Yes, that is the reason. Plastic wrap will cling to glass, and it will be almost impossible to get the transfer off when you cannot slide or lift the plastic away.

These are all amazing! I cant wait to try this.

Thanks again, Cakehelp. Your explanation makes a lot of sense. I remember that the icing for the skin and eye color was definitely runnier than the hair color (which didn't have any bleeding problems). I'll definitely keep making these. They're a lot of fun! I'll just have to find that perfect medium between not too thick and not too runny. ![]()

you could do this with candy melts and chocolate as well on wax or parchment paper.
Has any one tried this process with candy melts?! I have a bunch of candy melts left over, so I was wondering if I could put them to good use!
I did the topper of my avatar cake with candy melts - nothing too fancy but they had specifically wanted a chocolate crown so that's what I used.
Key advice which is fairly obvious, but I had not thought it through at the time - is that these will not hold up as well in warm weather/warm room and you need to be careful when handling with warm hands.

I wanted to say "thanks" again to Cakehelp for teaching us how to make these. I'm having so much fun with them! I just finished this one for my son's birthday cake.


Thank you, Andpotts! You just made my day!


glad someone posted on this as I hadn't seen it before. Terrific tips here and wow..that Spiderman rocks!

Hello everyone!!
Thanks OP for this awesome tutorial. I am going to give it a try for this weekend. Making a snoopy cake and have decided to just do a square cake with snoopy RIT. I have some questions.....the icing I use is SMBC, will it cause problems with my RIT or should I lay a strip of fondant onto the back of the RIT and then lay it flat on my cake??
Thanks ![]()
Quote by @%username% on %date%
%body%