


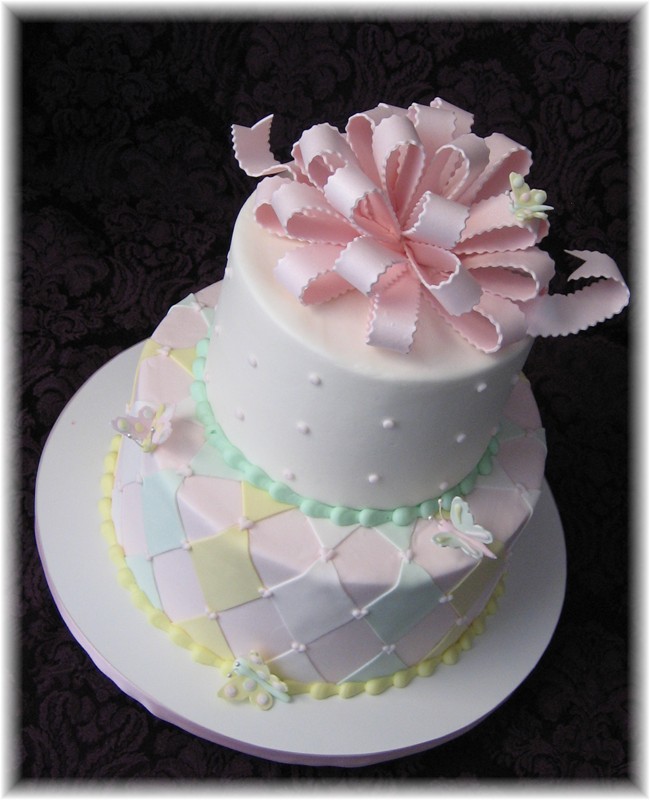
I've been getting a lot of requests lately for my loopy bow instructions - specifically the bow on my Harlequin and Butterfly cake (pic below) - so I'll post them here for everyone's convenience. I don't have any step-by-step pics, but I'll take some next time I make a bow.
Thanks to everyone who sent such nice compliments!
For my bows, I usually use fondant with tylose mixed in. That way, the bow will match the rest of the fondant used on the cake. Or, I'll use a mixture of about 75% gumpaste to 25% fondant.
Deciding on the width of the loops is usually just a shot in the dark. To determine the length of each loop, I divide the diameter of the cake by 2, then add 1-1/2 to 2 inches. So, if the cake is 6 inches, I'll make the majority of the loops 4-1/2 to 5 inches long. (6/2+1.5 or 2). Sometimes I'll make a few sample loops to experiment with.
I make LOTS of loops so I have a variety to choose from. And I make a variety of lengths, too. Generally, about 75% of the loops will be the same length, then the rest will be anywhere from 1/4 to 1/2 inch SHORTER. This helps when trying to fill up the top of the bow.
I built a contraption that holds an entire 3 foot long dowel. Deciding on the width of the dowel is yet another crap shoot. It all depends on the look you're after. I highly recommend the sample loops.
To make the loops, I first run my fondant through a pasta machine. The thinner the better. I cut strips with an adjustable rolling ribbon cutter, then measure and cut to the appropriate length. I keep the cut strips under a piece of vinyl to prevent them from drying out. (If you have a Wilton practice board, it's perfect for this) I only cut out about 10 at a time.
I then wrap each loop around the dowel, dab the ends with a damp paintbrush and pinch the ends together to come to a slight point. Watch how your loops are hanging from the dowel. If you want the 'perfect' look, make sure they're hanging evenly from front to back. If the pinched end is not DIRECTLY under the dowel, the loop will be uneven (which is good if you're doing a more natural, floppy looking bow).
Move the loops a little bit every now and then, for about the first 30 minutes, to make sure they don't stick to the dowel.
The bow on my harlequin and butterfly cake has about 25 loops. So, I would have made at least 35.
After a couple of hours, the loops are transferred to a sheet pan where they'll continue to dry on their sides overnight or longer.
The last few strips will be your tails. The ends have a V cut out, then little pieces of crumpled up tissue are shoved under the tail to give it movement. I usually prop the end of the tail up against the edge of the sheet pan so the end will curl up. Make sure you leave enough flat area at the other end of your tail pieces to allow for pushing under the bow.
When it's time to assemble the bow, I color some chocolate as close to the bow color as possible. Then, using a drop of the chocolate, glue a square of wax paper to the underside of a cake pan or dummy that is the same size as the cake the bow is for.
For most bows, I start with 8 loops in the first row. I arrange them in a circle on my cake pan and decide if the circle needs to be larger or smaller. It's usually just right if I did my initial measurements (and guesses!) correctly. There should be a fairly good-sized hole in the center of the circle.
I remove the loops from the pan and pipe a circle of chocolate onto the wax paper where the ends of the loops will go. Then, I replace the loops in the circle, making sure they stick to the chocolate. Then, I'll pipe a line of chocolate around the top of the ends just to be sure everyone is stuck together. Not too much, tho, because more chocolate will be added with the second row of loops. Pop this whole thing in the frig to let the chocolate set up.
The next row of loops is placed between each loop in the first row. It's getting a bit crowded now, so if necessary, I'll trim the pinched ends to a point so everyone fits nicely. No overlapping if you're going for the 'perfect' look.
Since it's a little tricky to remove all the second row loops and replace them exactly, I'll lift the loops one at a time, squirt a little chocolate on the end and replace it. At this point there will still be a hole in the center of the bow, but it should be much smaller. Pop in the frig to set up.
At this point in the bow, it's a little difficult to explain. Experiment with different lengths of loops in order to get the last row and the center spaced proportionately. Hold off on gluing until you're satisfied with the configuration.
Make sure you look at the bow from different angles to ensure you haven't left large gaps or stacked loops on top of each other rather than staggering them. This is where the different lengths come in handy. Once you've got the loops where you want them, go ahead and glue them on. Pop in the frig to set up.
When you're ready to place the bow on the cake, turn the whole thing over in your hand and peel off the wax paper. Attach the bow to the cake with a ring of icing. (Be sure to pipe the ring BEFORE you have the bow in your hand!)
Finally, pipe a little chocolate or icing on the ends of the tails and shove them under the bow. For a different look, or if you have a gap in the bow that's needs to be concealed, you can glue the tail between loops so it's in the air.

Thanks for taking the time to post this. Your cake is beautiful ![]()


Thankyou for sharing ![]() Your cakes are beautiful.
Your cakes are beautiful.


So glad I saw this! ![]() I have had the worst luck every time I've tried to make a bow, so they always ended up in the trash! Hopefully this will help me get it right. Your cake is beautiful Diane and that bow is fabulous! Thank you so much for posting this!
I have had the worst luck every time I've tried to make a bow, so they always ended up in the trash! Hopefully this will help me get it right. Your cake is beautiful Diane and that bow is fabulous! Thank you so much for posting this!

Thank you! Thank you! Thank you!  You are great with instructions. You should put this in the tutorial section...article section...or whatever it's called.

Thanks for sharing! I use a dowel too and I've found that I can wrap it with plastic wrap and then dust it with cornstarch, and then the loops won't stick on the dowel.


Thanks for the instructions - your bows are gorgeous!

Wow! That is a beautiful bow!! Thanks for sharing those instructions! ![]()
Thank you so much for sharing this. Bows have ALWAYS been a thorn in my side. This worked so well. Setting the length seems so easy now. Can't see why I never figured it out. ![]() Thanks again.
Thanks again.

Well, you are MORE than generous!! ![]()
I printed it, and hopefully, with some good "guesses", I'll be on my way!
Thanks Again, and beautiful cake!!


Thanks so much for posting. You provided very clear and detailed steps...very nice.
You also provided me with an Ah Ha! moment. Your tip about leaving the hole in the center of the circle is "gold". I've always put the first row tips close together and it get's hard to put additional loops in to make it look full.
I don't have any friend/family projects needing bows right now (maybe a Christmas Present cake is in order) but I'll be sure to try this - and all your other tips on the very next one.
THANKS for the generous post.

There is a visual tutorial for making bows like this at this link:
http://cakecentral.com/articles/77/how-to-make-a-fondant-loop-bow
Quote by @%username% on %date%
%body%