


I have tried looking on the forums for information on how to make a cupcake bouquet and I am coming up blank. I have also tried google search but nothing to help me out. ![]()
If anyone could help me could you please PM me so that I could ask you some questions? I would really appreciate it. I want to make one for my brothers girlfriends birthday next weekend!!
Thanks a ton!

many have had success using the tutorial i put together with pictures.
http://www.cakecentral.com/cake-decorating-ftopic-600270-0.html
good luck!
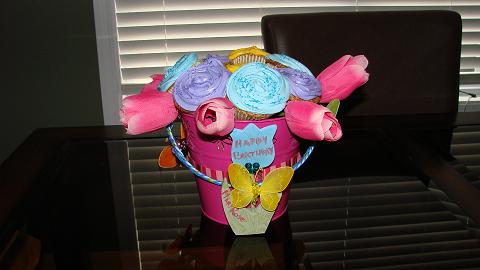
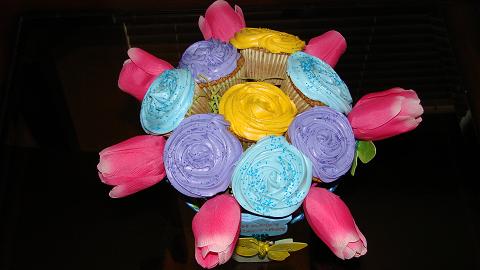
Hello!! I found a How-to article for this on here last year, but it's gone now. I have also attached pics of how mine turned out! Good Luck!
Luckily I printed it, and I actually used it this weekend to make my best friend's birthday cake. The only thing you're missing is the set-up pcitures.
The article is as follows.
How to Make a Cupcake Bouquet
List of Materials
4" terra cotta pot (or like container)
4" Styrofoam ball (white or green)
Green paper shreds (or Easter grass)
7 - 14 toothpicks (pointy round type)
7 - 14 cooled cupcakes
Buttercream for icining
Gel colors for buttercream
1M tip(s) and pastry bag(s)
ribbon (optional)
1. Tie a ribbon around the pot in a nice bow. Use either a glue gun or duoble sided tape on the back and front of the pot to keep the ribbon in place.
2. Place some green shreds around the perimeter of the pot so that when the Styrofoam ball is pushedinto the pot; it catches the green shreds and makes a nice borderaround the pot and also contributes to a nice, snug fit of the ball in the pot.
3. Place some green shreds on top of the Styrofoam ball; remember, the cupcakes will cover most of it, so it's ok if some white shows through here 'n' there. Feel free to hot glue it on if you like.
4. Using the 1M tip, pipe a rosette on top of each cupcake. Feel free to experiment with different colors of icing...you may be surprised how beautiful they turn out! To achieve the multicolor look, just place two different colors in the same piping bag! Ice all of your cupcakes before continueing to the next step.
TIP:Be aware that the heavier you apply your icing, the more weight you're adding to the cupcake, which could cause problems with your cupcakes staying on the toothpicks. If you like heavier icing, you may want to "upgrade" your toothpicks tp skewers or lillipop sticks. If using lollipop sticks, you will have to "start" a hole in the bottom of your cupcake first with a skewer or similar sharp object.
TIP FOR MAKING ROSETTES: Start your swirl in the center of the cupcake and move ONLY your hand in a clockwise direction, NOT your entire arm as we often do with other decorationg techniques. This forces the icing to twist 'n' turn on top of itself and results in the illusion of "folds" in the icing!
5. Insert the toothpicks into the Styrofoam ball, first starting just above the rim of the pot. i place mine about 1/2 - 1" above the rim of the pot. When you insert them, place them at an upward angle to prevent your cupcakes from wanting to face "down" and fall off.
6. Continue to insert the toothpicks all over the ball, adding a few on top, or just one, depending on the overall look you want to achieve.
TIP: The closer you place your cupcakes together, the less cupcake liner you will see and the overall look is better. You may find you can squeeze 12 - 14 cupcakes onto the foam...GO FOR IT! The more the merrier!
7. Starting on the bottom row of toothpicks, stick your cupcakes onto the toothpicks, being careful to "center" the cupcakes onto the toothpicks. If you have it off-center, it may hanf lop-sided or uneven, and possibly rip away from the toothpick.
8. Work your way around the pot, placing your cupcakes on the toothpicks, until you've placed your last two or three on top. You may have to adjust the spacing of your toothpicks as you go, but you'll get the hang of it! You can also trim any "stray" shreds for a nicer appearance!
FINISHED and now you have a beautiful cupcake bouquet to give to someone special!

Thank you everyone!! flechedelor you did an AMAZING job! Thank you so much for the detailed instructions. I can not wait to try one out now!
Quote by @%username% on %date%
%body%