


Hello everyone..I hope this isn't a silly question.
I want to make a fondant plaque for a cake. I've found a really cute picture and now I need to somehow trace/draw it onto the fondant. Can I just use piping gel? I'm completely at a loss. My drawing skills are really pathetic and I don't want to mess this up.
TIA ![]()

Okay, I hope I'm not way off base here. (not knowing what your desired pic looks like) What I do when I want to recreate a picture into fondant is I create a jigsaw puzzle out of the pieces.
First I print off 3 copies of my desired pic. 1 in color & 2 in black & white.
The first pic I leave alone for a finished color reference.
The second pic I cut out the pic itself to use for size placement.
The third pic I cut into pieces to use as puzzle piece templates for cutting out my fondant.
Once you have all of your fondant pieces cut out in the appropiate colors (or all white & I airbrush after cutting) then you can place your pieces onto the cake surface. Be careful to not let them stretch or pull. let the pieces set of about 5 minutes or so to give them a bit of stability.
Finish the fondant puzzle by piping around all of your seams & adding any additional surface piping.
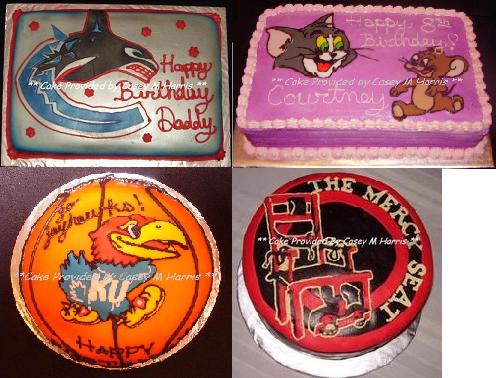
Here are some cakes that I have done with this method.
HTH. 

I am close to making a fondant plaque of a Transformer for my nephew, and I am doing just this same thing. I did a practice run. I made at least two copies of the pic I want, and it is a colouring book picture (i.e. just black outlines, not a photograph). I coloured one, so I could use it as a reference. The other one I used to cut out the overall outline of the character. Because this character has so many little areas to colour, I didn't think there would be an easy way to do it like a puzzle as Ayanami does. I would do that if the pic I had was less finely detailed. So I laid the picture on the fondant and cut around the entire picture. Then, I took a very small pointed fondant tool and, with the paper picture still lying on the fondant, I very gently traced all the black lines on the picture onto the fondant below. So when you lift off the picture, you only see a very light "scoring" or "lining" where the lines are on the pic - just deep enough to tell where various aspects of the design go. Then, I used icing colours to paint the proper colours in the right spots.
I am close to making a fondant plaque of a Transformer for my nephew, and I am doing just this same thing. I did a practice run. I made at least two copies of the pic I want, and it is a colouring book picture (i.e. just black outlines, not a photograph). I coloured one, so I could use it as a reference. The other one I used to cut out the overall outline of the character. Because this character has so many little areas to colour, I didn't think there would be an easy way to do it like a puzzle as Ayanami does. I would do that if the pic I had was less finely detailed. So I laid the picture on the fondant and cut around the entire picture. Then, I took a very small pointed fondant tool and, with the paper picture still lying on the fondant, I very gently traced all the black lines on the picture onto the fondant below. So when you lift off the picture, you only see a very light "scoring" or "lining" where the lines are on the pic - just deep enough to tell where various aspects of the design go. Then, I used icing colours to paint the proper colours in the right spots.
ohhh, really good idea! I'll have to remember that for bigger, more detailed pics.
I only cut my Tom (& jerry) into 4 pieces & free handed the eyes, mouth & tongue. I cut the white part out as one big piece, the grey & 2 pink ear parts. The rest is all piped.
Good luck & remember to post pics! ![]()

Great tips...I have been wanting to try this but was unsure as how I should do it...Thanks!

It is nice to see that I am not the only one that uses the "puzzle" method. I am allways amazeds at the number of people that this has never occured to. One tip for you when tracing onto your fondant. Lay a piece of saran wrap on the fondant then place your photo you are copying on that. Use a toothpick or I use a scewer to go over the original. That leaves you guidlines to follow. You can see more examples on my web site at BeeBoos.citymax.com then click on the fondart page.
I am planning to do some little things for a baby shower cake, I think these ideas will be a great help.
Quote by @%username% on %date%
%body%