

Rice Krispie Treats (Rkt)- Any Suggestions?
Decorating By jmlawren Updated 17 Jun 2010 , 11:51am by MaryAnnPriest
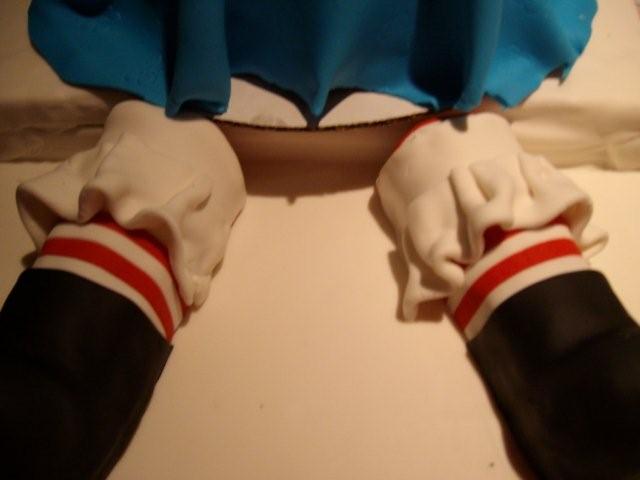

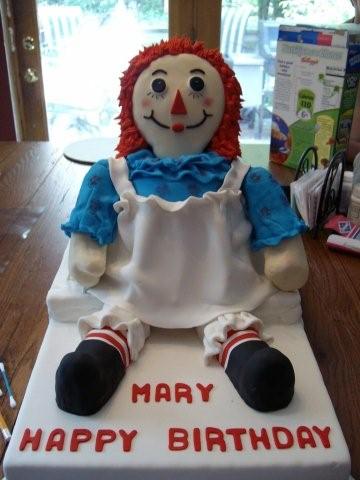


GREAT job on your Raggedy Ann!
I am going to be using some RKT for an armadillo head this week. You just reminded me to get some. ![]()

Additional instructions for Step 2 for the house of the AGD Tree House.
I realized I was missing the information as to how I added my fondant to the house. I wasn't able to just add it or edit it my original post, so I'm just going to put it here. Like I said though, I do have all of these instructions together with pictures that I can forward to anyone who is interested. Just let me know.
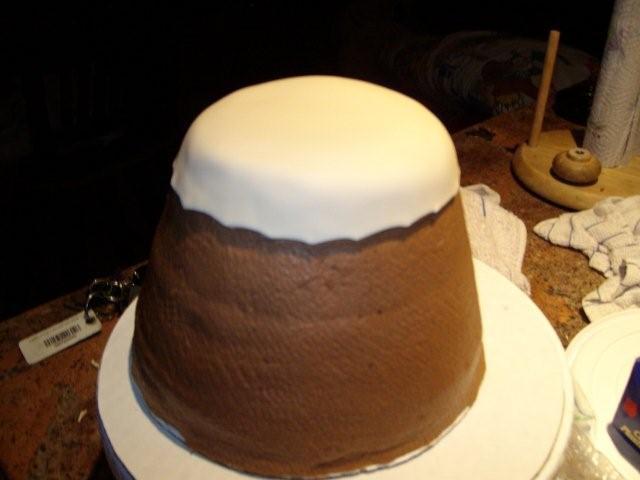
I cut out each piece seperately, and only the was I was going to add it to the house at the time, using my lamanated templates. The roof of the house has NOT been added yet. I added the fondant to the sides first, then the back making sure the fondant came right to the ends of each side giving me a nice straight corner. I wanted the side pieces to look as though they were on the inside of the front and back pieces. I hope that makes sense. I did the same with the front, except to add the front piece, you'll want to have something covering just the inside the window first, like a small piece of paper. You want to prevent the fondant from sticking to your mint window at all cost. I had several attempt at trying to cut out my window first before adding it to the house, but it kept distorting to much so I decided to just try it this way and it worked out a lot easier. You might have better luck then me. Just don't forget that little piece of paper first. LOL Talking from experience, you won't be able to get that darn fondant back off and run the risk of breaking the window trying to get it off. Again, experience talking. LOL Thank goodness I made spare piece and already had another front piece already made up just in case. Once you cut the window out you can also easily remove the paper, then carefully tuck the fondant into the inside edges of the window so you won't see the cookie. SIDE NOTE: After each piece of fondant is added on, while the fondant is still moist, use a ruler to give your fondant the appearance of vertical planks of wood on your house. The ruler wasn't used to measure, or to give me even line distances, which you could if you wanted to. I just used the rulers straight edge to push into the fondant to give me long straight even lines so it would look like there was individual planks of wood. Now I started on the roof. I made sure to let them dry completely before adding the fondant. You don't want the weight of the fondant to cave it in. I first covered the entire roof with a thin covering of fondant, covering the entire top, sides and completely underneath. I then started layering small strips of fondant, starting at the bottom of one side until it met to the top of that side, then did the same thing on the other side. Once both sides met at the top, I put one strip across the top to overlap the two sides. To get the appearance of shingles, I just used a tooth pick to give me the lines. Once the house dried, I went and dusted each plank a different color.
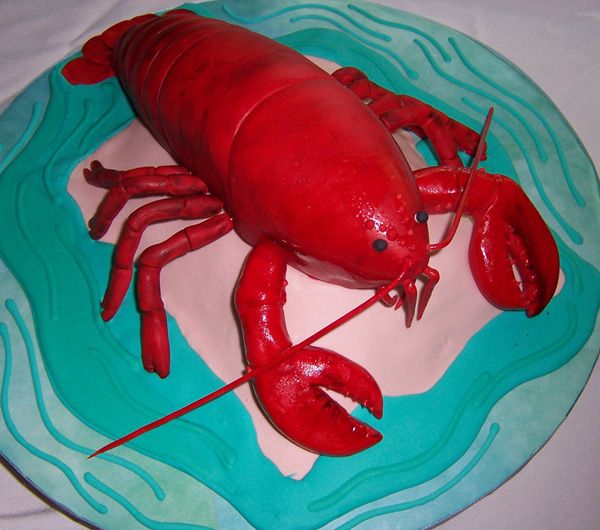
Hi guys.. Thank you so much for the great info on the RKT.. I am going to get the store bought this weekend for a Lobert Cake that I am making for my brother's wedding.. Could you please take a look at it and any advise you can give me for making the tail and the claws out of RKT will help so much..
Just so I know, I should make them a week or so inadvance correct to let the RKT get hard correct?
Here is the picture, thank you again!


I do the RKT as usual. I mold it & compact it as tight as I can. Then I cover it with thinned royal icing. I spackle it on & smooth it with my hands to fill every crevice. Then I pop it in the fridge for about 10 min. Works like a charm.
Quote by @%username% on %date%
%body%