

Rice Krispie Treats (Rkt)- Any Suggestions?
Decorating By jmlawren Updated 17 Jun 2010 , 11:51am by MaryAnnPriest
Tonight, I'm making a dinosaur cake. I've decided to make the head, tail and legs out of rice krispie treats and cover them with fondant. Problem is, I've never actually used rice krispie treats before, and I was wondering if anyone had any helpful hits and what not to do's when molding rice krispie treats? Should I use the recipe off the box or should I be using a different one? Any help or suggestions would be much appreciated!! ![]() .
.

I'd be really interested on advice as well. When I make them, I use the recipe on the box. I'm wondering if the premade ones that you buy stay more pliable though. When I make them they don't stay gooey enough to mold for long. Thanks for the post!

There's some helpful hints on this thread...including a slightly altered, but delicious Krispies recipe.
http://www.cakecentral.com/cake-decorating-ftopict-600889-rice.html+krispies
I have never used Rice Krispies for modeling, but I wonder about adding more butter to the recipe to achieve the gooey-ness (I don't think Oxford dictionary will be clamoring for that one) you want. I had friend make RK squares recently and he added a whole stick of butter, which made my arteries harden looking at it, but also made them rather gooey.

In working with RKT, I find that it takes some tweaking to make somthing that can be molded and not fall part. I start with the box recipe, but only use half of the butter and 2/3 of the marshmallows.
I also use my hands to crush up about half of the rice krispies into smaller pieces. These things together make a much firmer, though not quite as tasty end product.
When molding, you really have to use your muscle and compact it as much as possible so it will hold it's shape.
Other suggestions I've read are to just eliminate the butter altogether, or to use the pre-made RKTs form the store, but I've not done either of those.
Hope that helps!
dmich - Gooey is bad when modelingwith RKT. It won't hold the shape. What you want to do is make it as un-gooey (yep, that's Webster I hear at my door) as possible so you can still model it, but it will also hold it's shape.
I've also heard that letting it sit out a day or to helos to "harden" the finished product, but that wasn't the case for me. It was all about cutting the butter and marshmallow...
I have used the regular recipe when molding with RKT. I usually let it cool for a bit before handling (HOT and Gooey) I have had no problems with it. I tend to crush the detail while I am forming it to help make it smoother.
I can see where crushing the rice krispies would make the pieces finer and help to make it smoother though. I do put a generous amount of BC on it to help eliminate any defects too, before the fondant or instead of.

I have used the recipe on the box 3 times and every time I had a problem with it one was a sewing machine cake that after I put on the BC and fondant the whole thing started to fall apart it was getting mushy and it was hard when I started and the other 2 cakes were the turkey cakes I did the legs and wings out of RKT
and the same thing happened and I had to remake them a couple of times so I think I will try no butter next time. I did read on here that some people crush all of the rice krispies when they make them maybe I will try that. Hope someone has the answer.
On larger/taller pieces I've seen where you can actually spackle the whole thing with melted white chocolate before frosting. This will help hold it all otgether, but it will add extra weight...

I've worked with RKT a number of times, and I prefer to just buy the ready-made ones at the grocery store. They are the perfect consistancy, mold very well (you can smoosh the heck out of them and they stay together!), and there's no guesswork whatsoever.
Those are my 2 cents, good luck with your cake! ![]()

I have found using the boxed variety to be the best method when working with small molding projects --would not be as cost effective on a large project. I think the less gooey, the better for molding. I use "off brands" and name brand and have success with either. As well... I have used chewey granola bars with great results.

Thank you to the OP as I am doing a Spongebob Squarepants cake next weekend, and planned to make his pineapple house out of storebought RKT. Good to know that others have done it this way with success.
I didn't have enough MM, when I made the horns for my buffalo, so I just subbed Choc for it. Winged the butteramount, added the leftover MMs and some Choc, melted everything and then added as many ricekrispies as the melted stuff held. Was really easy to mold, I'm sold on it now. Was gooey enough while warm to mold easily, but firmed out beautifully when cold

How can I cover a RKT head with horns sticking up - using BC and fondant? Any suggestions?
I'm worried that the horns will poke through the fondant and tear it . . .
To avoid a headache, you may need to cover them separately. What I would do is take the horns off, cover the head w/fondant, then the horns, use a straw or toothpick to attach the horns back on the head, and viola!
I love using RKT's to help me create things I would not be able to do if it were cake. In both of the following projects I used the box instructions, doubling the recipe) to make the RKT. I dumped the whole mixture into a 1/2 sheet pan. I use a piece of wax paper, lightly greased with Crisco(greased side toward the RKT) to help flatten the RKT as thin as possible by spreading it from end to end. I then leave it to sit to set up for several hours or as long as it takes to no longer be sticky. When it comes time to mold the RKT into something, I start small and keep squeezing more and more together as tight as I can get it. I continue to add and squeeze tightly until I get the shape I'm looking for. I then immediately place the dowel where it's eventually going to be when I go to add it to the cake. After the hole is formed, I pull it back out and leave it to dry and harden completely which could take a few day's. I found it best to make these pieces several days in advance so they have plenty of time to harden for when I need to decorate them. I would like to mention one thing though - moisture is RKT worst enemy. If you have to refrigerate your cake you may run the risk of weakening your RKT. IMO if you don't have to refrigerate your cake - DON'T. But this is truly from my experience. Others may have had better result in this area. HTH
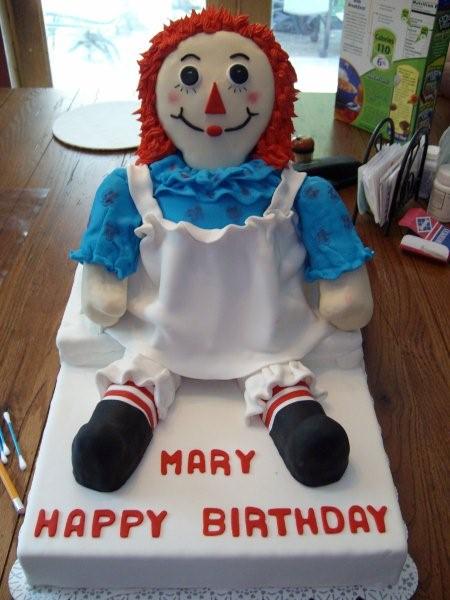
Raggedy Ann's head, arms and legs are all RKT
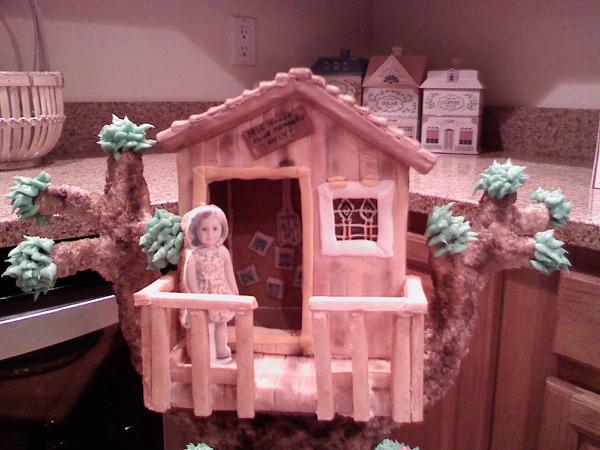
In the American Girl Doll Tree House Cake the tree is RKT
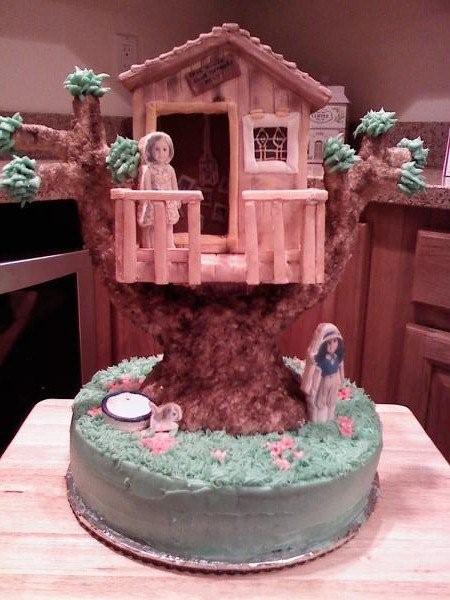
momade, I LOVE your tree house! Very cute idea. Is the house also made of cake? how did you get the house to sit in the RKT tree? And are the RKT covered in fondant? Thanks for your instructions.
bakerbear, I think this is exactly how I should tackle this one, Thanks!
momade, I LOVE your tree house! Very cute idea. Is the house also made of cake? how did you get the house to sit in the RKT tree? And are the RKT covered in fondant? Thanks for your instructions.
bakerbear, I think this is exactly how I should tackle this one, Thanks!
The house is sugar cookie covered in fondant. I'm sure there is a heck of a lot easier way of doing this, but having zero experience on how to construct something like this - this is what I came up with. If all these pictures aren't suppose to be here CC, just let me know and I will delete them. Anyone has any questions, I'll do my best to answer them. HTH

I'm so sorry, but I just went to check to make sure all the instruction came out ok and I see that it allowed only a certain amount of words to be used in instruction. If anyone is interested what should have been posted, just respond to this post giving me your email address. I should get it to come as a comment to my email address. I will gladly send you the instructions in full. I also have some step by step instructions on how I did the Raggedy Ann Doll Cake if anyone is interested too. Please keep in mind that I am bar far not a professional, and I'm sure there is a ton easier ways how to construct these things better then I did. Without any clue where to start or instructions on how to do them, I just guessed and made it up as I went along. There's definately things I would do differently now that I've done them, but hopefully showing you how I did them it will at least help give you some ideas on where to start. If I can answer any questions - don't hesitate to ask. If you haven't received them within a few day's, then please PM me with your email address.
Thanks.
Moreen
Sorry I tried to put this all in one, but for some reason I wasn't able to get these last few pictures of assembling the tree with RKT. Hopefully they'll go through this time.
PLACING THE TREE ONTO THE CAKE
Very importantly, I forgot to mention. There was a lot of trial and error while making this cake. In order to have this plate construction in the middle of the cake, I had to make sure I cut a circle out of the the middle of my cake and it's board. I went with a larger size cake to account for having to take some out of the middle. To do the cake, I first torted, dammed and filled the middle of my cake with filling. I didn't ice it anywhere else. I then cut out the same size circle out of the cake that I would need to fit around the PVC end cap. Once that hole was made I then went to work on doing the same for the cake board. I put the cake on a cake board, turned it upside down with the board now on the bottom of the cake and traced on the inside of the hole down inside the cake a circle onto the board with an edible marker. I then flipped the cake over onto another board and cut the hole out of the traced circle. I then put then put this cake board back on the cake board, lining up the hole and flipped the cake back right side up (with the cut circle facing down). I did all this because I was going to need to be able to put this cake and it's board right over the 12" and it's raised middle that the pvc end cap fit's onto. Before I put the pcv end cap and pipe down into the cake I covered them with foil and made sure it all fit. Make sure that you don't have so much aluminum foil around the pipe so your plastic tube won't slide easily down it when you go to add the tree. Talking from experience. LOL
Here is one mistake I would like to save you from. I'm going to try and explain it as best I can. In picture 1 you'll notice I don't have the long pcv pipe sticking out of the plastic tube. Now remember the end cap is not part of the constructing of the tree. Then end cap will be tucked down inside the cake resting down on the bottom of the cake on the cake board and plate. My problem came when I went to put the tree on the cake. Since I constructed it flat on the board I didn't account for how much of the plastic tube was going to have to go down inside of the cake to rest on the end cap. Do you understand what I mean? I hope your able to follow me. Anyway, going back to constructing. I first put dowels down inside the cake around where I figured my tree was going to be placed. To do this I traced along the bottom of the tree and cut it out from a cake board. I placed this board on top of the pcv pipe and from underneath I trace around the pcv pipe to show me where the hole needed to be. I wanted to make sure this board was going to fit tightly against the plastic tubing (because remember the plastic tub will fit over the pvc pipe that is already down inside the cake). I then placed the tree to the board with a little RI. With my dowels and board in place, and once I felt comfortable that the tree wasn't going to collapse inside the cake, I started lowering the tree (which has the plastic tube inside it) down the out side of the pcv pipe. This is where I panicked a little. Once the tree's board hit the dowels, I realized that I still had to push the plastic tube further down so it would be resting down onto the pvc end cap. Thank goodness once it touched that end cap I still had enough of the tubing left on top to fit the 6" plate on it. That was scary. I hope this has been some help on what to do and what not to do. I'm sure I've totally confused you all now, but if you have any questions don't hesitate to ask.

Sorry, I was just trying to add these instructions to the PLACING THE TREE ONTO THE CAKE instructions, but it wouldn't let me. Oh well! I thought it might be easier if I gave all the instructions in full here, but if anyone still interested in having them emailed to them, just let me know and I send them to you ASAP. I do have it all save as a fowarding email ready to send out - so it's no trouble at all. HTH
TREE HOUSE CONSTRUCTION
Step 1
I just made my own templates and cutout the cookies dough using these them. Once the cookies baked about a little while, I opened up the oven and carefully reshaped the inside of the window and put in crushed clear mint hard candies (you need way more then you think). Once cookies come out of the oven, I first flatten them lightly with a spatula. I then let them cool to where they are not hot to the touch, but still very soft. Due to some obvious spending that happens, I placed redone templates that I laminated back onto the cookies and re cut them once again (CAREFULLY) to exact same size the templates I started with.
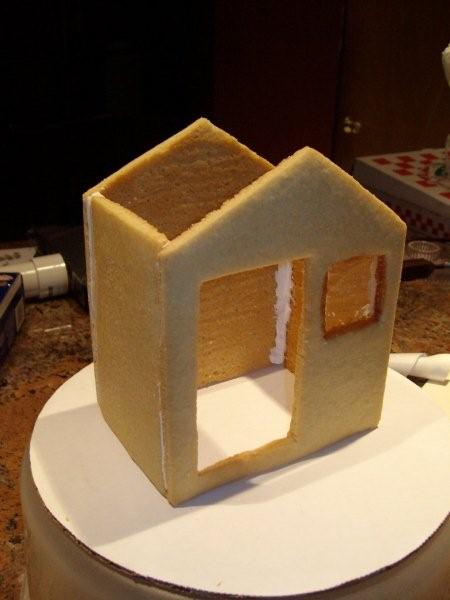
Step 2
I started putting the house together using RI as my glue.
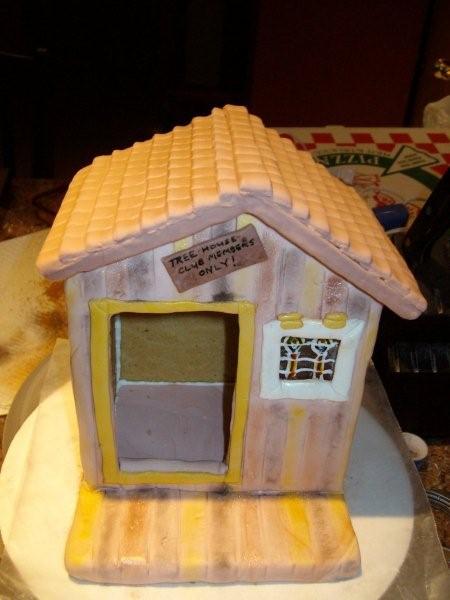
Step 3
This is the house completed with the outside of the cookie covered entirely with fondant. I didn't show the picture of the roof, but there is also roof made out of cookie that is placed on top of picture 2. Once side of the roof is longer then the other side. You may not be able to notice, but it's the right side of the house that is longer because the right side of the house was longer (which is the effect I was going for) to go along with the picture I was going by.
Step 4
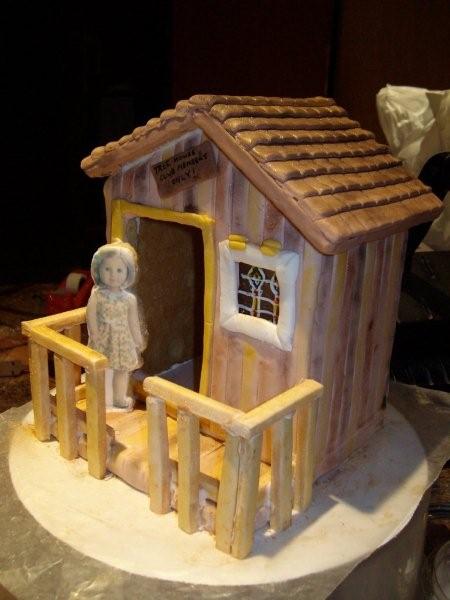
Railing is made of gum paste, dusted and attached with RI.
Step 5
This is the house completed and place on the plate (which goes unseen) to appear as though it's suspended inside the tree. I didn't realize it until I got home and got the pictures onto my computer, but I mistakenly had the tree turned backwards when I place the house onto the plate in the tree. The tallest side of the tree should have been on the right side of the house facing you. Oh well!
TREE CONSTRUCTION
Step 1
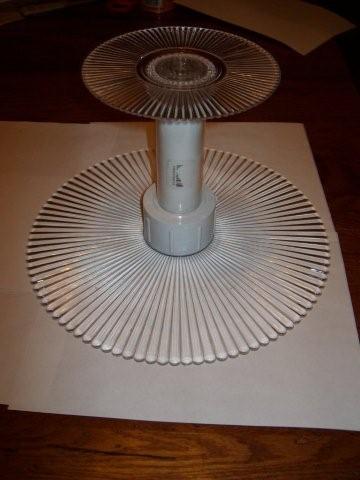
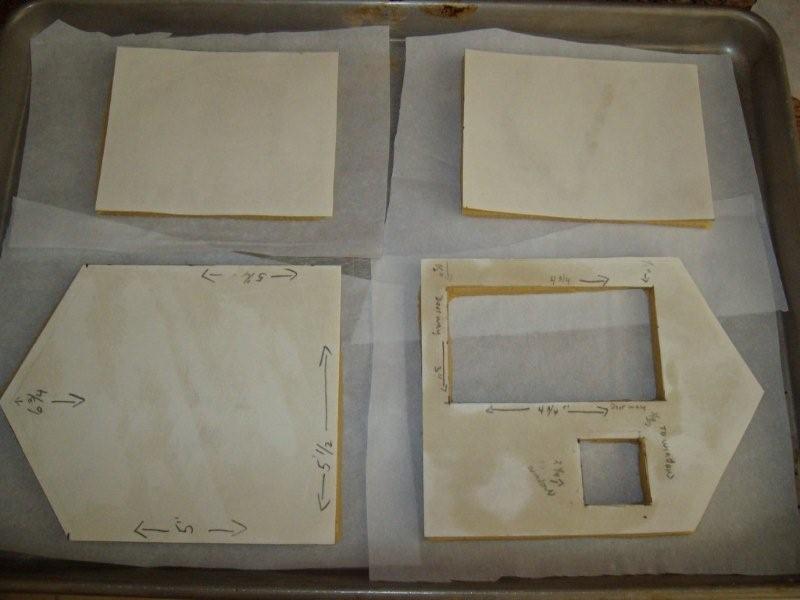
These are the pieces that I used to put inside of the tree. I ordered everything from www.[blocked].com Under the slide menu under weddings you see STANDS: click on Crystal Splendor. Then scroll down to individual plates and tubes. I ordered the 6" & 12" plates and the 5" tube.
Step 2
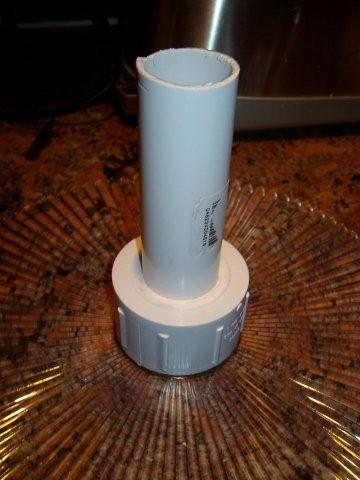
This picture is of the pvc pipe being placed all the way to the bottom of the end cap. My husband cut of the screw part of the end piece so the plastic tube could lay flat on top of it. I wanted the pcv pipe to go all the way down because I wanted this to rest inside and on the bottom of the insert in the 12" plate.
Step 3
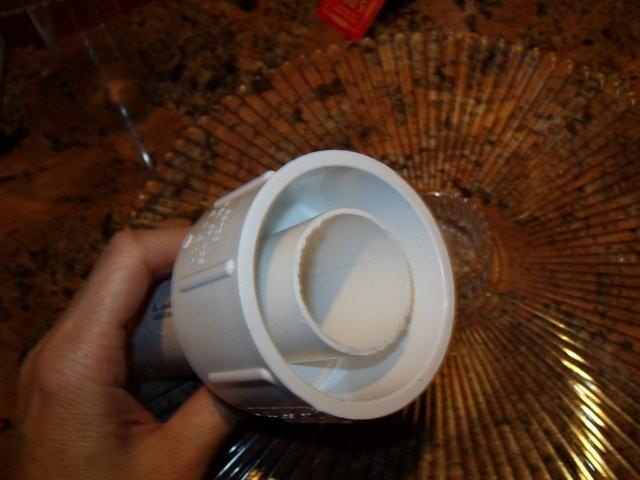
Here are the two piece are put together, showing you the top of the end cap where my husband cut off the screwed part.
Step 4
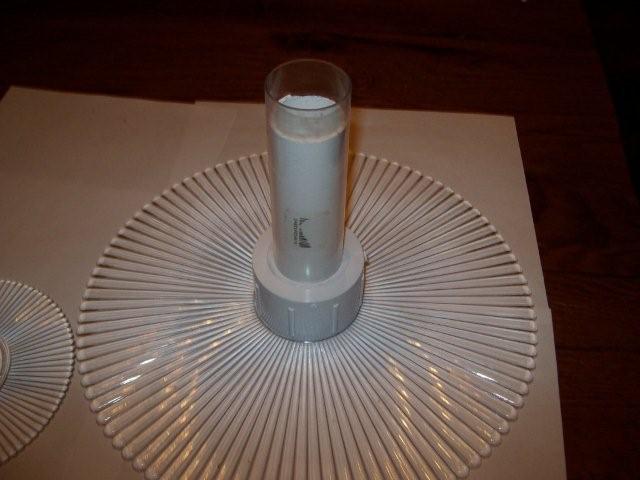
5" plastic tube placed overtop of the pvc, but sitting flatly on top of the end cap.
Step 5
This is how it looks when all the pieces are put together. I was now ready (I was hoping) to start constructing my tree.
Step 6
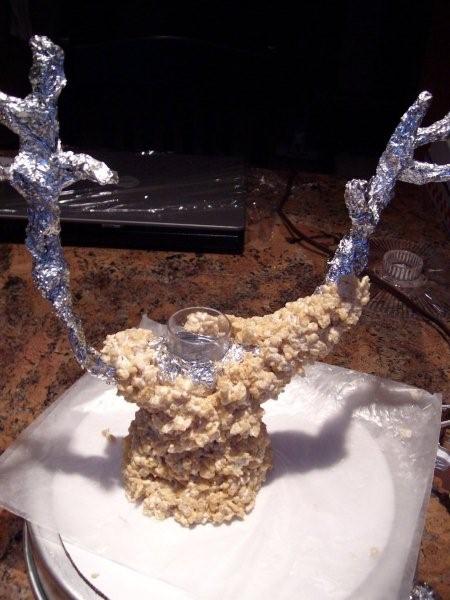
I started by using thick gauge wire to wrap around and up the tubing. I covered the entire thing with aluminum foil and then RKT. I covered the wire with aluminum foil first because I wasn't it would be food safe. I just kept adding and twisting in more wire until I got the shape I was looking for and then started covering it with RKT. I had to reform as I went.
Step 7
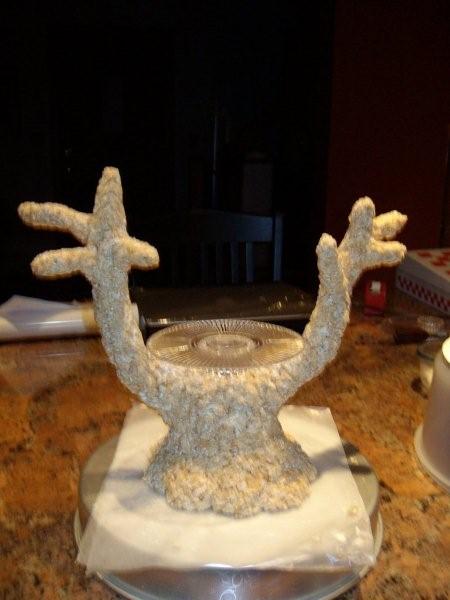
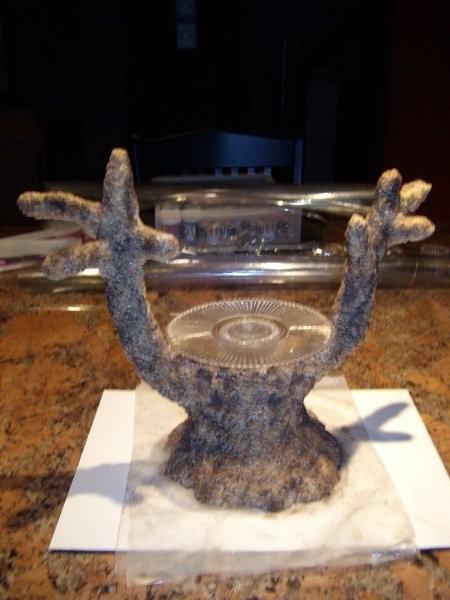
I started covering the tree as tightly as I could by packing on the RKT and forming it as I went along.
Step 8
I let it sit to dry completely. I had originally planned on covering the tree in fondant, but the texture from the RKT was exactly what I was looking for so I decided to just dust it. It turned out way better then I thought. I then added BC leaves to the
RAGGEDY ANN DOLL INSTRUCTIONS & PICTURES
Thank you all sooo much. I'm going to try and add all the Raggedy Ann Doll instructions with pictures here, but I also have these ready to go by email if anyone is interested also. Again, this was the very first 3D project I ever did. When I was asked to do her, I had totally no idea where to start, so there was lot of trial and error. Hopefully you'll find these helpful on how to do yours. HTH
Unfortunately, when it came to taking the pictures I got so involved in what I was doing I forgot to take some between steps. Where there is no picture - I'll do my best to describe what was done for that step. If I had to do it again, I would definitely make her differently. The Pyrex dishes worked great, to help save time, but she definitely came out way to rounded. I'd try to shape her body a little thinner the next time. I was also so afraid of her toppling over since the customer was going to be responsible for the transport, that I went completely over board with the base and cake board underneath he. I though the more I added around her, the less fear I'd have of her toppling over. Well, this really wasn't necessary. The long rectangle base she is sitting on is actually Styrofoam which was a tremendous help. I also had a total of 3 dowels going down through her body. Two just went down to meet the cake board, and 1 long dowel that went through the middle of her body, through the cake board and also down into the Styrofoam. She wasn't going anywhere. Next time I'll still use the Styrofoam to help give her height for her legs, but it would be cut to the size of her body. I'd like to see her dress to completely drape all around her legs. You'll be able to see what I mean in the instruction 8 - 12 plus. The back of her dress is laying on the board, which was not very soft looking. Anyway, I've talked enough, so here they are. If I've done this correctly, the instructions should coordinate in the same order as the pictures below.
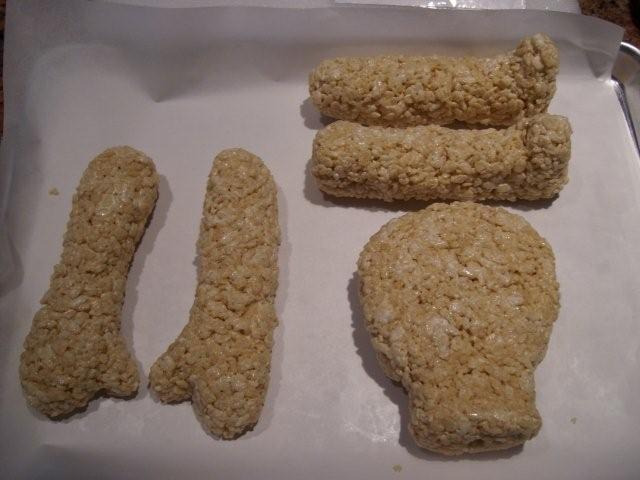
1. Raggedy Ann's limbs and head were made from RKT 4 day's in advance so they'd have enough time to harden. When molding them together, I tried making the mold as tight together as possible not to leave any holes or pockets inside.
2. At least, 2-3 day in advance I hot glued two pieces of Styrofoam together. One was a long rectangle piece and the other rectangle was cut to one 1/3 the length of the first one. I stacked the shorter one onto of the full size one. Then covered them with white fondant to give this enough time to harden as well. Like I said though, if I had to do this cake again - I would absolutely still use the Styrofoam, but it would all be cut to the size of the cake and cake board.
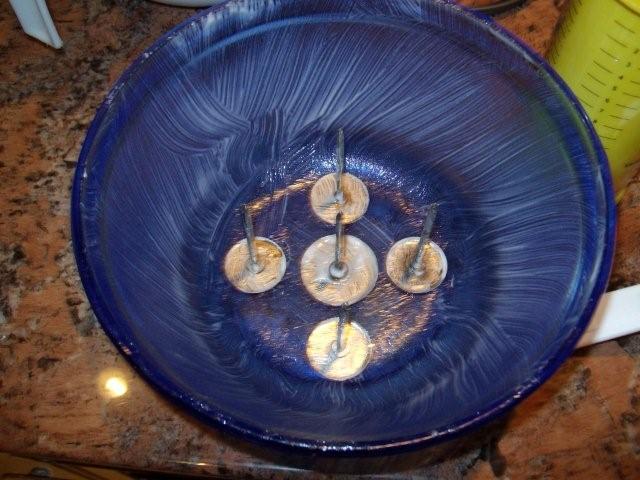
3. For the large Pyrex dish, I put in 5 nails (yes - it was overkill) but, I really wanted to make sure the middle got cooked all the way through. It worked great.
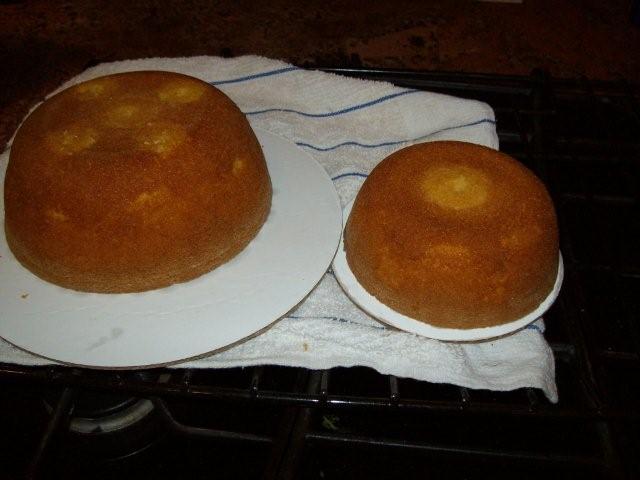
4. For the small Pyrex dish I only used one nail. I put the cakes side by side to see the sizes.
5. This is what the cakes looked like being stacked together. They fit like a glove. It was really amazing how well they fit together.
6. These cakes were filled with three layers of filling. Each torted once and filled with cherry filling, as well as in the middle of both cakes. Then it was all frosted with chocolate frosting, crusted and smoothed.
7. I started on the legs first. I lightly frosted them and while I was rolling out the fondant - it gave them enough time to crust. I only frosted the pieces I knew I was going to be covering with fondant right away because I didn't want the RKT to soften to much before I got the fondant on. To make the socks, I rolled out some red and white fondant and cut a bunch of narrow strips from each color. I then placed one red stripe next to a white stripe and continued the pattern to make stripes. Once I got the length I wanted - I then lightly rolled over the entire pattern going in the direction of the stripes to help them stick and look like one pattern. Then I cut them to the size sock I was looking for and placed one sock on each leg.
8. For the boot, I just cut out a square piece of fondant and formed it round the toe and overlapping the sock. This formed a cute little shoe/boot.
9. I covered her head and arms lightly in frosting then in fondant. Only going half way just enough to cover her hands. The dress sleeves will cover the top part.
10. Once the cake frosted I added this little bit of fondant just in case after her head was place on her body, the frosting wouldn't show through. But, this was actually not necessary. With all the ruffles I had around her neck and her head you never saw the top of the cake.
11. I added her frilly pants by rolling out some white fondant and cutting a strip to cover the top of her leg and overlapping her sock a little. I then cut a narrower piece, folded down one end and made it appear as ruffles. I laid these ruffles on the bottom of her pants and puffed them up to appear frilly. And then placed her legs underneath the board she was sitting on so they would appear to be underneath her once the dress covered her and draped down over top of them.
Here unfortunately is where I missed taking some pictures. By this time is was probably around 3:00 am and I just wanted to get it over with.
12. DRESS: I first measured approx how much fondant I was going to need to cover her body with her dress using Satin Ice Blue. Then cut it out and wrapped it around her meeting it in the back. I then added strips of blue fondant and made ruffles the same way I did the ruffle on her pants and placed it around her neck. I wasn't crazy about how the ruffling turned out so I decided to add a second smaller ruffle on top of that. I'm glad I did because I think it looked better that way. I then went over her dress and ruffle with one of the smaller flowers from the FMM Embossing Stamp Flowers set. Once I made the impressions I then brushed a little petal dust called "Poppy Red" into each of the flower impressions. NOTE: This is another step I would do differently next time. For her blue dress, I'll measure how much fondant I'll need to drape completely over the top of the cake and let it drape down the sides of the cake. Doing it this way instead would have made it a whole lot easier.
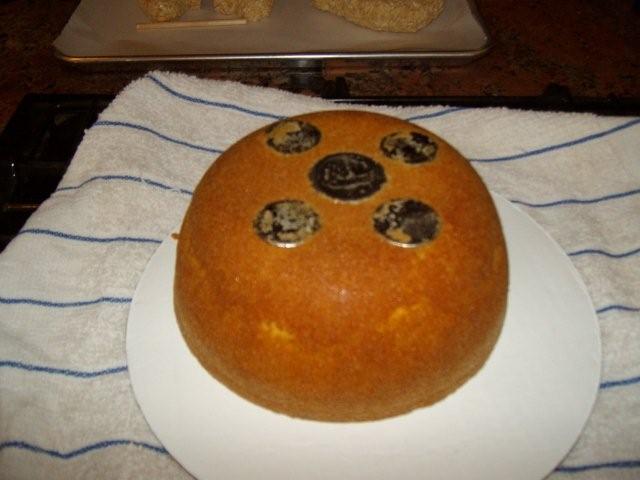
13. FACE: I had it laying flat on the table. For her eye's: out of fondant, I cut the white circles using a small circle cookie cutter. For the black circles I used the large end of a frosting tip. The opened end - not the tip side. For the nose: I just cut out a triangle of red. For the lips and mouth: I just made an oval shape and two small snake like piece and made a "Y" like shape at the ends. I also made little snake type piece for the eyebrows. None of these were placed on her face right away. I let each of them dry a little first so I could then place them on her face with the freedom of being able to move them around without sticking. This movement allowed me to I get the exact face expression I was looking for. I then just placed a little water underneath each piece to stick them in place. I then placed a little dab of brite white to give a little sparkle in her eye. This is not the brite white icing. This is the stuff you put in your icing to make it a little whiter.
14. HEAD (This has a picture) I forgot to mention that the dowel I had coming out of her head (in the picture with the head and feet partially covered in fondant) was just their to make the hole. It was taken out during drying and only placed back in if I needed to move it or something. Once I was ready to place her head on her body - I placed the long dowel straight down through the middle of the cake, through the cake board and straight down into the Styrofoam leaving about 2 1/2" sticking out the top of the cake (making sure it didn't go deeper then the original hole made in her head). After that dowel was placed in, I then stuck two shorter dowels one on each side of the middle one that only went down to the cake board and stuck up about 1/2" out of the cake. Think about the width of your head or neck to decide where to place them or how high to stick up. I just want them there for just for a little extra support. To place her head on, I first put a small blob of frosting down (not too much) though. Now, make sure you get her head first down onto the middle dowel, then you can very gently push her head down onto the other two smaller dowels - at all times making sure that they aren't coming out the side of her head.
15. APRON: This I just again measure out approx how much I wanted then I wrapped it around leaving an opening in the back (folding in the edges). The straps got added after the arms are added to cover any seems.
16. ARMS: First I added a sleeve to each of her arms with a little ruffle on the bottom. To add the arms to her body I placed a small dowel stinking out of the top inside part of her arm and placed it into the cake. Then after deciding where I wanted her arm to rest I then stuck a lollypop stick down into the Styrofoam and pressed her hand down into it. I did it this way for both arms. After her arms were in place, this is when I added her over the shoulder straps from her apron.
17. BOW: I added the bow to the back of her dress and held it there with tooth picks until it stuck. OOPS! Forgot to mention that this also gets made several day's ahead of time as well.
18. HAIR: I used tip #2010 for the hair. I used royal icing at first but, as you can see from the back picture it started to melt. I assumed it was because of the shortening in the fondant. I then just removed it all and us used BC instead. I actually liked that look a whole lot better.
I think I covered everything. If you have any questions what so ever, please don't hesitate to ask. HTH
Quote by @%username% on %date%
%body%