Tutorial On 3D Turkeys

Baking By GeminiRJ Updated 28 Sep 2011 , 5:37pm by GeminiRJ

GeminiRJ Cake Central Cake Decorator Profile
GeminiRJ Posted 13 Nov 2008 , 1:18pm
post #1 of 41

Since Thanksgiving is rapidly approaching, and it doesn't look like the article I submitted will be accepted in time (if at all), I've decided to take KHalstead's advice and just post the tutorial in the forums. Hopefully, someone will be able to use the information! I'll post all the photos last.

I use a cookie recipe similar to the NFSC on this site (it's just a smaller batch size). The icing I use is similar to Toba's Glace: 3 cups sifted powdered sugar, 3 T. skim milk, 3T. corn syrup, 15 drops brite white food color. Mix the milk and syrup into the powdered sugar until fully combined. Add the brite white and mix well. Divide and color. Keep the unused icing covered.

Concerning the cookies:

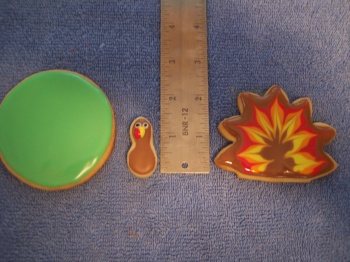
The tail is made by using a sunflower cookie cutter (approx. 3.25" across) and trimming off the bottom portion so it will sit straight on the base cookie. The base cookie is a 3" round. The head is peanut shaped. If you have my cutter kit, this is one of the mini-cutters. If you don't have the kit, cut a piece of dough that is about 5/8"x1.5" and press into the peanut shape.

Directions:

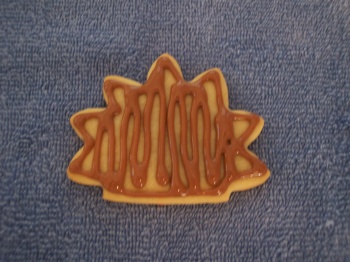
1. Using a #4 tip, outline the tail cookie in brown icing and immediately fill in with more icing in a zig zag pattern. (See photo) Smooth the icing with an offset spatula and move immediately to the next step.

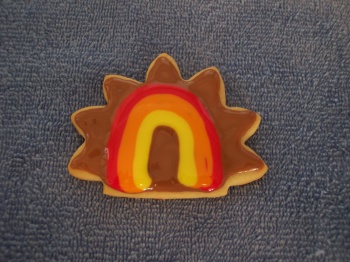
2. Using a #4 or #5 tip, pipe a thick band of red icing onto the tail, then a band of orange icing, and then a band of yellow icing. (See photo). Move immediately to the next step.

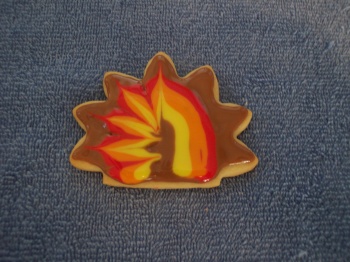
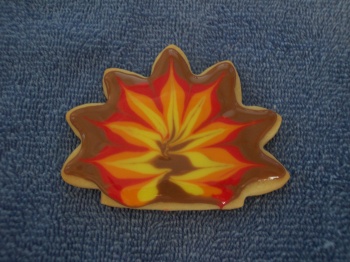
3. Drag a toothpick thru the icing, starting at a point on the top of the cookie (one of the points) and pulling down to the bottom. Repeat for each pointed end of the cookie, cleaning the toothpick after each drag. Now drag the toothpick in the opposite direction (moving from inside the band to the outside of the cookie) between each of the previous drags. (See photos). I know this is confusing...that's why a picture is worth a thousand words!

4. Ice the head of the turkey in brown (I use a #2 tip for this) and let dry.

5. Smooth brown icing onto a large marshmallow and set it aside to dry on some waxed paper. (If you don't want to mess with icing a marshmallow, you could use a chocolate covered caramel or mini-reese's for the "body").

6. Once the head has set, add two dots of white icing for the eyes, a yellow beak, and a red wattle. (I use a #1 tip for these details. Make sure your icing isn't too thin). Add a dot of black to each of the eyes.

7. Once all the pieces have dried, assemble the 3D cookie using melted chocolate CandyMelts as your "glue". (If you prefer, royal icing can be ued).
LL

40 replies
GeminiRJ Cake Central Cake Decorator Profile
GeminiRJ Posted 13 Nov 2008 , 1:19pm
post #2 of 41

Photo for icing the tail
LL

GeminiRJ Cake Central Cake Decorator Profile
GeminiRJ Posted 13 Nov 2008 , 1:20pm
post #3 of 41

Photo for tail
LL

GeminiRJ Cake Central Cake Decorator Profile
GeminiRJ Posted 13 Nov 2008 , 1:21pm
post #4 of 41

Photo for tail feathers
LL

GeminiRJ Cake Central Cake Decorator Profile
GeminiRJ Posted 13 Nov 2008 , 1:21pm
post #5 of 41

Photo of finished tail
LL

GeminiRJ Cake Central Cake Decorator Profile
GeminiRJ Posted 13 Nov 2008 , 1:22pm
post #6 of 41

Photo of all finished pieces
LL

GeminiRJ Cake Central Cake Decorator Profile
GeminiRJ Posted 13 Nov 2008 , 1:24pm
post #7 of 41

I didn't see where I could add multiple pictures per post, so sorry if having to scroll thru all the posts is a pain! I'm more than happy to answer any questions anyone may have concerning this 3D cookie or any of my other cookies. Enjoy...and Happy Thanksgiving a bit early!

P.S. - Any idea how to attach a sticky to keep this at the top for a while until Thanksgiving? Sorry, I freely admit that I'm a computer idiot!

mjballinger Cake Central Cake Decorator Profile
mjballinger Posted 13 Nov 2008 , 1:28pm
post #8 of 41

Those are so cute! Thanks for posting taking the time to post the instructions!

SILVERCAT Cake Central Cake Decorator Profile
SILVERCAT Posted 13 Nov 2008 , 1:50pm
post #9 of 41

I gotta say I will be trying one of your 3D cookies out! AWESOME job putting this together, Thanks

pamconn Cake Central Cake Decorator Profile
pamconn Posted 13 Nov 2008 , 2:01pm
post #10 of 41

Thank you, thank you, thank you!!

TracyLH Cake Central Cake Decorator Profile
TracyLH Posted 13 Nov 2008 , 2:36pm
post #11 of 41

This is really nice of you to do! Very cool!

GeminiRJ Cake Central Cake Decorator Profile
GeminiRJ Posted 13 Nov 2008 , 2:38pm
post #12 of 41

As I mentioned, don't hesitate to ask me any questions! I typed up this tutorial very quickly (before my boss came in!) so I may not have explained some things as well as I could have.

SweetDreamsAT Cake Central Cake Decorator Profile
SweetDreamsAT Posted 13 Nov 2008 , 3:05pm
post #13 of 41

GREAT tutorial! And thanks for taking the time to post this! Just love those turkey tails icon_smile.gif

angelatx Cake Central Cake Decorator Profile
angelatx Posted 13 Nov 2008 , 4:31pm
post #14 of 41

that is so super cute gemini. its so nice of you to take the time and put all the instructions and photos. thnx so much! Have a great day everyone!! icon_biggrin.gificon_biggrin.gif

Dinny2222 Cake Central Cake Decorator Profile
Dinny2222 Posted 13 Nov 2008 , 4:48pm
post #15 of 41

Great to see the tutorial. I have your set and LOVE it! Nice to see it all printed out like this.

Sweetlepea Cake Central Cake Decorator Profile
Sweetlepea Posted 13 Nov 2008 , 8:46pm
post #16 of 41

Thank you so much for posting this, I cant wait to try them. My kids, neices and nephews will love them come Thanksgiving!

ac0474 Cake Central Cake Decorator Profile
ac0474 Posted 14 Nov 2008 , 12:29am
post #17 of 41

Thank-you for sharing! I'm going to do it next week for my son's "Thanksgiving" with his class. I'm sure they'll be thrilled!

yankeegal Cake Central Cake Decorator Profile
yankeegal Posted 14 Nov 2008 , 1:18am
post #18 of 41

Gemini-you did a great job on the tutorial-love your 3D work!! thumbs_up.gif

GeminiRJ Cake Central Cake Decorator Profile
GeminiRJ Posted 14 Nov 2008 , 12:47pm
post #19 of 41

Thanks everyone for the positive responses! I wondered if maybe the photos were too blurry for CC to use for a tutorial. I hope there are a lot of 3D turkeys gracing the Thanksgiving Day tables of people everywhere!

GeminiRJ Cake Central Cake Decorator Profile
GeminiRJ Posted 18 Nov 2008 , 12:56pm
post #20 of 41

Just a quick note...change the icing colors for the cookies and you can make peacocks with the same technique.

mandifrye Cake Central Cake Decorator Profile
mandifrye Posted 18 Nov 2008 , 10:43pm
post #21 of 41

I can't say thank you enough! Great job on explanations! And, I love the tail technique! I am going to attempt to use the technique on another turkey cookie, too.

Do you think that I could use a snack size snickers or milky way instead of the marshmallow?

Thanks again!

GeminiRJ Cake Central Cake Decorator Profile
GeminiRJ Posted 19 Nov 2008 , 12:45pm
post #22 of 41
Quote:
Originally Posted by mandifrye


Do you think that I could use a snack size snickers or milky way instead of the marshmallow?

Thanks again!


Yes! I've also made them using cake balls, which worked fine. If you can find them, you can use chocolate marshmallows, too. For a flat cookie, you can just "glue" the head directly to the tail cookie.

GeminiRJ Cake Central Cake Decorator Profile
GeminiRJ Posted 20 Oct 2009 , 5:31pm
post #23 of 41

I just wanted to bump this up to the top. I know that we have to get thru Halloween yet, but it never hurts to start planning early. One thing that I have changed since last year is that I now roll the iced marshmallow in brown sanding sugar while it's still wet. Gives a bit of extra sparkle to the finished product.

sabbrina Cake Central Cake Decorator Profile
sabbrina Posted 21 Oct 2009 , 1:46am
post #24 of 41

I am so glad you posted how to do these. I am going to try and make one of these for each kid in my daughters class for Thanksgiving this year.

Thanks for sharing icon_smile.gif
Sabbrina

pieceacake830 Cake Central Cake Decorator Profile
pieceacake830 Posted 21 Oct 2009 , 2:01am
post #25 of 41

Thank you so much for taking the time to share this with us! icon_biggrin.gificon_biggrin.gif

GeminiRJ Cake Central Cake Decorator Profile
GeminiRJ Posted 21 Oct 2009 , 5:31pm
post #26 of 41

These are some of my favorite cookies to do. They aren't all that difficult, and they are something that most people haven't seen before.

moscakes5 Cake Central Cake Decorator Profile
moscakes5 Posted 22 Oct 2009 , 12:21am
post #27 of 41

Where can I get your cutter set from?

GeminiRJ Cake Central Cake Decorator Profile
GeminiRJ Posted 22 Oct 2009 , 12:25pm
post #28 of 41
Quote:
Originally Posted by mortega5

Where can I get your cutter set from?


Just send me a PM and I will get all the information to you.

KHalstead Cake Central Cake Decorator Profile
KHalstead Posted 22 Oct 2009 , 12:37pm
post #29 of 41

Love it Gemini, I'm pm'ing you about the set as well!! I LOVE your cookies!

bobwonderbuns Cake Central Cake Decorator Profile
bobwonderbuns Posted 22 Oct 2009 , 9:42pm
post #30 of 41

Well I've got the cutter set and it's well worth it! I have a couple of questions (which have probably already been addressed but I didn't see where...) First, do you have a pix on the assembly of the cookie? and Second, what icing did you use?

Quote by @%username% on %date%

%body%