


ShirleyW gave me wonderful instructions on this so I will try to do her justice. Bake and frost your cake as normal and then set aside(I chill mine). Cut strip of acetate paper to the height you want and make sure it is long enough to go around the cake with a little overlap. Melt your chocolate (guittard or other high quality chocolate) slowly and stir to make sure it is melted completely. Then pour and spread over strip of acetate. You don't want it so thick that it is goopy but you don't want to see through to the acetate either. It doesn't matter if it goes over the edges. Before it starts to set completly carefully pick up top two corners. I let the middle of the acetate strip set on the cake board right up next to the cake and then wrap one side around and then the other. Don't smooth the sides as this will make your wrap wavy. Let set up in fridge and then gently pull the acetate away from the chocolate. Viola! A beautiful wrap should be right before your eyes! Good luck!
Is it tough to cut a cake wrapped with this?
Does it set up hard - like chocolate usually does, and you have to saw through it? Or do you add some shortening to the melted chocolate to keep it softer?

If you temper the chocolate you don't add anything to it. If you aren't tempering you can add vegetable oil or melted cocoa butter to make the chocolate more pliable, it also adds a bit of shine to the finished wrap. When you cut the cake if you warm the kinfe in hot water, wipe it dry and then cut the chocolate it cuts easily. Some of it will shatter, but you can just add the pieces on the serving plate along with the cake slice.


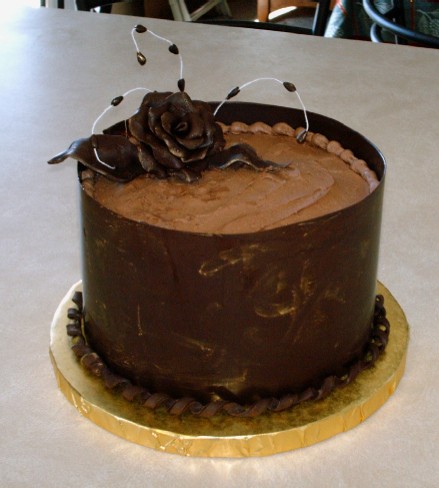
I covered a cheesecake with this, one piece with no seam between top and side. I started with Shirley's directions for melting and paper, but instead made a template and covered that. The seams were actually at the edges where the corners were "glued" together. http://www.cakecentral.com/cake-photo_87584.html
I would think a square cake would be much easier than a round, as there are actual seams to meet at the corners.
I had forgotten about you doing that. So it looks like it could be done on a square in one piece. But on a round I don't think you could get it all on in one piece where it was smooth and contured to the shape of the cake without wrinkles, especially if the cake were a standard 4" high. But then again, I have not tried it and the only way we'll know is if someone wants to experiment. Which one of you is willing to step up to the plate? ![]()

If you hand a steady hand I think you could pipe melted chocolate into the seam and smooth it with your fingertip.
And Misty, I am sorry. We seem to have hijacked your thread here.
Don't worry about it! This is interesting!

I'm going to try this and I was wondering if you can cover the entire cake with this method? like fondant?
Hello everyone ...
Great thread!
If you use chocolate clay, then yes you can cover a whole cake, just like fondant.
I roll the clay out on cellophane; then carefully place it on the cake & smooth it out slightly, before removing the cellophane. The rest is just like working with chocolate fondant. For anyone who is afraid to try the chocolate wrap and/or chocolate clay, then chocolate fondant is a viable alternative.
I watched the video that was at the start of this discuss & completely agree with Shirley's assessment.
I strongly disagree with putting the strip in the fridge too; chocolate which is spread that thinly will harden very quickly & break when you try to bend it to the shape of the cake; leaving it at room temperature until starting to set is a safer bet. Refrigerating the cake once the wrap is in place will let the chocolate 'shrink' to the exact size & shape of the cake. Once completely set, the acetate (parchement or wax paper) will easily peel away.
I have also made wraps with messages. ie: "I LOVE YOU" in red on a white background, wrapped around a Valentine's cake; or one of my favorites: diagonal stripes in 2-3 colors. They always look great & impressive.
The other thing I love about chocolate wraps is that you can easily wrap any odd shaped cakes beautifully & smoothly in very little time compared to smooth icing BC.
OK, I'm rambling... it's just that I really love chocolate
ciao


fascination- how do you do multi colored stripes? Thanks! jenni
Hello GIAcakes
I actually have an instructions document explaining the method, however, one of my laptops is down & I can not access the data. If you don't need it right away, I will post it (assuming it is not lost) as soon as my computer is fixed.
I originally found it on internet; if my copy is lost, I will either write up a an abridged version for you, or try to find it again on the web.
thank you for your patience.
ciao for now

Okay, I know that everyone is going to think that I am weird when I ask this question ![]() but, what is tempering?
but, what is tempering?
I've never worked with chocolate before except for the candy melts from Wilton.
This is great and I was wondering if someone could explaing how you do the multi coloured strips or like someone mentioned earlier with the words or with the gold dust...this is great I want to try this! Jen
Hello jlmaison
See my last msg to GIAcakes regarding the stripes.
As for the writing, there may be other ways, but this is what I do.
1) prepare your acetate (cut to height & length reqired) & place on a board.
2) write out your message
if using a computer & printer, do this in reverse print
if doing my hand write the msg, flip your paper over & trace the writing in reverse.
3) place the acetate over the paper with the message; make sure the message is centered.
4) melt small amont of chocolate (color A) - let cool slightly
5) melt chocolate (color B) - let cool,
6) place chocolate (color A) in piping bag fitted with tip number 2 or 3
7) carefully pipe over the written message
8 ) let this set completely
9) make sure remaining chocolate (color B) is completely cool, but still spreadable. Pour some gently over the acetate.
10) using offset spatula, spread to cover the whole strip; be gentle, do not press hard enough to disturb the writing. Lift board and gently tap it on the edge of the table (this will help spread out the chocolate, smooth it out & ensure no air holes/bubbles exist.
11) leave to set slightly.
12) lift & gently wrap around the cake as per instructions posted earlier.
that's about it... it's really easier than it sounds. Let me know when you try it.
feel free to ask questions (sorry that I do not have a photo to share)
ciao for now.
Okay, I know that everyone is going to think that I am weird when I ask this question
I've never worked with chocolate before except for the candy melts from Wilton.
hello
nothing weird about asking questions!
Check this site for a perfect definition and method.
http://www.marthastewart.com/page.jhtml?&type=content&id=channel160025&page=1
Candy melts will work well when making a cake wrap.
ciao
Quote by @%username% on %date%
%body%